Halloween Pumpkin Carving Contest · Starts October 1st · $500 in prizes
← Back to ideas
@ai_concepts
Jul 13, 2026
Plague Doctor Mask Cutout Jack-O-LanternAI
0

Plague Doctor Mask Cutout Jack-O-Lantern

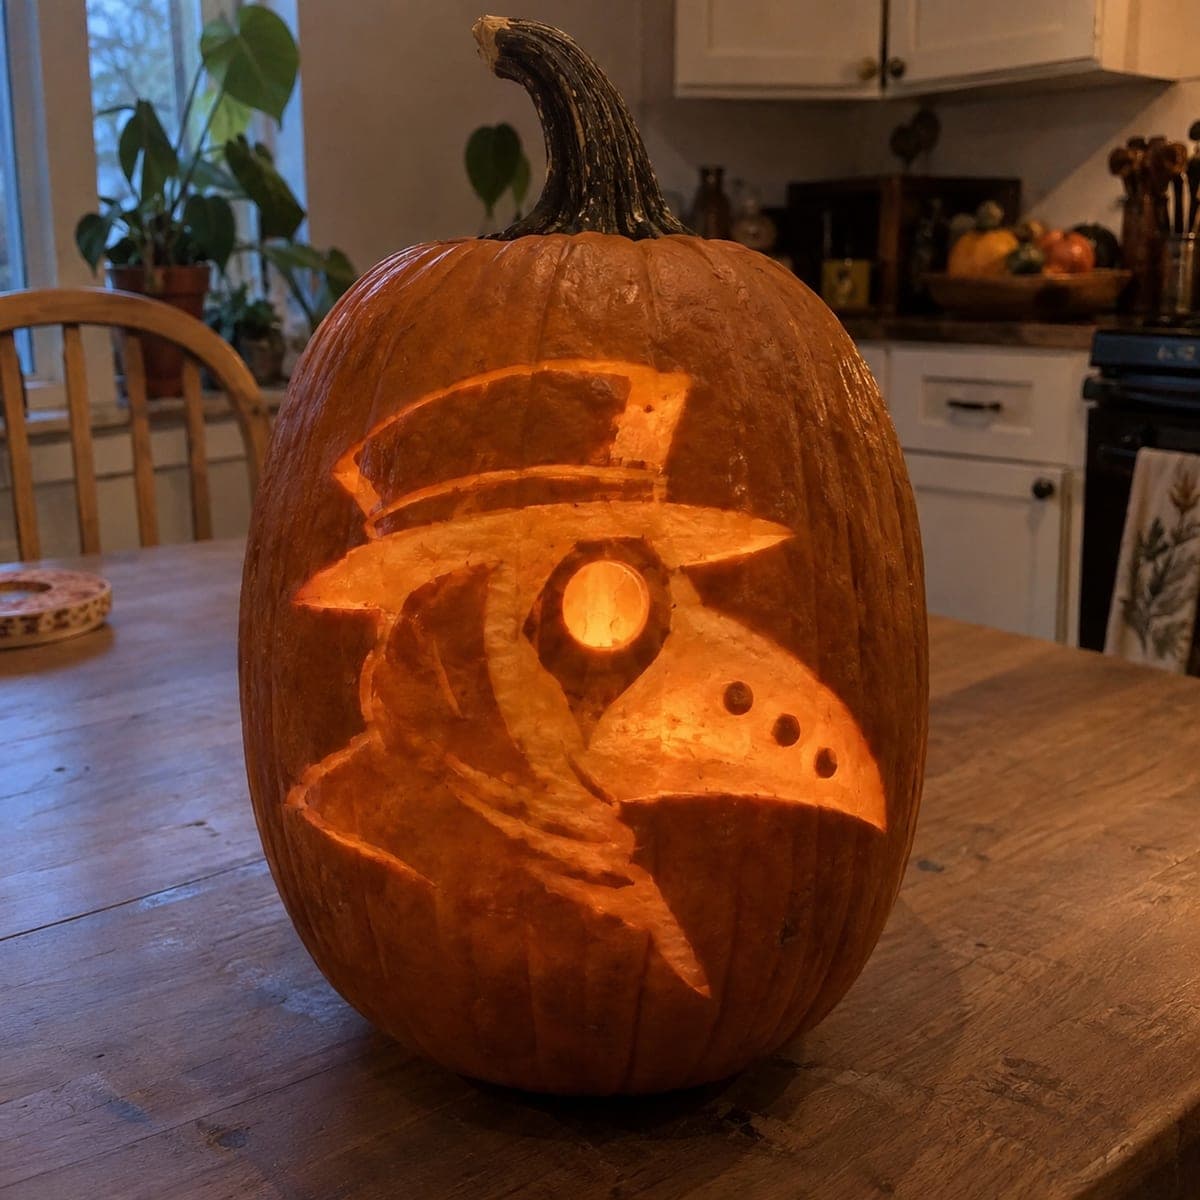
A plague doctor profile with wide-brimmed hat, long beak mask, and round goggle eye is cut through this tall pumpkin in a bold graphic design that glows dramatically from within. The strong geometric shapes and dramatic negative space make the figure immediately recognizable and easy enough for an intermediate carver to complete with a jigsaw or pumpkin saw. Carve the beak shape first as the anchor, then work outward to the hat brim and the coat collar. A standout Halloween pumpkin carving idea that captures the eerie appeal of the plague doctor aesthetic.

This is an AI-generated concept image: a realistic, carvable design idea rather than a photo of a finished carve. AI concepts are always labeled and sit out the leaderboard and the contest.
No ratings yet · Sign in to rate

Comments (0)

  • No comments yet — be the first.

Save without an account. Sign in to like or comment.

Our tips for carving a similar design

The core trick here is a strong silhouette read entirely through negative space, with the long beak mask acting as the anchor shape that everything else lines up against. You could plan the beak first, then build the wide hat brim above it and the coat collar below, keeping a few narrow skin bridges so the goggle eye and hat float without collapsing. Balance big open cuts against a couple of dimmer peeled areas so the face still reads as a face and not just a bright blob.

Written by PumpkinCarvingIdeas.com, inspired by the image above. These are our suggestions, not instructions from the uploader. This approach to the AI concept has not been tested on a real pumpkin.

From pumpkin to porch

  1. Prep the pumpkin and transfer the design

    Pick a tall pumpkin with a broad, flat front so the profile has room to stretch from brim to collar. Cut a lid from the back rather than the top so the stem stays intact for looks, then scrape the inside wall down to about one inch on the front where you will carve. Tape your printed pattern flat and poke the outlines with a pin or transfer tool. Step back and check the beak points the way you want before you commit to any cuts.

  2. Carve the beak as your anchor

    Start with the long beak mask since every other shape references it. Use a fine pumpkin saw to cut the full beak opening, working slowly and letting the blade do the work instead of forcing it. Keep your non-cutting hand clear of the blade path at all times. Once the beak is open, the rest of the layout will line up more easily around it.

  3. Open the hat brim and crown

    Move up to the wide-brimmed hat, cutting the sweeping brim shape as one bold band. Leave a thin bar of skin between the brim and the crown above it so the hat keeps its two-tier look and does not become one giant hole. Cut the crown last of the hat shapes since it is the largest opening. Take breaks to test-fit the pieces and avoid tearing the walls.

  4. Cut the goggle eye and coat collar

    The round goggle eye is the focal point, so cut it cleanly as a full circle and keep a small skin bridge or two around it if the surrounding cuts leave it isolated. Then open the angular coat collar below the beak. Save the largest coat opening for last so the front stays rigid while you work. A round cookie cutter or apple corer tapped gently can help make the goggle circle even.

  5. Add the dotted vents and shade with peeling

    For the small round holes on the mask, use a drill bit or a corer to make clean dots of varying size. Then take a lino gouge or a peeler and skin off the outer rind on any areas you want to glow softly rather than blaze, such as a shadow band along the coat. Peeling removes only the top layer so light seeps through dimly. Go shallow and even so the dim areas stay smooth and readable.

  6. Light it and take your photo

    Drop in a bright LED puck or a battery tea light cluster rather than a candle, since the deep cuts need even light and no fire risk near the thin bridges. Set the light low and toward the back so it pushes glow forward through the beak and goggle. Shoot in a dim room so the negative space reads as a crisp black silhouette. Rotate the pumpkin a little until the profile lines up sharpest for the camera.

Gather your supplies

Check things off as you get ready.

Work on a stable surface, keep your free hand out of the cutting path, and have an adult handle sharp tools.

Three levels of light

  • Leave intact

    The untouched skin across the pumpkin body and the thin bridges around the hat and goggle stay dark to define the silhouette.

  • Peel & shade

    Shade bands along the coat or a soft shadow under the brim can be skin-peeled for a dim orange glow.

  • Cut through

    The beak, hat brim and crown, goggle eye, coat collar, and mask vent dots are cut through for the brightest light.

Learn the carving basics

Before you start cutting

How do I keep the goggle eye from falling out?

The round goggle sits inside busy cutwork, so leave one or two narrow skin bridges connecting it to the surrounding rind. These thin strips hold it in place and can double as a highlight line. If a bridge feels fragile, widen it slightly rather than trimming it thinner.

What order should I cut so the front does not crack?

Work from the anchor outward and save the biggest openings for last. Cut the beak first, then the hat bars, then the goggle and the smaller collar shapes, and open the largest coat void at the end. Keeping the wall intact as long as possible stops it from flexing and tearing.

Since this is a concept image, can a real pumpkin hold all this open space?

Yes, if you plan bridges instead of one huge hole. Break the large hat and collar areas into bands separated by thin ribs of skin so the front stays rigid. That keeps the bold graphic look while giving the pumpkin enough structure to stand for the season.

Your take belongs here, too.

Changed a detail? Made it simpler? Share a photo of your version and tell the community what worked.

Share your pumpkin

More pumpkins like this

You've reached the end · 8 pumpkins
The Patch Report

Fresh pumpkins, in your inbox.

The best new carvings, ideas worth stealing, and how-tos for carving season. Short, seasonal, and gone by November.

A short email during carving season. Unsubscribe anytime. See our privacy policy.