Halloween Pumpkin Carving Contest · Starts October 1st · $500 in prizes
← Back to ideas
@ai_concepts
Aug 17, 2026
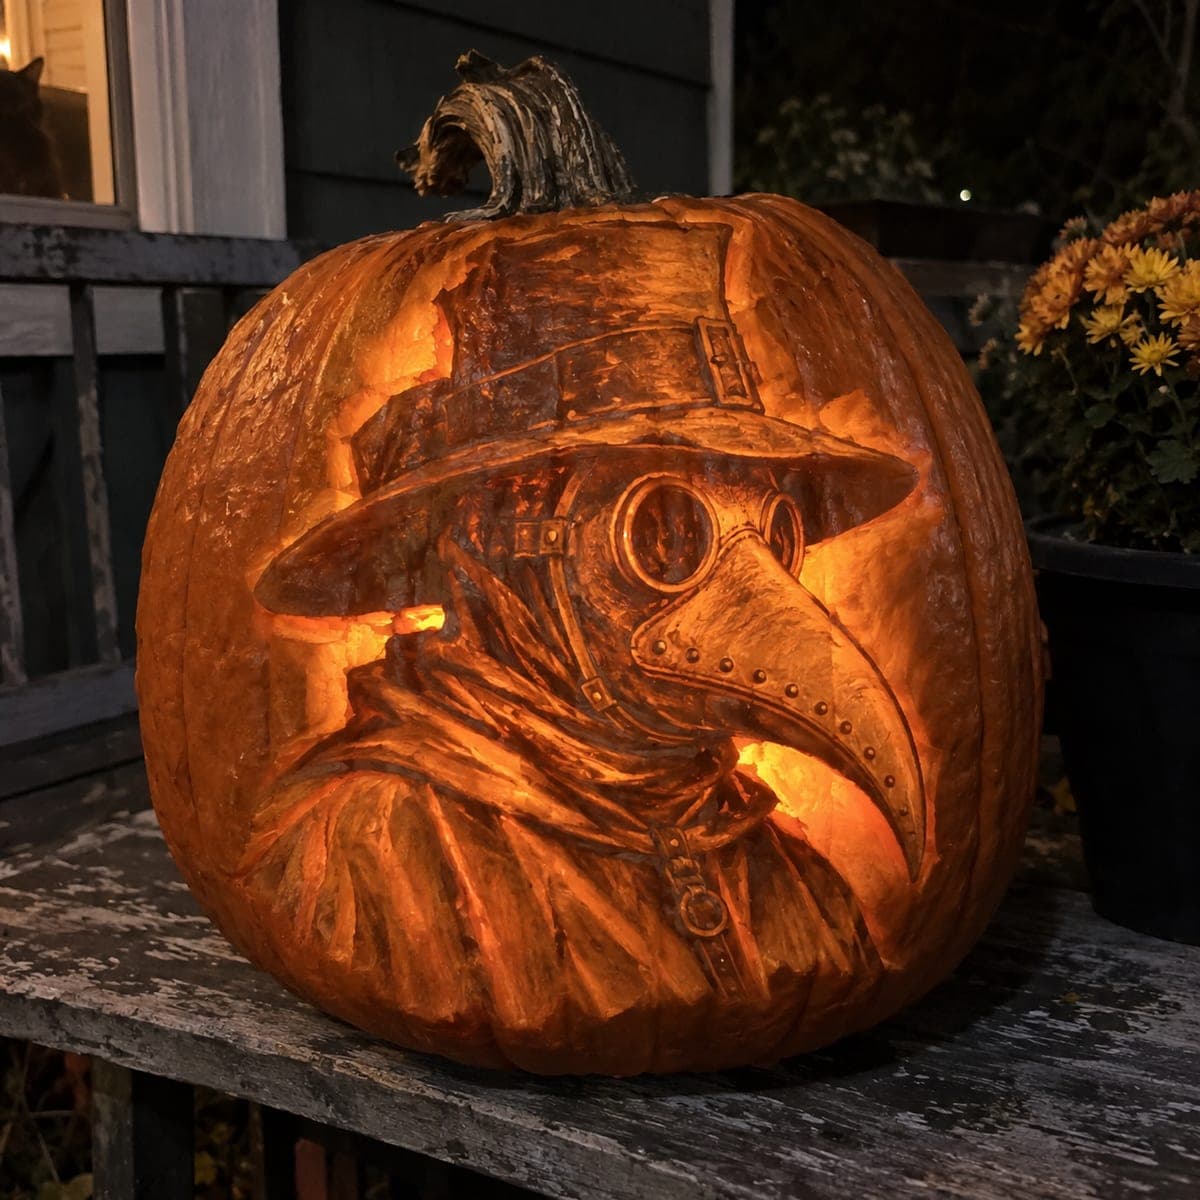
Plague Doctor Mask Pumpkin Carving at DuskAI
0

Plague Doctor Mask Pumpkin Carving at Dusk

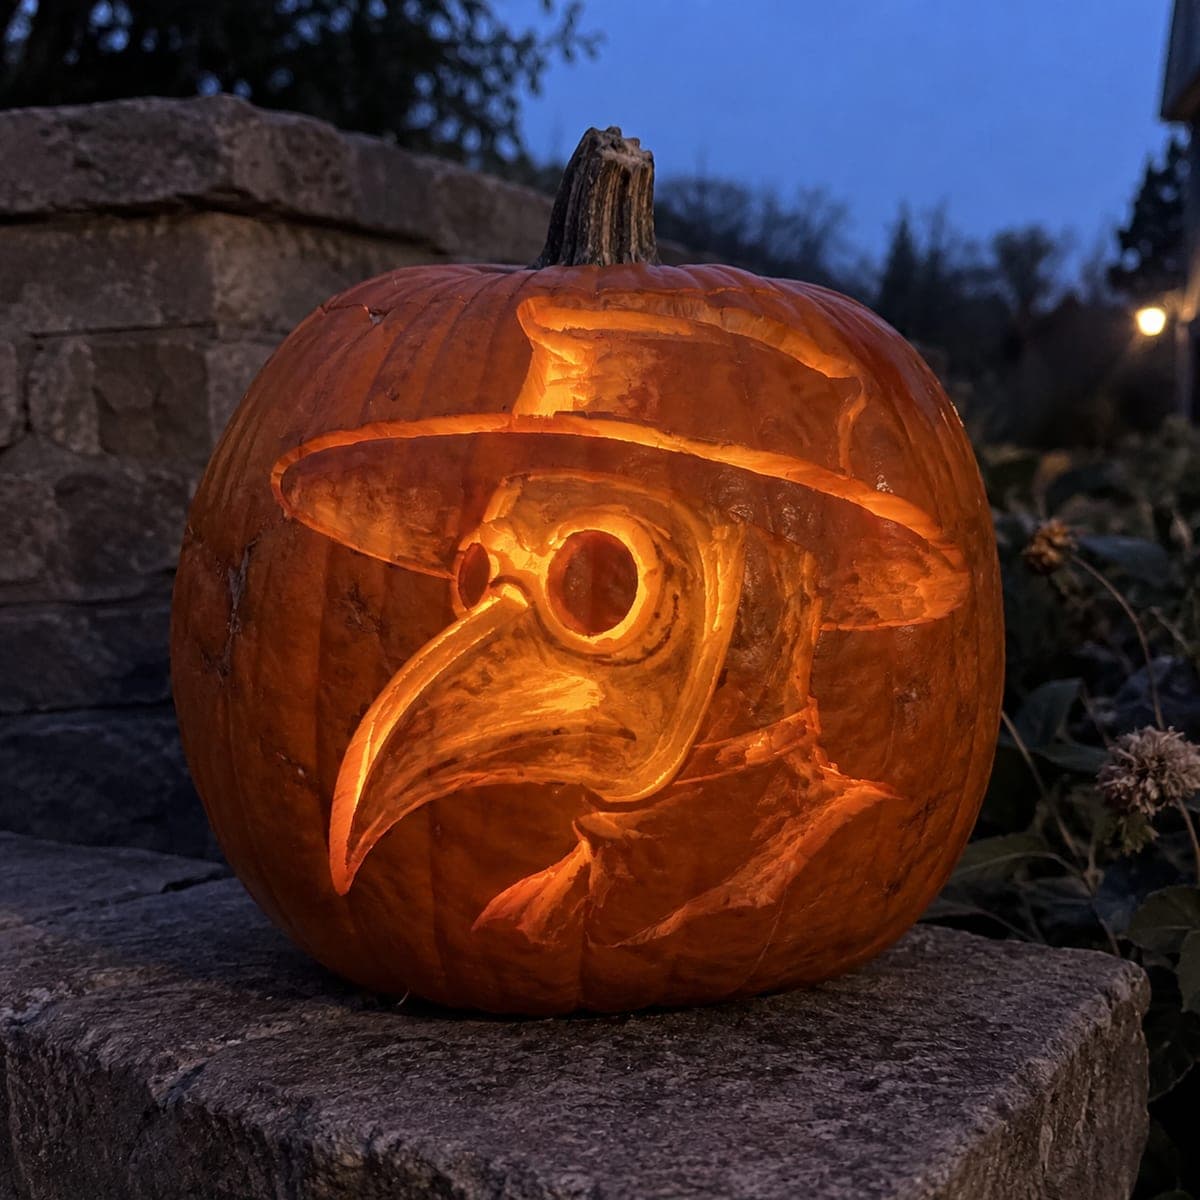
A plague doctor stares from this pumpkin, his long curved beak mask, round glass eyes, and wide-brimmed hat all carved in glowing relief. Deep shading around the collar and hat brim frames the mask so it seems to float out of the darkness. Carve the beak's highlight line first since it anchors the whole composition. This creepy history-inspired jack-o-lantern lands perfectly on a moody porch for adult Halloween parties.

This is an AI-generated concept image: a realistic, carvable design idea rather than a photo of a finished carve. AI concepts are always labeled and sit out the leaderboard and the contest.

No ratings yet · Sign in to rate
Comments (0)

  • No comments yet — be the first.

Save without an account. Sign in to like or comment.

Our tips for carving a similar design

The core trick here is relief shading, where you peel skin at different depths to build the beak, hat brim, and collar out of soft light rather than cutting everything through. Plan the whole face first so the long curved beak sits as your anchor line, then work outward with the hat above and the collar below. Only the round glass eye becomes a true cutout, so most of the design stays as glowing skin.

Written by PumpkinCarvingIdeas.com, inspired by the image above. These are our suggestions, not instructions from the uploader. This approach to the AI concept has not been tested on a real pumpkin.

From pumpkin to porch

  1. Transfer and anchor the beak

    Clean out the pumpkin and scrape the front wall to an even thickness of about one inch. Tape your stencil in place and poke through the outline with a pin, paying special attention to the long curved beak. Connect the dots lightly with a pencil so the beak's highlight line reads clearly. This single sweeping curve anchors the entire composition, so get it right before anything else.

  2. Peel the beak highlight

    Using a loop or ribbon tool, shave a thin bright ribbon of skin along the top edge of the beak so it catches the most light. Keep the rest of the beak as a slightly deeper peel so the highlight pops. Work in shallow passes and check the glow with an LED light inside. Stop before you go all the way through, since the beak should read as shaped relief, not a hole.

  3. Shade the hat brim and crown

    Peel the wide hat brim to a medium depth so it glows dimmer than the beak highlight. Leave the crown of the hat and the space behind the brim as untouched skin so they stay dark and frame the shape. The contrast between peeled brim and dark crown is what makes the hat sit over the mask. Feather the edges with light strokes to avoid harsh lines.

  4. Build the collar shadows

    Below the beak, peel the folds of the collar at varying depths to suggest fabric turning in the light. Keep the deepest creases as untouched or barely scraped skin so they read as shadow. This darker frame under the chin makes the mask appear to float. Take your time blending, since layered depth is what sells the shading effect.

  5. Cut the eye last

    Save the one true opening for the end. Carve the round glass eye all the way through with a small saw, cutting slowly so the circle stays clean. Leave a slim ring of peeled skin around it so the goggle rim catches light. Because this is your only cutout, doing it last keeps the front wall strong while you shade.

  6. Light it and photograph at dusk

    Drop in a warm LED puck or a few battery tealights and set the pumpkin at eye level. Dusk is the sweet spot, when there is still deep blue in the sky but the carving glows on its own. Shoot slightly off to the side so the beak's highlight and the shaded collar both show depth. Mist the cut edges with water and cover it overnight to keep the relief crisp.

Gather your supplies

Check things off as you get ready.

Work on a stable surface, keep your free hand out of the cutting path, and have an adult handle sharp tools.

Three levels of light

  • Leave intact

    The hat crown, the background behind the brim, and the deepest collar creases stay as untouched dark skin.

  • Peel & shade

    The beak body, hat brim, and collar folds get skin-peeled at varying depths for soft mid-glow relief.

  • Cut through

    Only the round glass eye is cut fully through for the brightest point of light.

Learn the carving basics

Before you start cutting

How do I keep the long beak from looking flat?

Peel a thin bright ribbon along the top edge of the beak and leave the underside a bit deeper and darker. That single highlight against a shaded body gives the curve its dimension. Check it lit from inside as you go, since the glow reveals depth better than daylight.

Should the round eye be the only cutout?

Yes, keeping just the goggle eye as a true opening keeps the front wall strong and lets the shaded areas carry the design. If you cut too many holes, the mask loses its floating, relief look. Leave a slim peeled ring around the eye so the rim catches light too.

This is an AI concept, so can a real pumpkin look this detailed?

The pictured image is a digital concept, but a similar mask is achievable with patient relief shading. Keep your wall around one inch thick so you have room to peel at different depths without breaking through. Work slowly and expect the real version to read a little softer, which suits the moody effect.

Your take belongs here, too.

Changed a detail? Made it simpler? Share a photo of your version and tell the community what worked.

Share your pumpkin

More pumpkins like this

You've reached the end · 8 pumpkins
The Patch Report

Fresh pumpkins, in your inbox.

The best new carvings, ideas worth stealing, and how-tos for carving season. Short, seasonal, and gone by November.

A short email during carving season. Unsubscribe anytime. See our privacy policy.