Halloween Pumpkin Carving Contest · Starts October 1st · $500 in prizes
← Back to ideas
@ai_concepts
Sep 14, 2026

Long-Horned Demon Mask PumpkinAI
0

Long-Horned Demon Mask Pumpkin

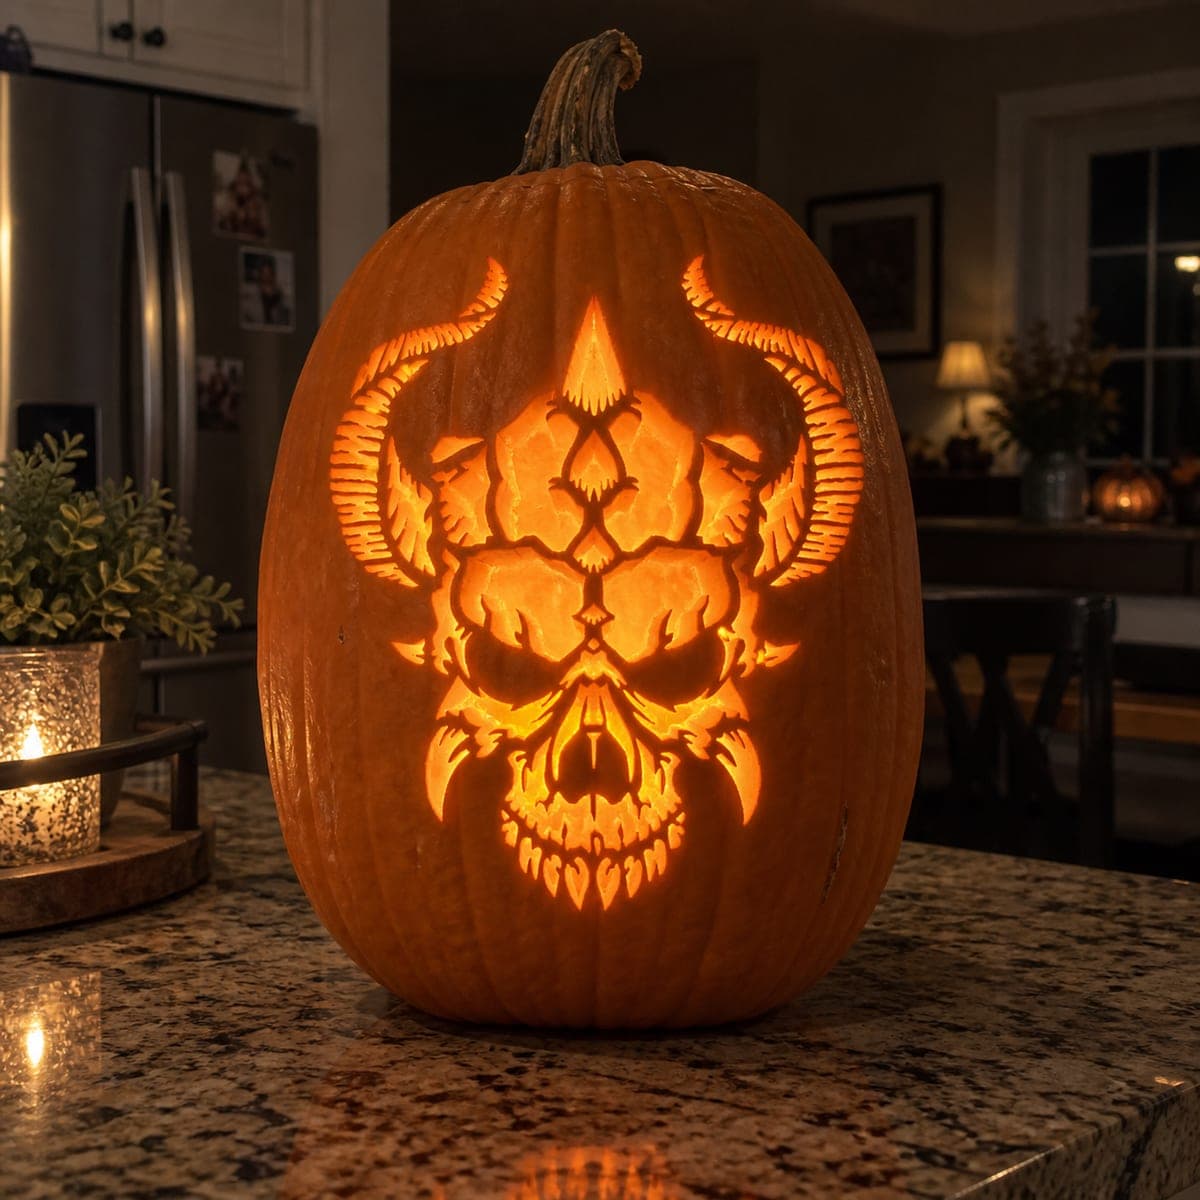
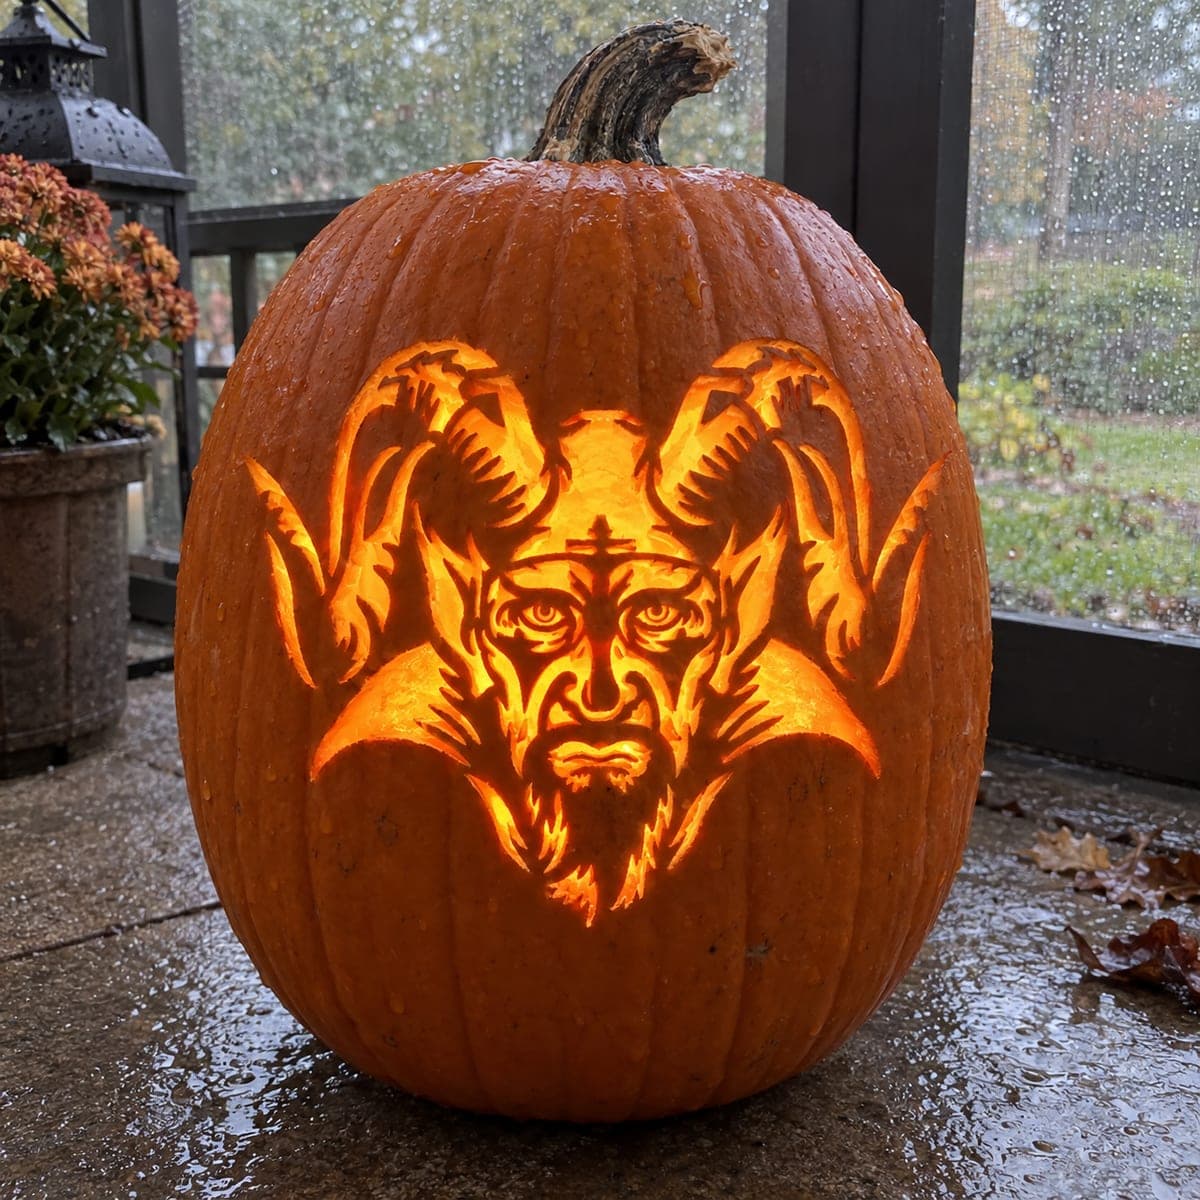
Sweeping curved horns rise above a scowling demon mask with hollow eye sockets, a broad nose, and a fang-lined jaw, all rendered in a shaded pumpkin carving with fine surface texture suggesting scales or etched feathers on the horn bases. The shading technique scrapes the skin to varying depths so brighter highlight areas glow while dark sections remain opaque. Map the lightest areas in pencil before picking up any tool, and peel the broad horn surfaces first at medium depth before sharpening the fine facial grooves with a detail blade.

This is an AI-generated concept image: a realistic, carvable design idea rather than a photo of a finished carve. AI concepts are always labeled and sit out the leaderboard and the contest.

No ratings yet · Sign in to rate
Comments (0)

  • No comments yet — be the first.

Save without an account. Sign in to like or comment.

Our tips for carving a similar design

The core trick here is depth-based shading, where the skin is scraped to different levels so highlights glow and untouched areas stay dark. You could build the whole demon from that contrast, using medium peels for the sweeping horns and sharp detail grooves for the scowling face. Only the eye sockets and a few key gaps get cut fully through, so the mask reads as glowing skin rather than a hollow silhouette.

Written by PumpkinCarvingIdeas.com, inspired by the image above. These are our suggestions, not instructions from the uploader. This approach to the AI concept has not been tested on a real pumpkin.

From pumpkin to porch

  1. Prep the pumpkin and pick your light

    Choose a tall, smooth pumpkin with a broad clean face so the horns have room to sweep upward. Cut a hatch in the bottom rather than the top, so the stem stays intact and the pumpkin sits flat. Scoop the wall behind the face down to about one inch so your shading tools glide easily. Drop in an LED tea light or puck light to test the glow before you carve, never a real flame.

  2. Transfer and map the highlights

    Tape your demon stencil over the face and poke the outline with a pin, or draw it on directly. Before touching a blade, shade the pattern in pencil to mark your lightest zones: the horn ridges, the brow, the nose, and the fang tips. Those areas will get the most skin removed. Keeping this map in front of you prevents over-scraping the parts meant to stay dark.

  3. Peel the horns at medium depth

    Start with the broad curved horns using a ribbon or shaving tool. Scrape away just the orange skin to reveal the pale flesh, going a touch deeper along the highlight ridges you mapped. Keep the deepest scraping thin and even so the surface glows without breaking through. Leave narrow bands of untouched skin between the horn scales to hold that etched, feathered texture.

  4. Sharpen the facial grooves

    Switch to a fine detail blade for the scowling brow, the broad nose, and the fang-lined jaw. Carve these as narrow V-grooves that catch light along their edges rather than full holes. Vary the depth so shadowed folds stay dark and raised ridges glow brighter. Work slowly and keep loose bridges of skin between fangs so the jaw stays strong.

  5. Cut the eye sockets last

    Save the only true openings, the hollow eye sockets, for the end so the face keeps its structure while you shade. Cut them cleanly with a small saw and angle the blade outward so the light spreads wide. If any nostril or mouth gap needs full brightness, open those now too. Test the LED and deepen any shaded area that reads too dim.

  6. Clean up and photograph

    Wipe away pulp dust with a dry brush and trim any ragged highlight edges. Rub a little petroleum jelly on cut edges to slow drying and keep the shaded areas crisp. Set the pumpkin somewhere dim at dusk, like a porch table, and light it with the LED. Shoot slightly to the side so the horn texture and glowing mask both show.

Gather your supplies

Check things off as you get ready.

Work on a stable surface, keep your free hand out of the cutting path, and have an adult handle sharp tools.

Three levels of light

  • Leave intact

    Deep face shadows, the gaps between horn scales, and the dark folds around the brow stay as untouched skin.

  • Peel & shade

    The broad horn surfaces, the nose, and the fang tips get shallow skin peels for a mid orange glow.

  • Cut through

    The hollow eye sockets, and any nostril or mouth gap, are cut fully through for the brightest light.

Learn the carving basics

Before you start cutting

How do I keep the shaded horns from breaking through to full holes?

Scrape only the top orange layer plus a little of the pale flesh, checking the wall thickness with your fingertip as you go. Aim to leave roughly a quarter inch of flesh so light glows through without a hole. If a spot gets too thin it will read as a bright cutout instead of a shaded area, so slow down on the deepest ridges.

This is a concept image, so how would a real fang-lined jaw hold up?

On a real pumpkin, carve the fangs as shaded grooves rather than free-standing points, and keep thin bridges of skin between them. That keeps the jaw structurally sound while still reading as teeth in the glow. Deep V-cuts catch light on their edges and give the fang look without weakening the wall.

What if my shading looks flat and muddy once it is lit?

Flat shading usually means the depths are too similar, so exaggerate the contrast between your lightest and darkest zones. Take the highlight ridges a touch thinner and leave the shadow areas fully skinned and opaque. Testing with the LED as you work lets you catch dim spots and deepen them before you finish.

Your take belongs here, too.

Changed a detail? Made it simpler? Share a photo of your version and tell the community what worked.

Share your pumpkin

More pumpkins like this

You've reached the end · 8 pumpkins
The Patch Report

Fresh pumpkins, in your inbox.

The best new carvings, ideas worth stealing, and how-tos for carving season. Short, seasonal, and gone by November.

A short email during carving season. Unsubscribe anytime. See our privacy policy.