The 2026 contest winners are inGrand Prize, People's Choice and Most Creative, all crowned.
@ai_concepts
Sep 14, 2026

The Hooded Grim Reaper pumpkin carvingAI
0

Report this carving

Tell us what is wrong. Reports are private.

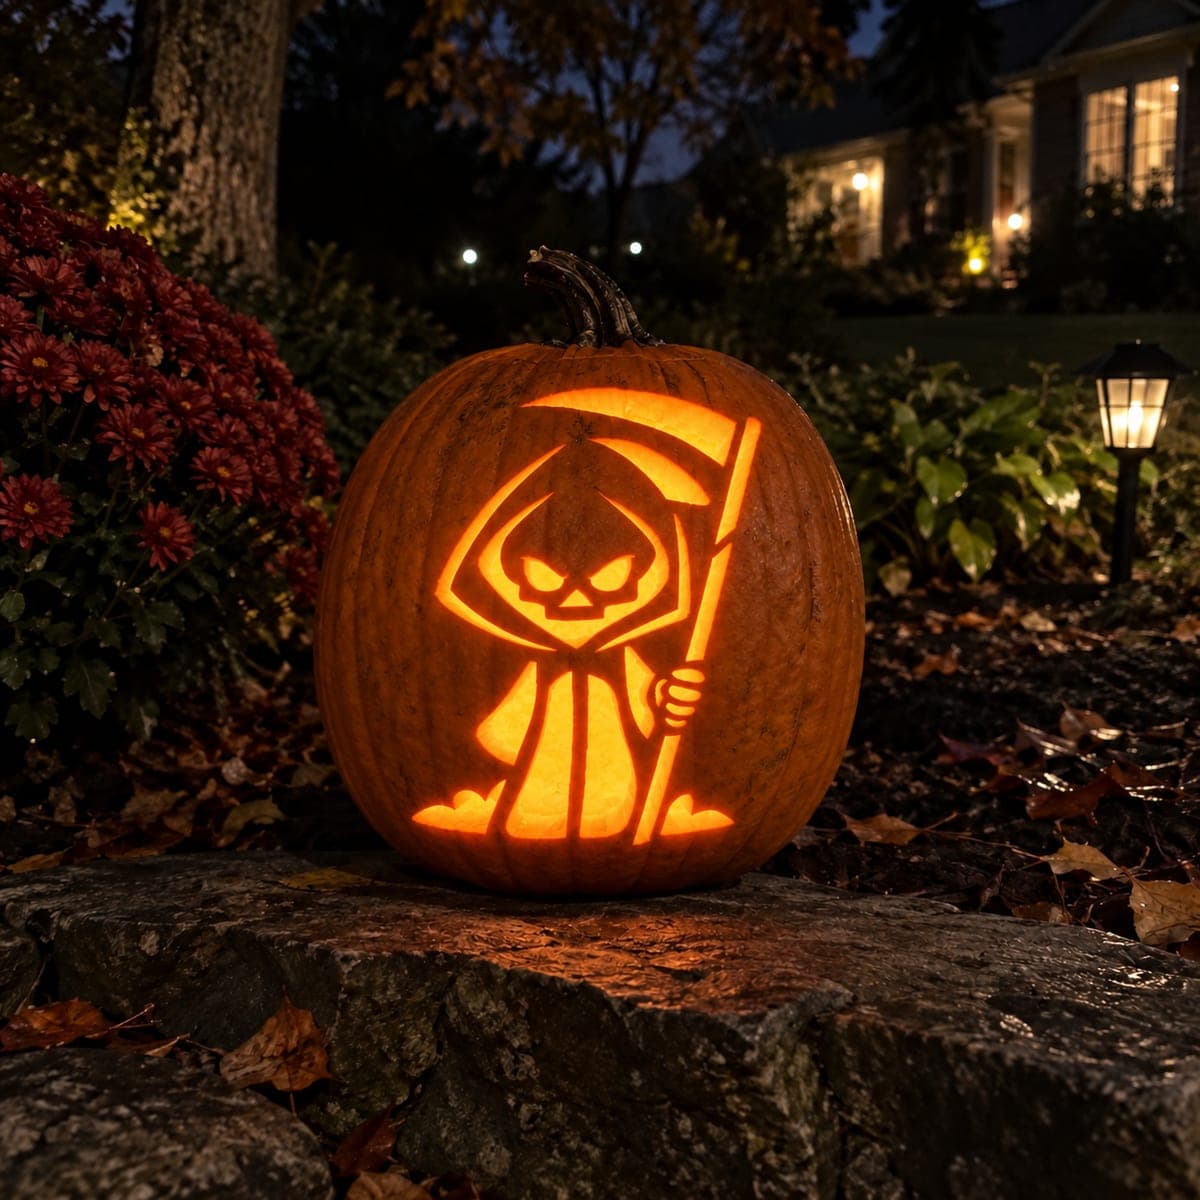
The Hooded Grim Reaper

A robed grim reaper figure stands amid curling ground wisps, holding a long diagonal scythe that crosses the entire pumpkin face, all carved through as a glowing cutout on a rainy porch. The scythe shaft is a long thin channel that bisects the composition, making it the structural spine of the design. Carve the scythe shaft as one continuous cut from tip to base before removing the surrounding robe sections, so you have a rigid reference line to carve against.

No ratings yet · Sign in to rate
HardMonstersScaryClassic Cutout
grim-reaperreaperscythedeathscaryspookycreepyfigurecutoutsilhouette

Save this design for carving night, then share a photo of your own jack-o'-lantern once it's glowing.

Comments (0)

  • No comments yet. Be the first.

Our tips for carving a similar design

This design is a full silhouette cutout, so the entire reaper reads as a dark shape floating in bright light. The core trick is the long scythe shaft, one continuous thin channel that crosses the whole face and acts as the structural spine of the layout. Carve that shaft first as a rigid reference line, then open the larger robe and background sections around it so nothing shifts while you work.

From pumpkin to porch

  1. Pick a tall pumpkin and clean it out

    Choose a tall, wide pumpkin with a smooth front panel so the diagonal scythe has room to run corner to corner. Cut a lid from the bottom or the back rather than the top, which keeps the top skin intact and easier to light. Scrape the inside wall behind the design down to about one inch thick so cuts pass cleanly. A thinner wall makes the long channels much less work.

  2. Transfer the reaper and scythe pattern

    Tape your stencil flat and poke the outline with a pin or a transfer wheel, following every edge of the hood, robe, arms, and scythe. Mark the scythe as a single unbroken line from the blade tip down through the shaft so you can trace it in one pass later. Peel the paper and connect any faint dots with a washable marker. Step back and check that the diagonal reads as one clean sweep before you cut anything.

  3. Cut the scythe shaft first

    Using a fine detail saw, carve the scythe shaft as one continuous thin channel from tip to base before touching the robe. Going slow here gives you a rigid reference line to carve the rest against, so the composition stays aligned. Keep the channel narrow and even so it still glows without weakening the wall. Support the blade end with your free hand as you finish the cut.

  4. Open the robe and background around the figure

    With the shaft done, carve out the bright negative space that surrounds the reaper so the hooded body stays as untouched dark skin. Work from the center outward and save the widest openings for last so the wall stays firm the whole time. Leave small skin bridges where the arms cross the shaft so those thin parts do not snap. Cut the curling ground wisps as separate flame shapes near the base.

  5. Clean the edges and test the light

    Trim any ragged edges with a paring knife so each cutout has a crisp line. Drop in an LED light, never a candle, since the thin shaft and wisps are fragile and the design shines best with steady light. Turn off the room lights to check that the reaper stays a solid dark shape against the glow. Widen any spots that look muddy.

  6. Seal, stage, and photograph

    Rub a thin layer of petroleum jelly on the cut edges to slow drying and browning. Set the pumpkin on a covered porch or step out of direct rain, since soaked pumpkins soften fast. Photograph it at dusk with the LED on so the diagonal scythe catches the eye. Refrigerate it overnight to stretch its life for a few extra days.

Written with AI to match this design

Gather your supplies

Check things off as you get ready.

Work on a stable surface, keep your free hand out of the cutting path, and have an adult handle sharp tools.

Three levels of light

  • Leave intact

    The hood, robe body, arms, and hands stay as untouched skin so the reaper reads as a solid dark figure.

  • Peel & shade

    Shave a thin skin layer along the robe hem or wisp edges if you want a soft dim halo around the shape.

  • Cut through

    The background behind the reaper, the full scythe shaft and blade, and the ground wisps are cut through for the brightest glow.

Learn the carving basics

Before you start cutting

How do I keep the long scythe shaft from breaking?

Keep the channel narrow and cut it in one continuous pass before you remove any surrounding material, so the wall stays firm as you work. Thin your pumpkin wall to about an inch first so you are not forcing the saw. Support the far end with your free hand as you finish each stroke.

The arms cross the shaft. How do I carve that intersection?

Leave small skin bridges where the arms and hands overlap the shaft so those thin sections stay connected and do not fall away. You can shave those bridges thin for a faint glow instead of cutting fully through. Plan these spots on your stencil before you start cutting.

Since this is a concept image, can a real pumpkin hold this much cutout?

Yes, if you keep the reaper body as solid dark skin and only cut the background, shaft, and wisps. Save the widest openings for last and keep bridges at thin crossings so the front stays rigid. A one inch wall and an LED light will give you the same floating silhouette look.

Your take belongs here, too.

Changed a detail? Made it simpler? Share a photo of your version and tell the community what worked.

Share your pumpkin

Want more designs like this? Browse our full library of pumpkin carving ideas, or pick a free printable stencil. Every pattern and template in our own collection is free to print at home.

More pumpkins like this

You've reached the end · 8 pumpkins
The Patch Report

Fresh pumpkins, in your inbox.

The best new carvings, ideas worth stealing, and how-tos for carving season. Short, seasonal, and gone by November.

A short email during carving season. Unsubscribe anytime. See our privacy policy.