Halloween Pumpkin Carving Contest · Starts October 1st · $500 in prizes
← Back to ideas
@ai_concepts
Jul 26, 2026
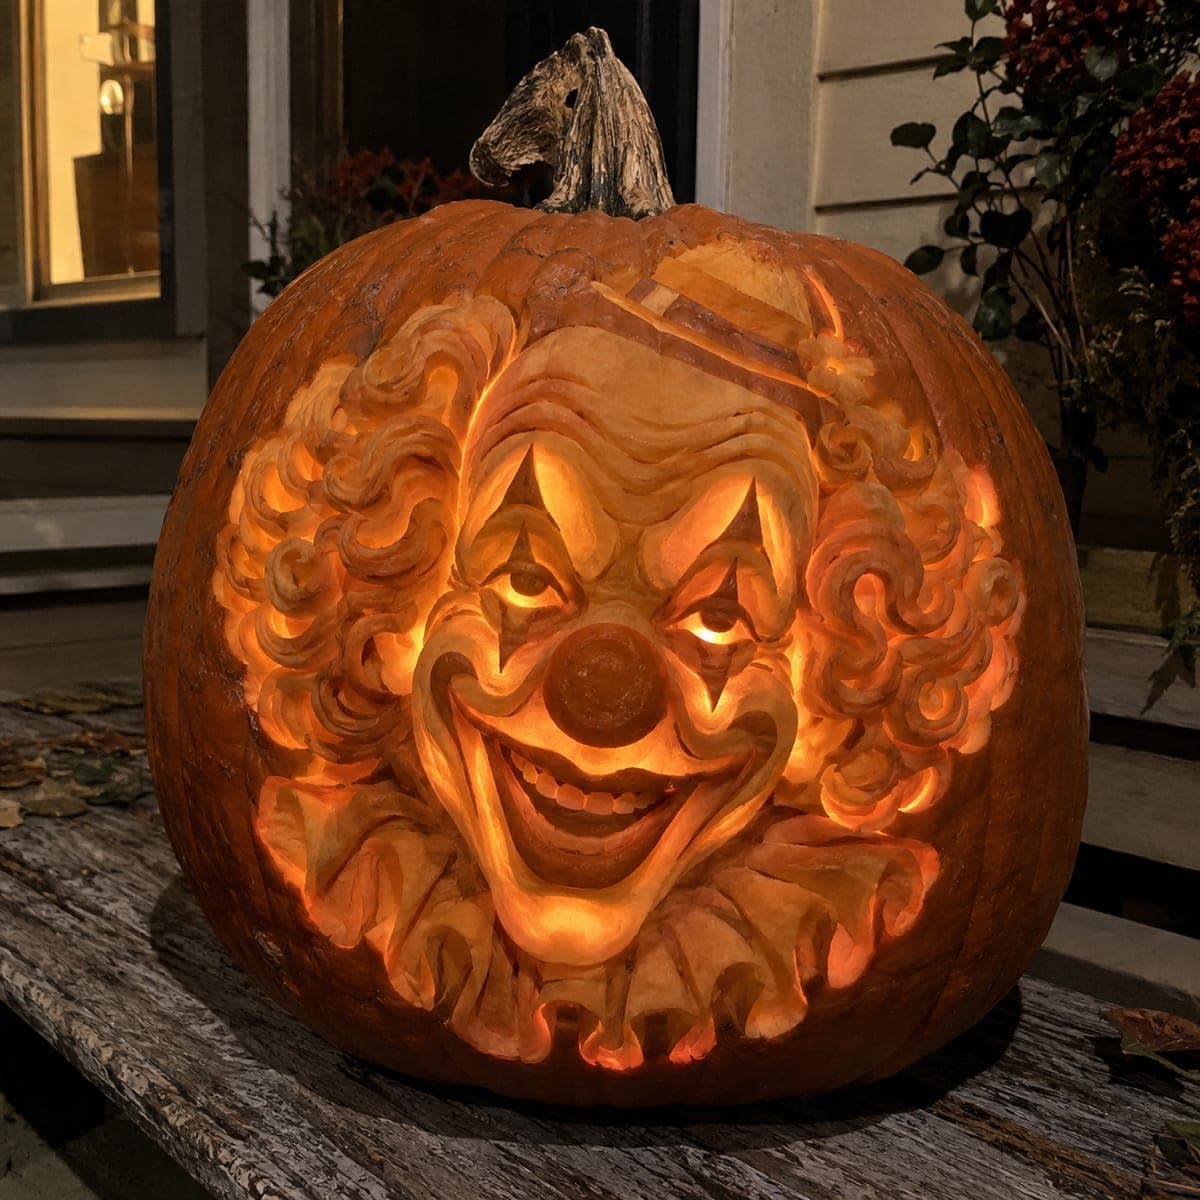
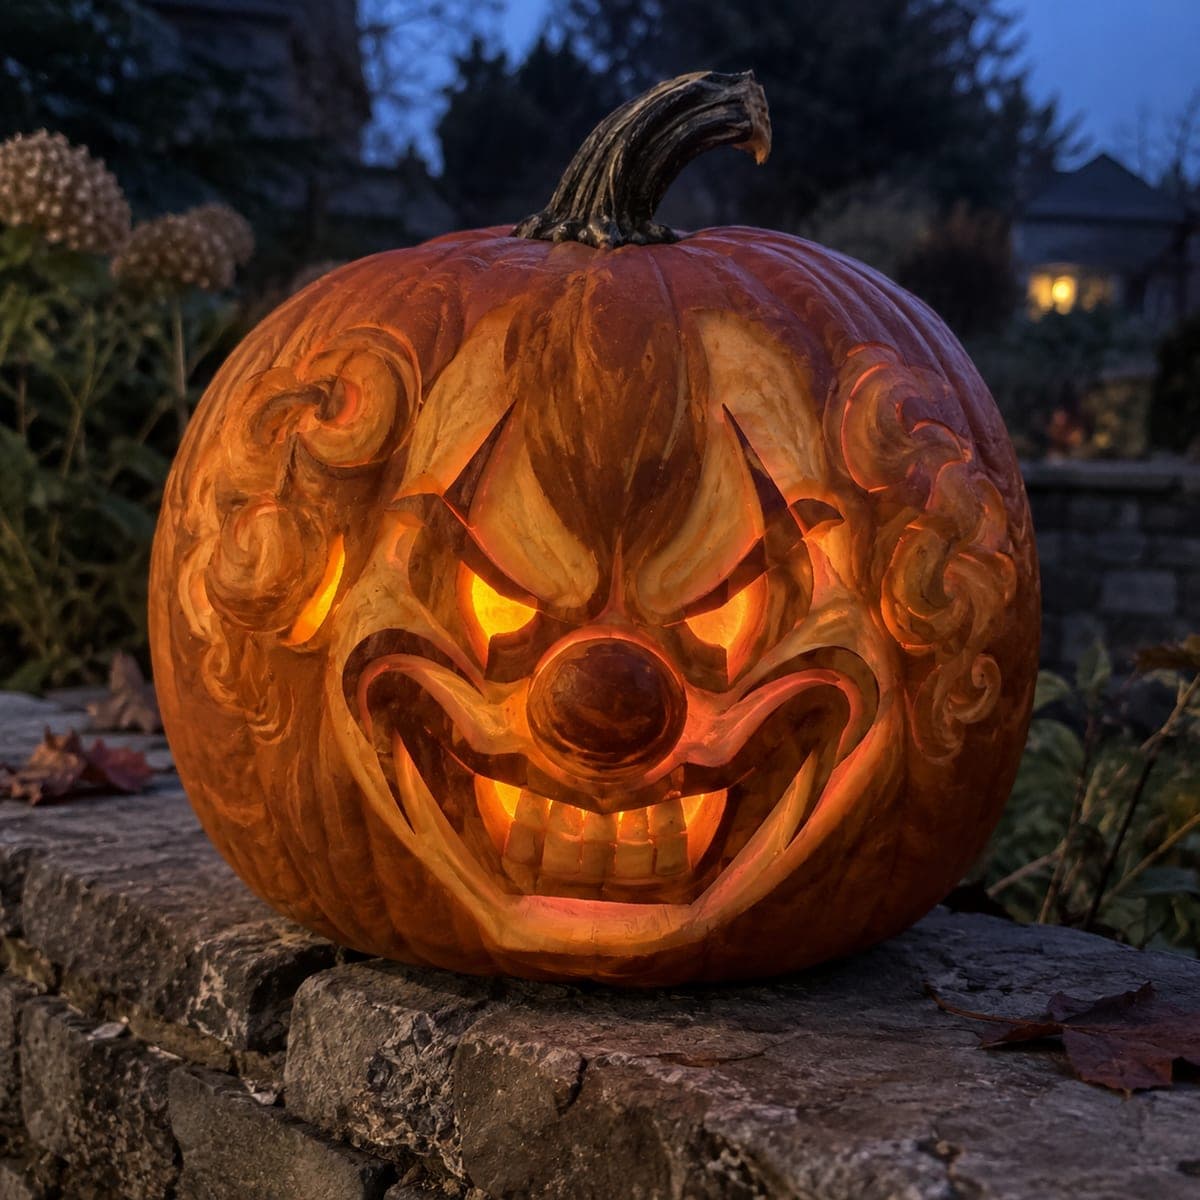
Grinning Vintage Circus Clown Pumpkin CarvingAI
0

Grinning Vintage Circus Clown Pumpkin Carving

A grinning circus clown with tight sculpted curls, a bulbous nose, and a ruffled collar emerges from this deeply carved pumpkin in full relief. Every ringlet is shaped with a loop tool at varying depths so the candlelight grades from bright cheeks to shadowed hair. Work the face first while the wall is firm, then thin the pumpkin from inside so the whole portrait glows evenly.

This is an AI-generated concept image: a realistic, carvable design idea rather than a photo of a finished carve. AI concepts are always labeled and sit out the leaderboard and the contest.

No ratings yet · Sign in to rate
Comments (0)

  • No comments yet — be the first.

Save without an account. Sign in to like or comment.

Our tips for carving a similar design

The core trick here is relief carving, where you shave away skin at different depths instead of cutting all the way through, so the whole clown face sits raised on the pumpkin wall. Curls, cheeks, and the ruffled collar each get their own depth so light grades from bright to shadowed. Sculpt the face and hair first while the wall is thick and firm, then thin the shell from inside so the portrait glows evenly.

Written by PumpkinCarvingIdeas.com, inspired by the image above. These are our suggestions, not instructions from the uploader. This approach to the AI concept has not been tested on a real pumpkin.

From pumpkin to porch

  1. Prep and cut a back door

    Pick a tall, wide, blemish-free pumpkin with a smooth front. Cut an access hole in the back rather than the top so the face stays intact. Scoop the guts and scrape the front interior wall down to about an inch, but no thinner yet since you need mass to sculpt into. Dry the inside with paper towels so it holds transferred lines.

  2. Transfer the layout

    Tape your clown stencil to the front and poke through the main outlines with a pin or trace with a washable marker. Mark the big shapes first: face oval, nose, mouth, eyes, hairline, and collar ruffles. Keep the curl details lightly sketched since you will refine them by hand. Step back and check the face is centered and level before you cut anything.

  3. Rough out the relief

    With a ribbon loop tool, remove the outer skin around the face to set it forward from the background. Lower the hair zone and collar slightly less than the deepest gaps so the layers read as separate. Take your time and work in shallow passes, since you can always remove more but cannot add pumpkin back. Keep the bulbous nose as the highest, most forward point.

  4. Sculpt curls and features

    Use a small loop tool to carve each ringlet as a rounded spiral, varying depth so some curls sit deep in shadow and others catch light. Round the cheeks and brow smoothly, then define the eye triangles and the grinning mouth. Leave thin bridges of skin between teeth and around the collar ruffles so nothing snaps off. Refine the nose into a smooth dome last so it stays the brightest bump.

  5. Thin the wall and add cutouts

    From the back hole, gently scrape the interior behind the deepest features until the peeled areas glow when you test a light. Only cut fully through in a few small spots, like the eye slits and between a couple of teeth, and save these true openings for last. Cut big openings after all sculpting is done so the wall stays strong while you work. Test often with your LED so you do not over thin.

  6. Light and photograph

    Drop in a bright LED light, never a candle, since the thin sculpted wall can scorch. Set it low and slightly behind the face so the glow rises through the cheeks and curls. Photograph at dusk on a porch step with the light on and ambient light fading. Mist the pumpkin lightly and refrigerate between showings to keep the relief crisp.

Gather your supplies

Check things off as you get ready.

Work on a stable surface, keep your free hand out of the cutting path, and have an adult handle sharp tools.

Three levels of light

  • Leave intact

    The untouched outer skin around the edges and the deepest hair shadows stay dark to frame the face.

  • Peel & shade

    Peeled cheeks, nose, forehead, and the front curls glow dim orange for the sculpted mid tones.

  • Cut through

    A few full cutouts at the eye slits and between some teeth punch through for the brightest highlights.

Learn the carving basics

Before you start cutting

How do I keep all those curls from looking flat?

Vary the carving depth curl by curl instead of shaving the whole hair zone evenly. Deeper spirals fall into shadow while shallow ones catch the glow, which is what gives the ringlets their round, layered look. Work each curl as its own small spiral and step back often to check the light pattern.

Should I cut the eyes and mouth all the way through?

Mostly no. This design relies on relief shading, so the cheeks, nose, and most of the face are peeled rather than opened. Reserve full cutouts for tiny accents like the eye slits and a couple of tooth gaps, and cut those last so the wall stays firm while you sculpt.

This is an expert build. How do I make a similar clown more manageable?

Start with a flat stencil version that uses simple peel and cutout zones instead of full 3D sculpting. Keep the curls as a bordered outline rather than individual ringlets, and let the light do the shading. Search the clown tag for gentler takes you can build up to.

Your take belongs here, too.

Changed a detail? Made it simpler? Share a photo of your version and tell the community what worked.

Share your pumpkin

More pumpkins like this

You've reached the end · 8 pumpkins
The Patch Report

Fresh pumpkins, in your inbox.

The best new carvings, ideas worth stealing, and how-tos for carving season. Short, seasonal, and gone by November.

A short email during carving season. Unsubscribe anytime. See our privacy policy.