Halloween Pumpkin Carving Contest Β· Starts October 1st Β· $500 in prizes
← Back to ideas
@ai_concepts
Aug 3, 2026
Cyclops Troll Face Shaded Pumpkin CarvingAI
0

Cyclops Troll Face Shaded Pumpkin Carving

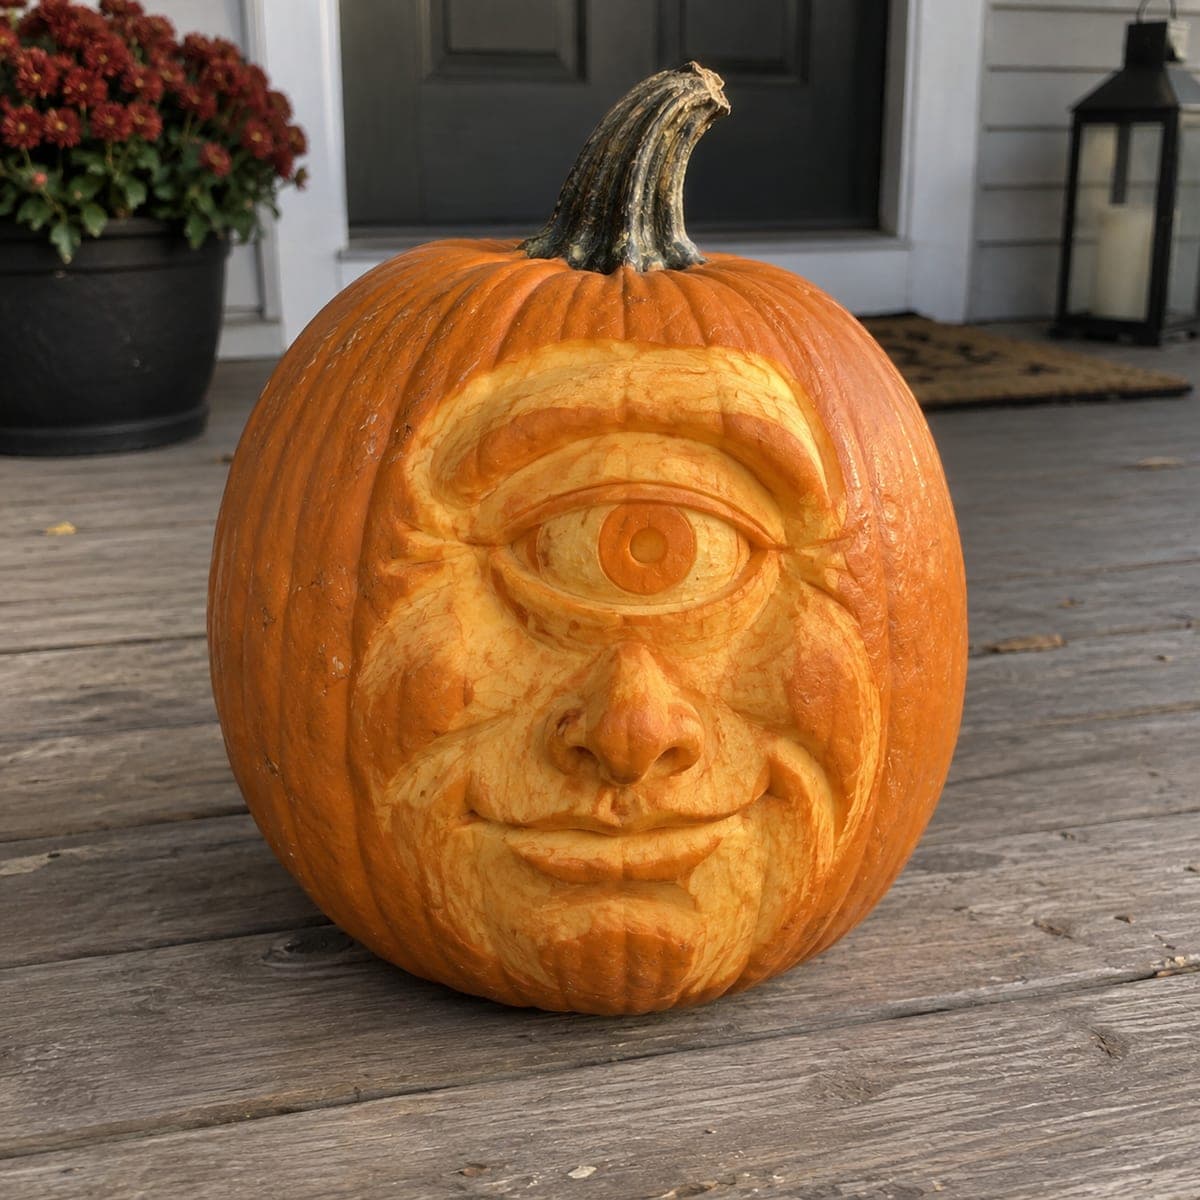
A single-eyed troll or cyclops face with a bulbous nose, heavy brow, and smirking mouth is sculpted in full 3-D relief on this ribbed pumpkin, giving it an eerily realistic presence in daylight. The entire carving uses shading and surface-depth removal, with no cutouts, so the face emerges from the pumpkin's natural curves. Carve the deep eye socket first to establish the focal point, then work outward to the brow ridge, cheeks, and lips at progressively shallower depths.

This is an AI-generated concept image: a realistic, carvable design idea rather than a photo of a finished carve. AI concepts are always labeled and sit out the leaderboard and the contest.

No ratings yet Β· Sign in to rate

Comments (0)

  • No comments yet β€” be the first.

Save without an account. Sign in to like or comment.

Our tips for carving a similar design

The whole trick here is 3-D relief shading, where the face is sculpted out of the skin and flesh at different depths rather than cut all the way through. You establish the deep central eye socket as the focal point first, then step outward to the brow, nose, cheeks, and lips at gradually shallower levels. Because nothing is cut through, the piece reads as a solid sculpted face in daylight and glows softly from within at night.

Written by PumpkinCarvingIdeas.com, inspired by the image above. These are our suggestions, not instructions from the uploader. This approach to the AI concept has not been tested on a real pumpkin.

From pumpkin to porch

  1. Pick a big pumpkin and map the face

    Choose a large pumpkin with a smooth, fairly flat front panel and thick walls, since you will be carving into the flesh, not through it. Wipe it clean and let it dry. With a washable marker or a light stencil, sketch the single centered eye, the heavy brow above it, the bulbous nose, the round cheeks, and the smirking lower lip. Keep the eye slightly above the center of the front so the face sits at a natural viewing height.

  2. Open a lid and thin the front wall

    Have an adult cut a lid from the bottom or the back so the stem stays intact on top. Scoop the pumpkin fully and scrape the inside of the front panel down to about one inch thick with a loop tool. A thinner front wall lets more light pass through the peeled areas later. Work slowly and check the wall thickness with your fingers as you go.

  3. Carve the deep eye socket first

    Using a small gouge or a detail knife, cut the eye socket as your deepest recess to anchor the whole face. Round out the eyeball inside the socket so it bulges forward, then carve a shallow ring for the iris and leave a small raised dot for the pupil highlight. Keep the eyelids and the heavy brow ridge above it standing proud by removing flesh around them, not through them. This central depth is what gives the cyclops its stare.

  4. Shape the nose, cheeks, and brow in relief

    Work outward at shallower depths so the brow ridge, nose, and cheeks read as rounded forms. Carve away the flesh around the bulbous nose so it stands out, then round the nostrils and the crease where the nose meets the cheeks. Sculpt the puffy cheeks and forehead by removing thin layers and blending the edges smooth. Constant gentle rounding, rather than sharp cuts, keeps the face looking organic.

  5. Peel the skin for the glowing highlights

    Decide which surfaces should catch the most light: the eyeball, the bridge and tip of the nose, the top of the cheeks, and the lower lip. Peel just the orange skin off these raised areas to expose the pale flesh, which will glow dim orange when lit. Leave the deep sockets, the shadow under the brow, and the mouth line as untouched skin so they stay dark. This contrast is what makes the face pop both in daylight and at night.

  6. Light it and photograph

    Set a battery LED puck or a string of LED lights inside, never a candle, since the trapped heat would cook the thin front wall. Test the glow in a dark room and add small peeled patches anywhere you want more light to read. Mist the carved face with water and store it cold between showings to slow shrinking. Shoot your photo at dusk on a porch so both the sculpted daylight detail and the inner glow show up.

Gather your supplies

Check things off as you get ready.

Work on a stable surface, keep your free hand out of the cutting path, and have an adult handle sharp tools.

Three levels of light

  • Leave intact

    The deep eye socket, the shadow under the heavy brow, the nostrils, and the smirking mouth line stay as untouched skin so they read dark.

  • Peel & shade

    The bulging eyeball, nose bridge and tip, cheeks, and lower lip get skin-peeled for a soft dim orange glow.

  • Cut through

    Nothing is cut all the way through on this design, so there are no full-brightness openings.

Learn the carving basics

Before you start cutting

This is a concept image, so can a face like this really be carved?

Yes, a similar single-eye troll face can be sculpted as a shading and relief project on a real pumpkin. The key is choosing a large pumpkin with thick walls so you have flesh to carve into without breaking through. Since there are no thin fangs or fragile cutouts, the design is structurally safe once the front wall is thinned evenly.

How deep should I carve the eye socket without going through the wall?

Thin the front wall to about one inch first, then carve the socket as your deepest point while leaving a little flesh so light still passes through when lit. Check the remaining thickness with your fingers often. Stop removing flesh once you feel the wall getting thin and translucent.

Why no cutouts on a scary face like this?

The whole effect depends on shaded depth, so the face looks like solid sculpture in daylight and glows softly at night. Cutting an opening would create a harsh bright hole that breaks the realistic sculpted look. Keep all the drama in the peeled highlights and the dark untouched shadows instead.

Your take belongs here, too.

Changed a detail? Made it simpler? Share a photo of your version and tell the community what worked.

Share your pumpkin

More pumpkins like this

You've reached the end Β· 8 pumpkins
The Patch Report

Fresh pumpkins, in your inbox.

The best new carvings, ideas worth stealing, and how-tos for carving season. Short, seasonal, and gone by November.

A short email during carving season. Unsubscribe anytime. See our privacy policy.