Halloween Pumpkin Carving Contest · Starts October 1st · $500 in prizes
← Back to ideas
@ai_concepts
Jul 12, 2026
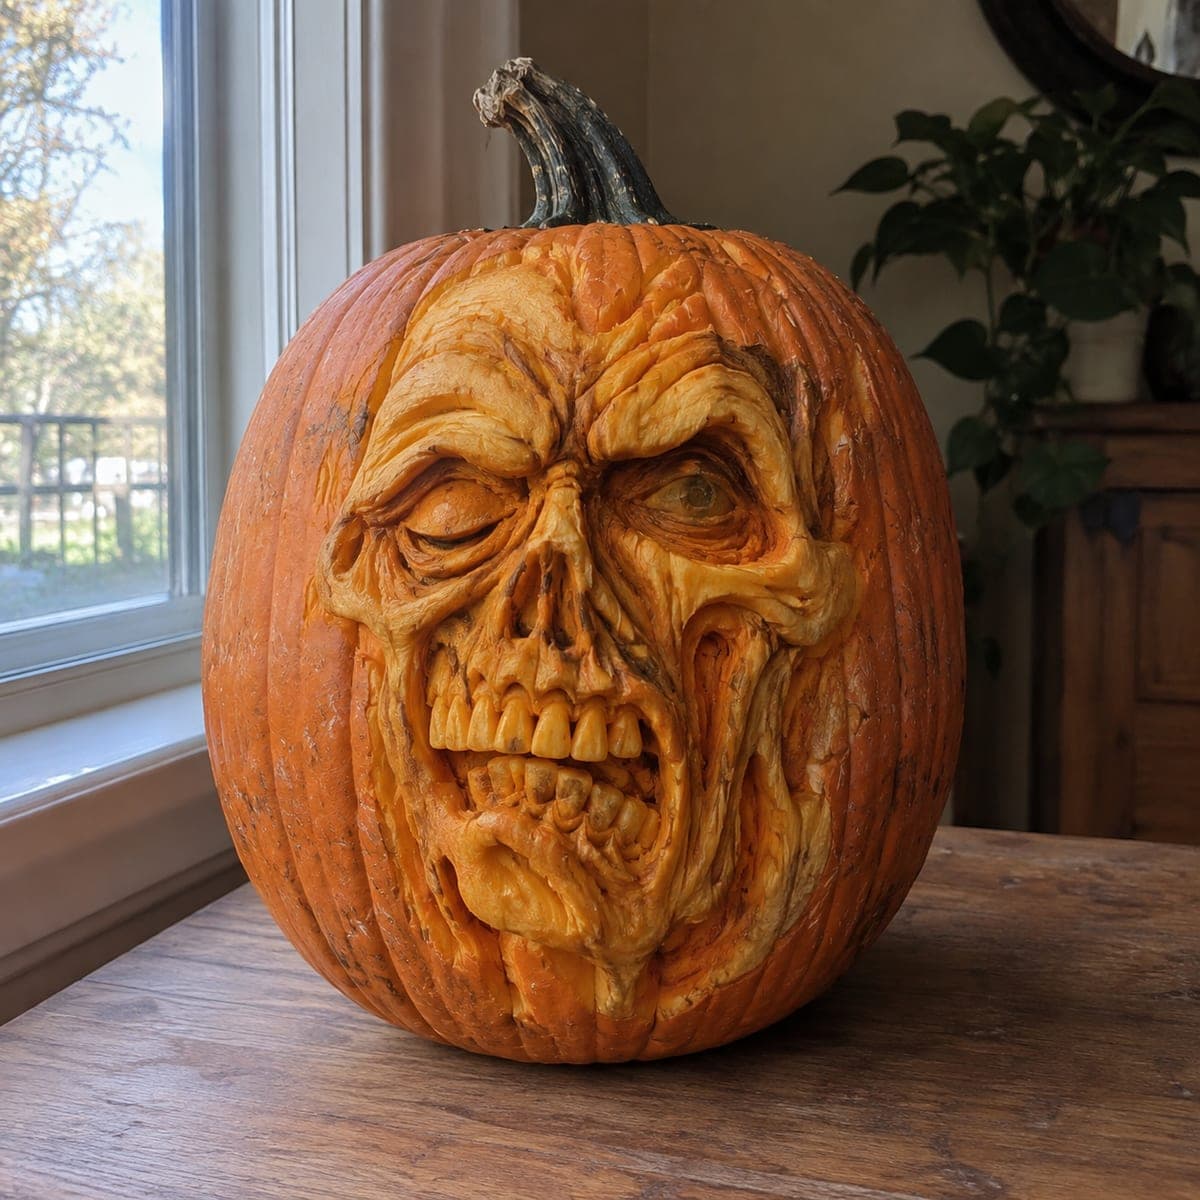
Rotting Zombie Skull Sculpted PumpkinAI
0

Rotting Zombie Skull Sculpted Pumpkin

Sunken eye sockets, a collapsed nose, and a gaping jaw full of gritted teeth make this sculpted zombie skull pumpkin genuinely grim in broad daylight. Ropes of carved flesh drape and sag around the face, shaped with loop tools after the main skull planes were roughed in. Push the eye sockets deeper than feels natural, since strong shadow pockets are what give a horror carving its dread without any light at all.

This is an AI-generated concept image: a realistic, carvable design idea rather than a photo of a finished carve. AI concepts are always labeled and sit out the leaderboard and the contest.

No ratings yet · Sign in to rate

Comments (0)

  • No comments yet — be the first.

Save without an account. Sign in to like or comment.

Our tips for carving a similar design

This design is a shallow 3D relief, meaning almost nothing is cut all the way through. The whole horror effect comes from carving depth into the pumpkin wall, digging the eye sockets and collapsed nose deep so they read as dark shadow pockets even in daylight, then draping ropes of raised flesh across the cheeks and jaw. Plan it as a sculpture first and a lantern second, roughing in the big skull planes before you refine any wrinkle.

Written by PumpkinCarvingIdeas.com, inspired by the image above. These are our suggestions, not instructions from the uploader. This approach to the AI concept has not been tested on a real pumpkin.

From pumpkin to porch

  1. Choose a tall pumpkin and map the face

    Pick a large, firm pumpkin with a smooth flat area on the front, since you need thick wall to sculpt into. Leave it whole rather than gutting the top, or cut a small access hole in the back later. Sketch the skull with a washable marker, placing the deep eye sockets high, the collapsed nose in the center, and the gaping jaw low. Keep everything inside the front face so the ribbed sides stay as a border.

  2. Rough in the main skull planes

    Using a large ribbon or loop tool, shave away the skin and a shallow layer of flesh across the whole face to establish the raised brow, cheekbones, and jaw. Work in broad passes and step back often to check the big forms before adding detail. Leave the highest points, the brow ridge and cheekbones, closest to the original surface. Take your time, since you cannot put pumpkin back once it is gone.

  3. Dig the eye sockets and collapsed nose deep

    Switch to smaller loop tools and carve the eye sockets much deeper than feels natural, hollowing under the brow so they hold heavy shadow. Do the same for the triangular nose cavity, angling the cut inward and upward. These deep pockets are what sell the dread without any light at all. Stop before you break through the wall, keeping a solid backing so the sockets stay dark.

  4. Sculpt the ropes of rotting flesh

    With a fine detail loop, carve the sagging ropes and folds that drape across the cheeks and around the jaw. Work in flowing lines that hang downward, leaving thin raised ridges between your grooves to look like torn, drooping skin. Vary the depth so some folds catch light and others fall into shadow. This is the sculpted texture that makes it look rotting rather than clean bone.

  5. Carve the gritted teeth with bridges intact

    Outline the gaping jaw and shape each tooth as a raised block, carving the gaps between them only partway down rather than punching through. Leave small bridges of pumpkin at the top and bottom of the tooth row so the teeth stay strong and attached. Round and nick a few teeth so they look worn and grim. Skin-peel the teeth so they glow a shade paler than the shadowed mouth around them.

  6. Add light, seal, and photograph

    If you want a faint inner glow, cut one small vent through the deepest part of an eye socket and mouth from the back, saving these full cutouts for last. Drop in a battery LED, never a candle, so the flame cannot catch the thin sculpted ridges. Rub cut edges with petroleum jelly to slow drying and keep the folds crisp. Shoot it in daylight first to show off the shadow work, then again with the LED on.

Gather your supplies

Check things off as you get ready.

Work on a stable surface, keep your free hand out of the cutting path, and have an adult handle sharp tools.

Three levels of light

  • Leave intact

    The ribbed orange sides and the outer border stay as untouched dark skin framing the face.

  • Peel & shade

    The raised cheekbones, brow, gritted teeth, and draped flesh ropes are skin-peeled for a dim orange glow and texture.

  • Cut through

    Only tiny vents in the deepest eye socket and the mouth are cut through for a faint point of bright light.

Learn the carving basics

Before you start cutting

How thick does the pumpkin wall need to be for this?

You want a wall at least an inch and a half to two inches thick since almost all the work is carving depth, not holes. Pick a heavy, mature pumpkin and test the wall near the stem before you commit. If a spot feels thin, keep your sockets shallower there so you do not break through.

Do I need to light it at all?

No, and that is the point of this design. The deep sockets and collapsed nose throw real shadows in daylight, so it reads as a horror piece with no light. If you do add an LED, keep it dim so it accents rather than washes out the sculpted shadows.

How do I keep the sculpted folds from drying out and curling?

Sculpted relief pumpkins dry faster than simple lanterns because so much skin is removed. Coat every cut surface with petroleum jelly right after carving and mist it if it starts to look dull. Carve it as close to display day as you can and store it somewhere cool overnight.

Your take belongs here, too.

Changed a detail? Made it simpler? Share a photo of your version and tell the community what worked.

Share your pumpkin

More pumpkins like this

You've reached the end · 8 pumpkins
The Patch Report

Fresh pumpkins, in your inbox.

The best new carvings, ideas worth stealing, and how-tos for carving season. Short, seasonal, and gone by November.

A short email during carving season. Unsubscribe anytime. See our privacy policy.