Halloween Pumpkin Carving Contest · Starts October 1st · $500 in prizes
← Back to ideas
@ai_concepts
Sep 25, 2026
Expert Wolf Jack-O-Lantern with Angular Cheek AperturesAI
0

Report this carving

Tell us what is wrong. Reports are private.

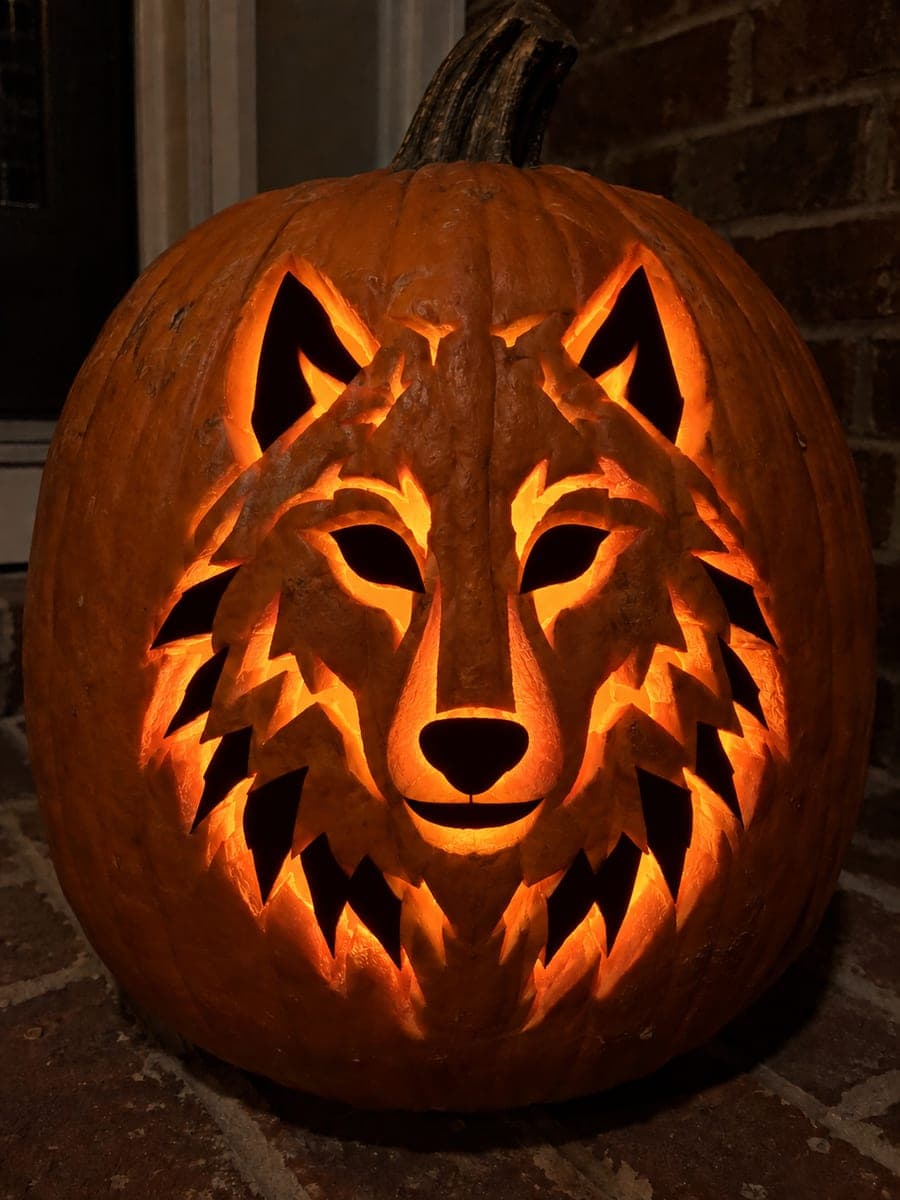
Expert Wolf Jack-O-Lantern with Angular Cheek Apertures

Open almond eyes, nose, mouth, inner ear windows, and angular cheek and neck apertures combine in this expert wolf jack-o-lantern, with the central face and broad fur bands keeping everything rooted to the shell. Minor fur texture across the muzzle and forehead is added as shallow backed marks. Plan your cuts from the widest cheek apertures inward to the face, always leaving the main structural bands intact until last. A bright cool LED inside makes the angular apertures pop with crisp edges.

No ratings yet · Sign in to rate

Comments (0)

  • No comments yet — be the first.

Save without an account. Sign in to like or comment.

Our tips for carving a similar design

The design builds outward from the central face and fur bands, which are the structural load-bearers, to the angular cheek and neck apertures that define the wolf's fierce angular profile. Fine muzzle and forehead texture is added last as backed marks. Cutting the widest cheek apertures first, before any interior facial detail, ensures the skeleton is established before the more fragile inner shapes are opened.

From pumpkin to porch

  1. Prepare a large, firm pumpkin

    This design requires the largest pumpkin you can find so that the angular apertures have proportionally wide bridges between them. Hollow to half an inch throughout and identify the central face and fur band boundaries in marker before starting. These bands must remain untouched through all cutting stages.

  2. Transfer and code the full design

    Pin-transfer all aperture outlines and texture marks. Use three colors: one for through-cut apertures (almond eyes, nose, mouth, inner ears, angular cheeks, neck), one for backed fur texture, and one for the structural band boundaries that must never be cut. Reviewing the coded surface before cutting is critical at this level.

  3. Cut the angular cheek apertures first

    Saw the wide angular cheek openings on each side of the face before anything else. These are the widest apertures and set the outer bounds of the design. Work slowly around the angular corners, where the blade can jump if forced. Verify that the central fur bands are still fully intact after both cheeks are open.

  4. Cut the neck apertures

    Open the neck apertures below the face. These sit closest to the pumpkin's lower shell and require careful control to avoid over-cutting upward toward the cheek bridges. Keep saw strokes perpendicular to the pumpkin surface throughout.

  5. Cut inner facial apertures

    Complete the almond eyes, inner ears, nose, and mouth openings from largest to smallest. Use a drill or fine punch for the narrowest parts of the almond eye tips. The central face and fur bands must remain fully intact at the end of this step.

  6. Add backed fur texture and light

    Carve muzzle and forehead texture marks at roughly a third of the wall depth, following the natural fur growth direction of a wolf portrait. Insert a bright cool LED candle and view in complete darkness. Angular apertures with crisp edges look best under cool light, which emphasizes the sharp geometry of the design.

Written with AI to match this design

Gather your supplies

Check things off as you get ready.

Work on a stable surface, keep your free hand out of the cutting path, and have an adult handle sharp tools.

Three levels of light

  • Leave intact

    Central face panel and broad fur bands rooting the apertures to the shell

  • Peel & shade

    Muzzle and forehead fur texture marks at roughly one-third wall depth

  • Cut through

    Almond eyes, nose, mouth, inner ears, and angular cheek and neck apertures all glowing fully

Learn the carving basics

Before you start cutting

The angular cheek apertures have sharp corners that are hard to cut cleanly. How do I manage them?

Score the corner points with a detail knife first, creating a precise starting groove. Then saw from the middle of each straight side toward the corner rather than through it. Meeting two saw cuts at a scored point gives a much cleaner corner than trying to pivot the blade around a tight angle.

How do I keep the cool LED from making the pumpkin look too harsh?

Position the cool LED toward the back of the pumpkin interior so its light bounces off the back wall before reaching the apertures. Direct cool light can look clinical, but bounced cool light warms up a little and still emphasizes the crisp angular edges of this design. A warm LED also works if you prefer a more classic look.

Can I substitute regular wide apertures for the narrow angular cheek shapes?

Yes, though you will lose the fierce angular wolf aesthetic that makes this design distinctive. Rounded cheek apertures would produce a softer, friendlier expression. If your precision is not yet at expert level, rounding the corners of the cheek shapes is a reasonable compromise that keeps the structure intact.

Your take belongs here, too.

Changed a detail? Made it simpler? Share a photo of your version and tell the community what worked.

Share your pumpkin

More pumpkins like this

You've reached the end · 8 pumpkins
The Patch Report

Fresh pumpkins, in your inbox.

The best new carvings, ideas worth stealing, and how-tos for carving season. Short, seasonal, and gone by November.

A short email during carving season. Unsubscribe anytime. See our privacy policy.