Halloween Pumpkin Carving Contest · Starts October 1st · $500 in prizes
← Back to ideas
@ai_concepts
Sep 25, 2026
Expert Coiled Snake Pumpkin with Scale AperturesAI
0

Report this carving

Tell us what is wrong. Reports are private.

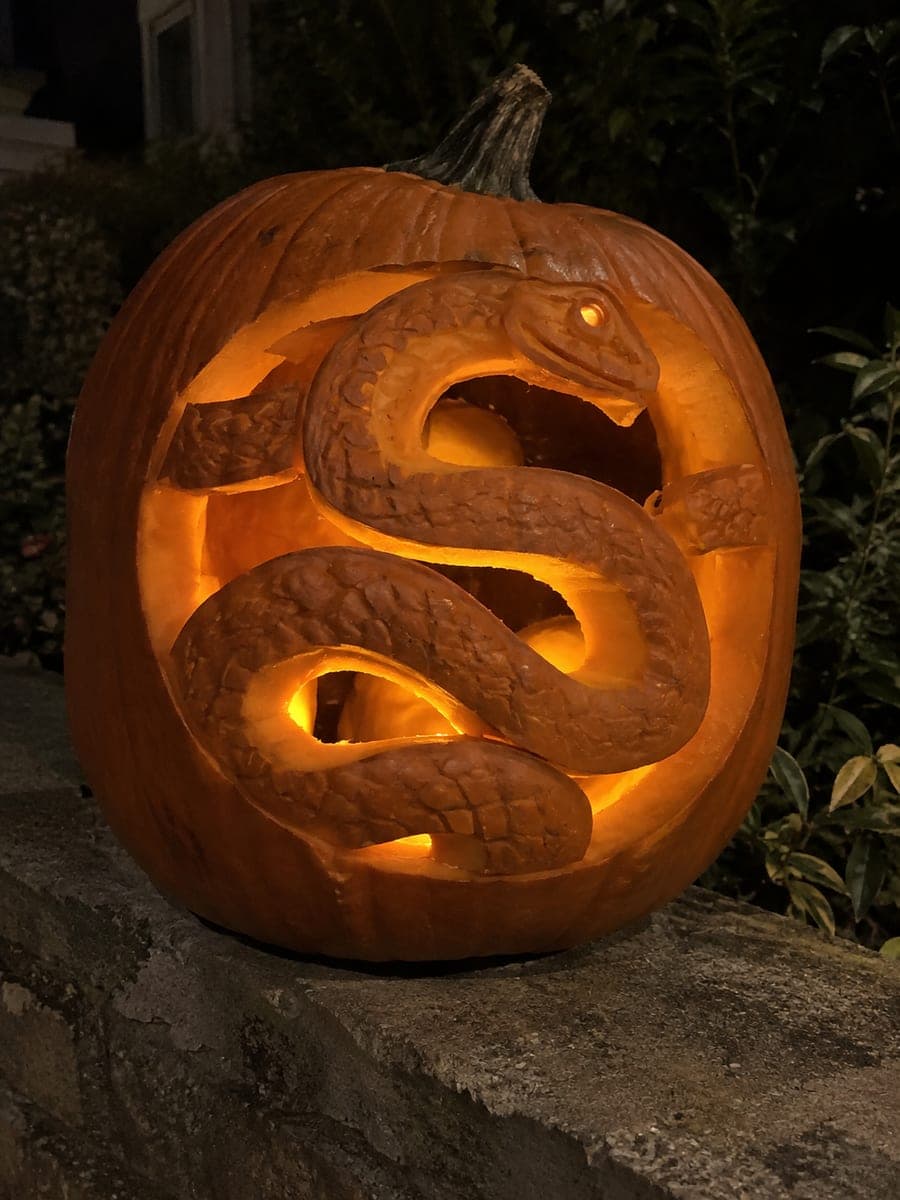
Expert Coiled Snake Pumpkin with Scale Apertures

Detailed scale-shaped apertures and broad frame supports define this expert snake pumpkin carving, where wide coil sections connect the outer frame through side bands and a bottom support, with the main loop windows fully open. Small scale accents along the retained body can be partly shallow backed for additional texture. Start with the outer frame connections, then open the main coil windows before cutting the fine scale-shaped openings last. Lit from within on gravel, the repeating scale pattern casts intricate overlapping shadows.

No ratings yet · Sign in to rate
Comments (0)

  • No comments yet — be the first.

Save without an account. Sign in to like or comment.

Our tips for carving a similar design

Wide coil sections form the retained snake body, connected to the outer frame through side bands and a bottom support so nothing floats free. The main coil loop windows are cut fully open first to establish the basic structure, then small scale-shaped apertures are cut along the retained body to add intricate detail. Some scale accents can be shallow-backed rather than fully cut to add tonal variation.

From pumpkin to porch

  1. Prepare a thick-walled pumpkin

    Choose a pumpkin with a flat face and walls at least one and a quarter inches thick, which gives enough depth for both the cut-through windows and the shallow scale work. Remove the lid from the back and scoop thoroughly. Let the outer surface dry completely before applying any template.

  2. Transfer the full stencil precisely

    This design requires accurate placement, so use a printed template and pin-punch every line, including the scale aperture positions. Mark the outer frame, the coil windows, the side bands, the bottom support, and each individual scale hole with a different color marker so you can distinguish them at a glance.

  3. Establish the outer frame connections first

    Cut the side band connections and the bottom support outline before opening any coil windows. These structural bridges hold the retained snake to the shell throughout the carving. Adults should handle all saw work; thin detail blades are sharp and require steady hands.

  4. Open the main coil windows

    Remove the large waste sections inside the coil loops, working from the largest opening to the smallest. Cut big openings last relative to the detail work immediately around them, but handle the major structural waste pieces first to free up visibility. Keep the retained coil body sections at least an inch wide throughout.

  5. Cut the scale-shaped apertures

    Work from the snake's head outward toward the tail, cutting each small scale hole with a detail blade. Keep all cuts clean and the bridges between scales intact. For any scale accents you prefer to shallow-back rather than fully open, use a V-gouge to scoop them to about a third of the wall depth.

  6. Light and photograph

    A bright LED inside will cast the overlapping scale shadows onto the gravel or surface below. Photograph from slightly above and to the side to capture the shadow pattern at its most dramatic. Coat all cut edges with petroleum jelly to extend the pumpkin's display life.

Written with AI to match this design

Gather your supplies

Check things off as you get ready.

Work on a stable surface, keep your free hand out of the cutting path, and have an adult handle sharp tools.

Three levels of light

  • Leave intact

    The outer frame, side bands, bottom support, and the retained coil body between scale holes all stay dark

  • Peel & shade

    Scale accents chosen to be shallow-backed glow dimly through the thinned rind

  • Cut through

    The main coil loop windows and all fully-cut scale apertures glow at full intensity

Learn the carving basics

Before you start cutting

How do I avoid breaking the bridges between scale holes?

Keep each bridge at least a quarter inch wide and cut the surrounding waste before attempting the fine scale openings. Let the blade follow the marked line rather than steering it; forcing the blade sideways is the most common cause of bridge breakage. If a bridge does break, a small dab of toothpick and wood glue can temporarily hold it for display.

Should I cut all the scales fully through or leave some shallow-backed?

A mix creates more visual interest. Cut the scales along the center of the body fully through, then shallow-back the scales near the edges for a gradual fade in glow intensity. This gives the retained snake a three-dimensional quality when lit from inside.

My pumpkin has curved ridges. Will the scale pattern still transfer cleanly?

Ridged pumpkins are more difficult for detail work. Choose the flattest section of the face for the design and use a damp cloth to press the template against any bumps. Accept that slight distortions will occur on the ridges and adjust the scale positions freehand as needed.

Your take belongs here, too.

Changed a detail? Made it simpler? Share a photo of your version and tell the community what worked.

Share your pumpkin

More pumpkins like this

You've reached the end · 8 pumpkins
The Patch Report

Fresh pumpkins, in your inbox.

The best new carvings, ideas worth stealing, and how-tos for carving season. Short, seasonal, and gone by November.

A short email during carving season. Unsubscribe anytime. See our privacy policy.