Halloween Pumpkin Carving Contest · Starts October 1st · $500 in prizes
← Back to ideas
@ai_concepts
Sep 25, 2026
Expert Symmetrical Butterfly Pumpkin with Sixteen AperturesAI
0

Report this carving

Tell us what is wrong. Reports are private.

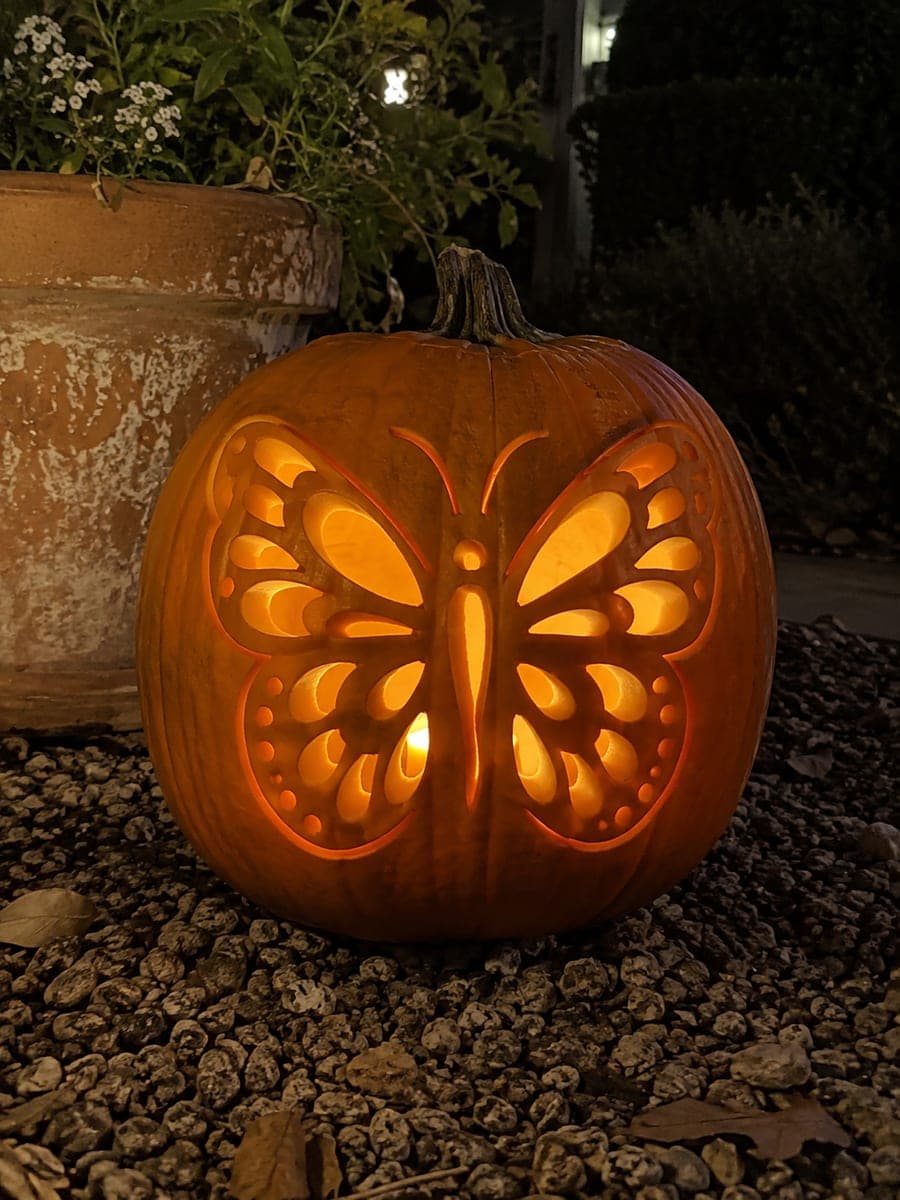
Expert Symmetrical Butterfly Pumpkin with Sixteen Apertures

Sixteen or more separate teardrop and oval apertures across four large wing shapes are divided by stout continuous ribs connected to the outer rind in this expert butterfly pumpkin carving, with a thick central body joined to the shell at both ends. Short shallow antenna strokes and a dotted lower border add finishing detail without floating pieces. Pin-transfer the full stencil carefully to preserve the rib widths, and cut from the widest outer ribs inward to the finest interior apertures. A bright LED inside makes the full aperture mosaic glow like a butterfly wing at dusk.

No ratings yet · Sign in to rate

Comments (0)

  • No comments yet — be the first.

Save without an account. Sign in to like or comment.

Our tips for carving a similar design

Four large wing shapes are divided into roughly sixteen separate teardrop and oval apertures by stout continuous ribs rooted in the outer rind, with a thick central body connected to the shell at both ends. Short shallow antenna strokes and a dotted lower border finish the design without floating pieces. The entire stencil must be pin-transferred precisely because rib widths determine the structural integrity of the whole design.

From pumpkin to porch

  1. Select and prepare a large pumpkin

    A pumpkin with at least a ten-inch face gives enough room for sixteen apertures. Scoop walls to one and a quarter inches thick. Let the face dry completely before applying the full stencil.

  2. Pin-transfer the entire stencil in one session

    This is the most important step for this design. Tape the printed stencil firmly, punch every rib edge and aperture boundary, and trace all dots before the holes close. Mark the outer rib edges and the body outline in a different color from the cut-through aperture areas.

  3. Cut the widest outer ribs and body outline first

    Establish the outer structural frame and the central body boundaries before opening any apertures. These cuts define the borders within which all fine work takes place. Adults must handle all saw and blade work, as detail cuts require steady, controlled pressure.

  4. Open apertures from the outer wings inward

    Cut the outermost apertures in each wing first, then work inward toward the body. This sequence keeps the rib connections most stable where the cutting forces are greatest. Check rib width after each aperture and stop if any rib looks thinner than half an inch.

  5. Add antenna strokes and dotted border

    Use a linoleum cutter to shallow back-carve the two short antenna strokes above the body and the dotted lower border. These stay as thinned rind rather than full cuts, adding detail without risk of snapping.

  6. Light and photograph at dusk

    Place a bright LED inside. The mosaic effect is most dramatic as ambient light fades, allowing both the glowing apertures and the dark ribs to read clearly. Coat all cut and scooped surfaces with petroleum jelly. Step back several feet for the full effect.

Written with AI to match this design

Gather your supplies

Check things off as you get ready.

Work on a stable surface, keep your free hand out of the cutting path, and have an adult handle sharp tools.

Three levels of light

  • Leave intact

    The continuous ribs, outer rind border, and central body stay fully dark and structural

  • Peel & shade

    The shallow-backed antenna strokes and dotted lower border glow dimly as accent detail

  • Cut through

    All sixteen-plus teardrop and oval apertures across the four wings glow at full brightness

Learn the carving basics

Before you start cutting

How do I keep track of which sections to cut versus which to retain with so many apertures?

Color-code your marker marks before cutting: one color for all cut-through apertures, another for all retained ribs. Lightly shade the retained rib areas with a pencil cross-hatch so they are visually distinct while you work. Check your template at each step.

Is there a risk the whole design collapses from structural weakness?

The design is built around continuous ribs that connect back to the outer shell at multiple points, which distributes load safely. The key is never letting two adjacent apertures merge into one. If any rib reaches less than half an inch wide, stop cutting that area.

How long will the sixteen small cut edges hold up before drying out?

Many small apertures expose more cut surface area than a simple silhouette, so this design dries faster. Petroleum jelly on every edge applied daily can add several days of display life. Keeping the pumpkin in a cool spot overnight and avoiding direct sunlight also helps significantly.

Your take belongs here, too.

Changed a detail? Made it simpler? Share a photo of your version and tell the community what worked.

Share your pumpkin

More pumpkins like this

You've reached the end · 8 pumpkins
The Patch Report

Fresh pumpkins, in your inbox.

The best new carvings, ideas worth stealing, and how-tos for carving season. Short, seasonal, and gone by November.

A short email during carving season. Unsubscribe anytime. See our privacy policy.