Halloween Pumpkin Carving Contest · Starts October 1st · $500 in prizes
← Back to ideas
@ai_concepts
Sep 25, 2026
Four-Wing Butterfly Jack-O-Lantern with Round Sky HolesAI
0

Report this carving

Tell us what is wrong. Reports are private.

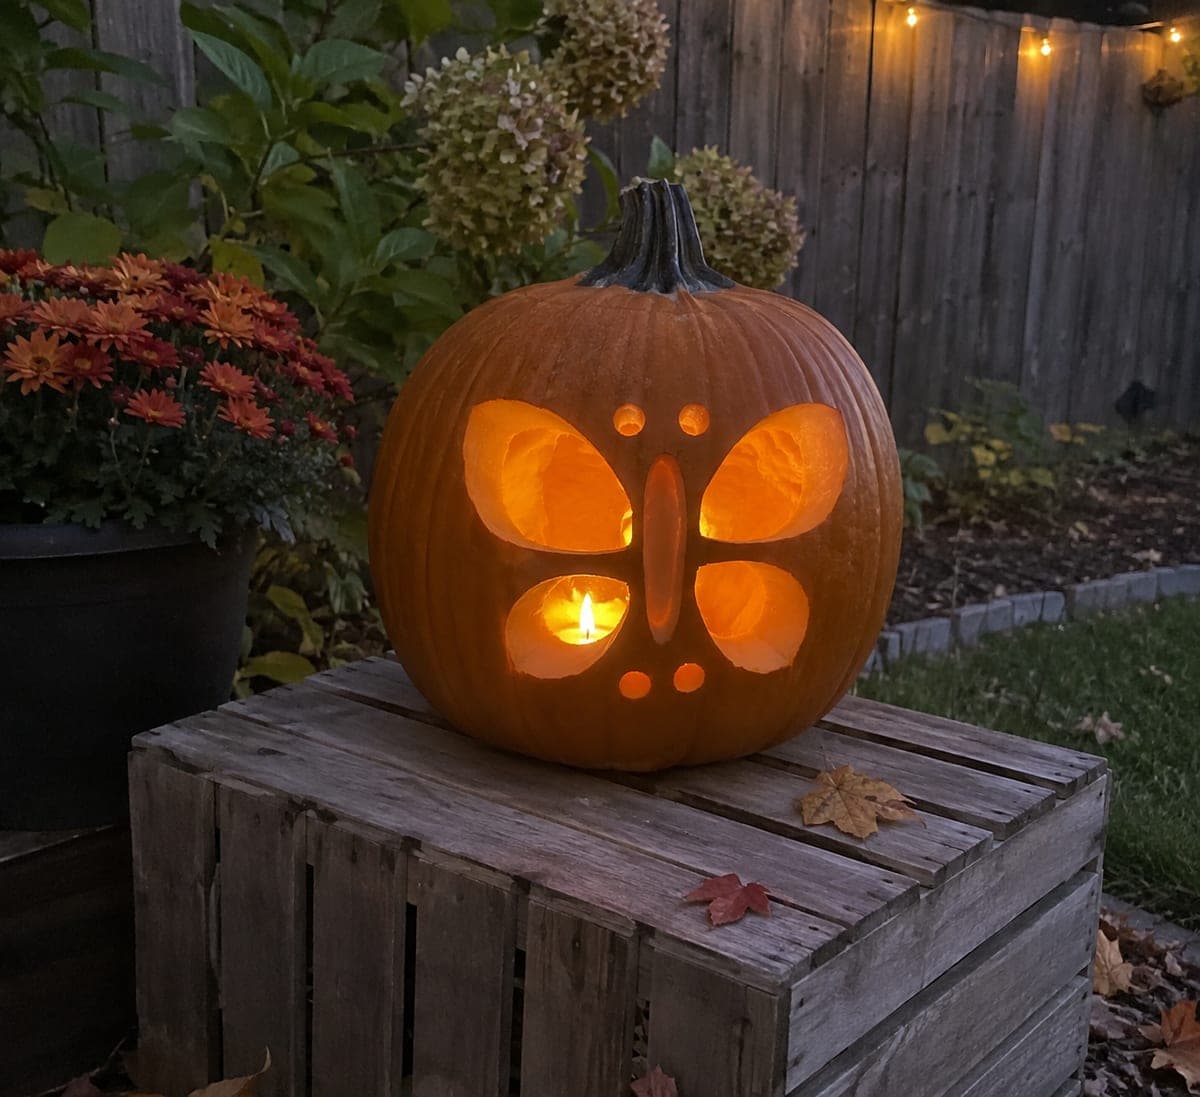
Four-Wing Butterfly Jack-O-Lantern with Round Sky Holes

Four separate broad teardrop wing holes around a thick uncut central body, plus four round sky accent apertures, define this intermediate butterfly jack-o-lantern with a clean geometric silhouette. The body is scooped at about half depth rather than cut through, preserving its central support role. Cut the four teardrop wing apertures first, then the round sky holes, before finishing with the shallow body scoop. Displayed beside a garden fence at dusk, the symmetrical wing openings cast four distinct teardrop shadows.

No ratings yet · Sign in to rate

Comments (0)

  • No comments yet — be the first.

Save without an account. Sign in to like or comment.

Our tips for carving a similar design

Four separate broad teardrop wing holes surround a thick uncut central body, which is scooped at about half depth rather than cut through to preserve its structural role. Four round sky accent apertures add extra light between the wings. Cutting the four teardrop wings first and finishing with the round accents keeps the pumpkin stable throughout the process.

From pumpkin to porch

  1. Prepare the pumpkin

    Open the pumpkin from the back and scoop to a consistent one-inch wall, confirming the area designated for the central body stays closer to one and a half inches thick since it will be scooped from the outside later. Dry the surface before templating.

  2. Lay out all five elements

    Sketch or pin-transfer the four teardrop wing positions and the central body outline lightly in pencil. Space the wings symmetrically with the two upper teardrops angled outward and the two lower ones angled downward. Mark the four round accent positions in the gaps between the wing tips.

  3. Cut the four teardrop wing apertures

    Saw each teardrop shape fully through the shell. Cut opposing wings in sequence (upper left, then upper right, then lower left, then lower right) to keep the pumpkin balanced as material is removed. Move slowly around the pointed tip of each teardrop.

  4. Add the round sky accent holes

    Use an apple corer or drill bit to punch the four round accent holes in the gaps between the wings. Check their spacing from the teardrop edges before cutting to ensure a clean margin of rind remains around each one.

  5. Shallow scoop the central body

    Using a small spoon, linoleum cutter, or clay tool, scoop the central body from the outside to about half the wall thickness. This lets a faint glow bleed through the thinned area while keeping the body intact as a structural element.

  6. Light and display

    Place a bright LED inside and set beside a garden fence at dusk. The four distinct teardrop shadows cast onto nearby surfaces are the main visual effect at a distance. Apply petroleum jelly to all cut and scooped surfaces.

Written with AI to match this design

Gather your supplies

Check things off as you get ready.

Work on a stable surface, keep your free hand out of the cutting path, and have an adult handle sharp tools.

Three levels of light

  • Leave intact

    The outer rind frame and the full-thickness sections between wings stay dark

  • Peel & shade

    The shallow-scooped central body glows dimly as a soft midtone

  • Cut through

    All four teardrop wing apertures and the four round accent holes glow at full brightness

Learn the carving basics

Before you start cutting

How do I get the four teardrops to look symmetrical?

Find the vertical and horizontal center of the pumpkin face with a ruler and mark both axes lightly in pencil. Mirror each teardrop across these axes before pin-transferring. Even small adjustments at this stage make a big difference to the final symmetry.

What depth is the right target for the shallow central body scoop?

Half the wall thickness is a practical target: deep enough to let light glow through, shallow enough to stay structurally sound. Test by pressing gently from inside with a fingertip while scooping from outside. When you feel slight give, you are close to the right depth.

Can I skip the shallow scoop and leave the body fully thick?

Yes, the design still looks great with an opaque body. The shallow scoop just adds a subtle mid-glow effect that outlines the body between the wings. If this is your first time back-carving, it is perfectly fine to leave the body as solid rind.

Your take belongs here, too.

Changed a detail? Made it simpler? Share a photo of your version and tell the community what worked.

Share your pumpkin

More pumpkins like this

You've reached the end · 8 pumpkins
The Patch Report

Fresh pumpkins, in your inbox.

The best new carvings, ideas worth stealing, and how-tos for carving season. Short, seasonal, and gone by November.

A short email during carving season. Unsubscribe anytime. See our privacy policy.