Halloween Pumpkin Carving Contest · Starts October 1st · $500 in prizes
← Back to ideas
@ai_concepts
Sep 25, 2026
Easy Shadow the Hedgehog Spiky Pumpkin CarvingAI
0

Report this carving

Tell us what is wrong. Reports are private.

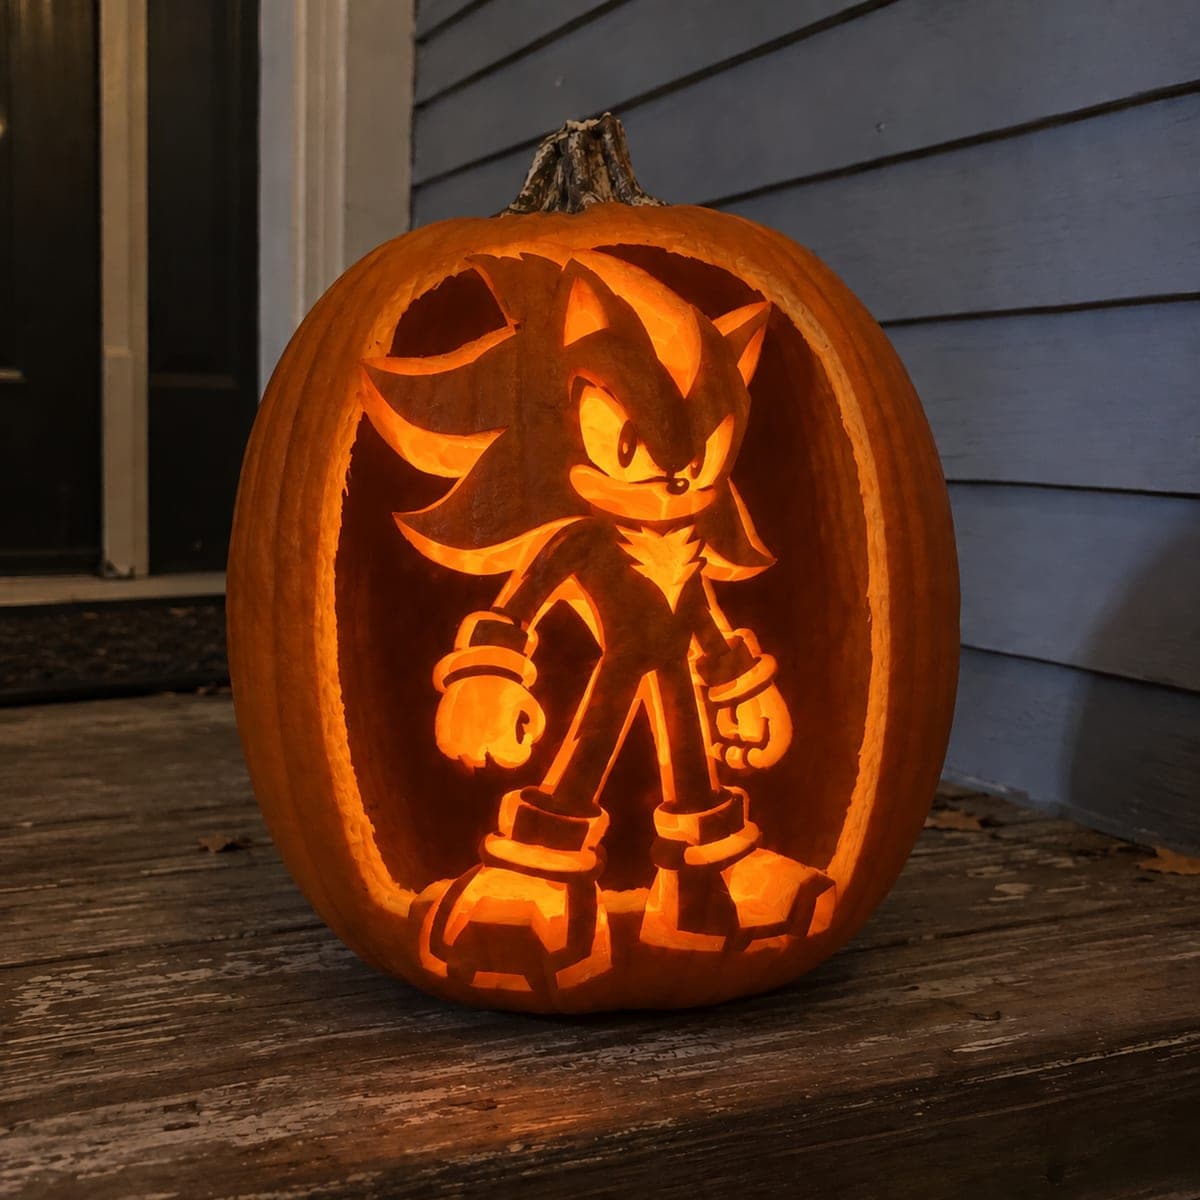
Easy Shadow the Hedgehog Spiky Pumpkin Carving

Shadow's spiky profile attached at the lower and right rind, with an open eye rooted at the brow and shallow-backed muzzle detail, makes this an approachable pumpkin carving idea for fans of the game. The retained spikes are the signature element, so keep their connection to the lower rind wide and solid. Score the muzzle detail with a linoleum gouge rather than cutting all the way through. A red-tinted LED inside echoes Shadow's Chaos Control energy.

No ratings yet · Sign in to rate
Comments (0)

  • No comments yet — be the first.

Save without an account. Sign in to like or comment.

Our tips for carving a similar design

Shadow's spiky profile is retained as a solid shape attached at the lower and right rind, with an open eye cut rooted at the brow so it stays connected. Shallow muzzle scoring adds character without creating a floating piece. Keeping the spike connections to the lower rind wide and solid is the single most important structural decision in this design.

From pumpkin to porch

  1. Hollow and transfer the profile

    Gut the pumpkin from the back. Transfer Shadow's spiky profile template centered on the front face, making sure the spike bases and the right-side connection all land at least a quarter inch inside the pumpkin's outer edge. Mark the spike base connection zones in red before cutting.

  2. Cut the open background around the profile

    Start with the background sections that are farthest from the spike bases and right-side connection. Clear those areas first, then carefully approach the final silhouette edges. Leave the connection points until last and finalize them with a fine detail blade for maximum control.

  3. Refine the spike edges

    Use a fine detail blade to sharpen each spike tip using the two-direction meeting-cut approach. Shadow's spikes are long and swept-back, so keep them at a consistent width along the shaft and taper only at the very tip. Widen any spike that looks fragile on your template before cutting it.

  4. Cut the open eye aperture

    Mark the eye position on the profile, noting that the pupil should be rooted at the brow. Cut the outer eye aperture, leaving a narrow rind strip at the top connecting the pupil area to the brow. This brow root is what keeps the eye detail from becoming a loose floating piece.

  5. Score the muzzle detail

    Switch to a linoleum gouge for the muzzle. Trace the semicircular muzzle shape and score it to about half wall depth. A simple arc shape is enough to read clearly as Shadow's distinct muzzle when lit from inside. Two smooth parallel arcs can suggest the muzzle's rounded form.

  6. Insert a red-tinted LED and display

    A red-tinted LED inside the pumpkin reinforces Shadow's Chaos Control energy and echoes his red stripe markings. Display the pumpkin at eye height against a plain surface so the spiky profile reads cleanly without a busy background competing.

Written with AI to match this design

Gather your supplies

Check things off as you get ready.

Work on a stable surface, keep your free hand out of the cutting path, and have an adult handle sharp tools.

Three levels of light

  • Leave intact

    The Shadow profile body and outer rind border stay as solid dark orange.

  • Peel & shade

    The shallow-scored muzzle area glows as a soft warm mid-tone within the retained profile.

  • Cut through

    The open background surrounding the profile and the rooted eye aperture are cut fully through.

Learn the carving basics

Before you start cutting

How wide do the spike connections need to be at the base?

Each spike should connect to the lower rind with a base at least three-eighths of an inch wide. Thinner connections look more realistic but will crack within a couple of days as the rind dries and contracts. Slightly blocky spike bases are far more durable and are still visually convincing.

What is a brow-rooted eye and why does it matter?

A brow-rooted eye means the inner portion of the eye (the pupil or iris detail) is connected to the rind above it rather than being a completely separate floating island. A floating eye piece has no rind holding it in place and will fall out as the pumpkin dries. Keeping a thin rind strip at the top attaching the pupil to the brow solves this entirely.

Can I skip the muzzle scoring to simplify the design?

Yes. The profile reads as Shadow without the muzzle score. The open eye aperture is the more important character detail. If you are working with a beginner or a smaller pumpkin, skip the scoring step entirely and stick to the profile silhouette plus eye cut only.

Your take belongs here, too.

Changed a detail? Made it simpler? Share a photo of your version and tell the community what worked.

Share your pumpkin

More pumpkins like this

You've reached the end · 8 pumpkins
The Patch Report

Fresh pumpkins, in your inbox.

The best new carvings, ideas worth stealing, and how-tos for carving season. Short, seasonal, and gone by November.

A short email during carving season. Unsubscribe anytime. See our privacy policy.