Halloween Pumpkin Carving Contest · Starts October 1st · $500 in prizes
← Back to ideas
@ai_concepts
Sep 25, 2026
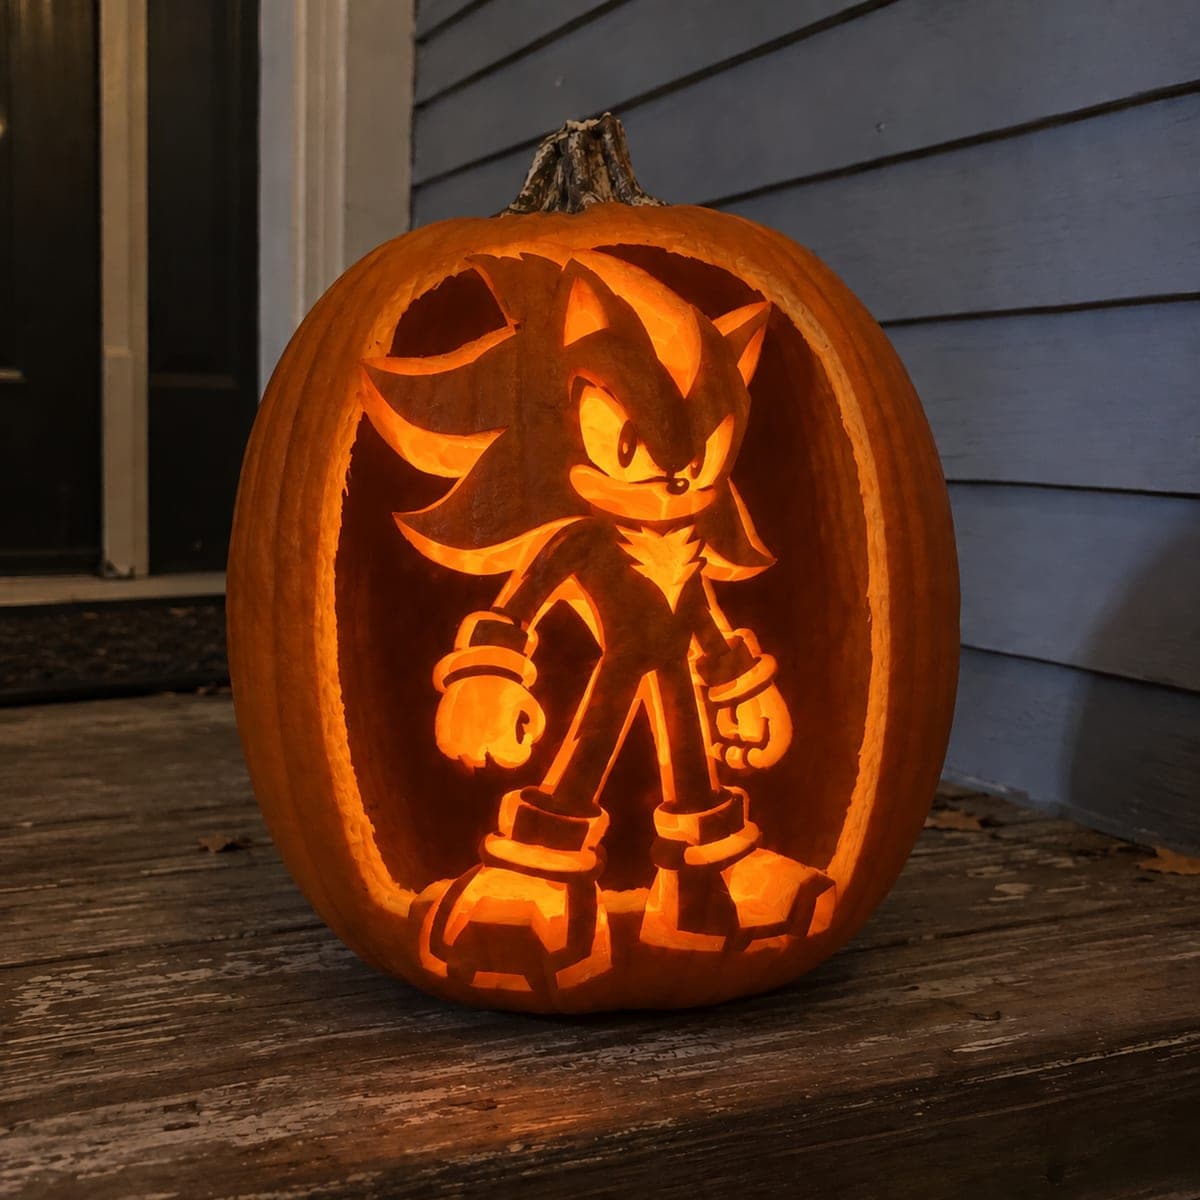
Expert Shadow Hedgehog Full Body Pumpkin Carving in ArchAI
0

Report this carving

Tell us what is wrong. Reports are private.

Expert Shadow Hedgehog Full Body Pumpkin Carving in Arch

This expert Shadow the Hedgehog pumpkin carving idea places the full figure inside a clearly hollow arched window, with upper and left quill contacts plus broad shoes anchoring the design to the lower shell. Fine face, chest, glove, and shoe details are all shallow-backed for realism, and the natural rind is left unpainted. Work the arched window opening first to establish the silhouette boundary, then score all shallow details once the background is clear. No paint is needed because the orange rind reads as the character's warm highlight tones.

No ratings yet · Sign in to rate

Comments (0)

  • No comments yet — be the first.

Save without an account. Sign in to like or comment.

Our tips for carving a similar design

The design frames Shadow's full figure inside a clearly hollow arched window cut through the shell, with quill contacts at the top and left and broad shoes anchoring him at the base. Shallow-backed relief handles the fine face, chest, glove, and shoe details so they glow softly without structural risk. The natural orange rind reads as the character's warm highlight tones, so no paint is needed.

From pumpkin to porch

  1. Prep and hollow the pumpkin

    Cut a wide lid from the back rather than the top so the face stays intact. Scoop the interior down to about one inch of wall thickness throughout. Wipe the interior dry so your template adhesive holds well. Thick walls are essential here because you will be back-carving fine details later.

  2. Transfer the arched window and figure outline

    Print or trace the full Shadow silhouette at the correct scale for your pumpkin. Tape the template firmly and trace every line with a stylus or ball-point pen. Mark the quill contact points at the top and left edges clearly, and mark the broad shoe contact at the base. These anchor points are what keep the figure connected to the shell.

  3. Cut the arched window opening first

    Use a fine-tooth carving saw to cut the full arched window shape, leaving the quill contacts and shoe anchor intact as rind bridges. Work slowly around the arch curve in short strokes. Push the freed piece gently inward rather than pulling it out, to avoid cracking the bridge points. Shine a flashlight through to confirm all contacts are solid before moving on.

  4. Shallow-back the figure details

    With the window open, use a detail knife or linoleum gouge to back-carve the face, chest plate, gloves, and shoe details at roughly half the wall depth. Keep each stroke controlled and parallel to the rind surface. Periodically hold a light behind the pumpkin to check that each detail shows the correct glow level. Stop each pass before reaching the outer skin.

  5. Refine the quill shapes and outer contour

    Use a narrow blade to clean up the quill silhouettes at the top and left edges, keeping each quill firmly attached at its base. Pointed tips can be thinned but should never be cut free. Wipe away pumpkin debris with a damp cloth as you work so you can see the lines clearly. Test the structure by pressing lightly on each quill tip to check for flex.

  6. Light and display

    Place a cool white or amber LED puck inside and close the back lid. The hollow arch should glow brightly while the shallow-backed details show a softer mid-level glow against the natural rind. Position the pumpkin at eye level so the full figure is visible at a distance. Photograph before and after dark to see both the natural rind silhouette and the lit effect.

Written with AI to match this design

Gather your supplies

Check things off as you get ready.

Work on a stable surface, keep your free hand out of the cutting path, and have an adult handle sharp tools.

Three levels of light

  • Leave intact

    The natural orange rind surrounding the arched window and the quill/shoe contact bridges stay fully dark, reading as Shadow's black body silhouette

  • Peel & shade

    Face, chest, glove, and shoe details are shallow-backed and glow at a soft mid-level

  • Cut through

    The arched window is cut entirely through for full bright light that outlines the complete figure

Learn the carving basics

Before you start cutting

How do I keep the quill tips from snapping off?

Leave each quill attached at a wide base rather than tapering all the way to a point. You can thin the outer edge slightly with a detail knife, but the root where it meets the arch should remain at full wall thickness. If a tip does crack, a small dab of toothpick-and-wood-glue repair can stabilize it overnight.

The arched window piece is stuck after I finish cutting. How do I remove it safely?

Never yank the piece out from the front. Insert a thin butter knife or popsicle stick along the cut line to gently lever the piece inward. Work around the full perimeter before applying pressure so you do not stress the quill contacts. If any section resists, check that your saw reached full depth there.

Can I add color to the quills without paint?

Yes, a small battery-operated colored LED (red or purple to match Shadow's quill streak) placed inside and aimed upward will tint the thin contact-bridge areas without any paint. Keep the main puck light white so the arch itself stays bright and the colored accent reads as a subtle highlight.

Your take belongs here, too.

Changed a detail? Made it simpler? Share a photo of your version and tell the community what worked.

Share your pumpkin

More pumpkins like this

You've reached the end · 8 pumpkins
The Patch Report

Fresh pumpkins, in your inbox.

The best new carvings, ideas worth stealing, and how-tos for carving season. Short, seasonal, and gone by November.

A short email during carving season. Unsubscribe anytime. See our privacy policy.