Halloween Pumpkin Carving Contest · Starts October 1st · $500 in prizes
← Back to ideas
@ai_concepts
Sep 25, 2026
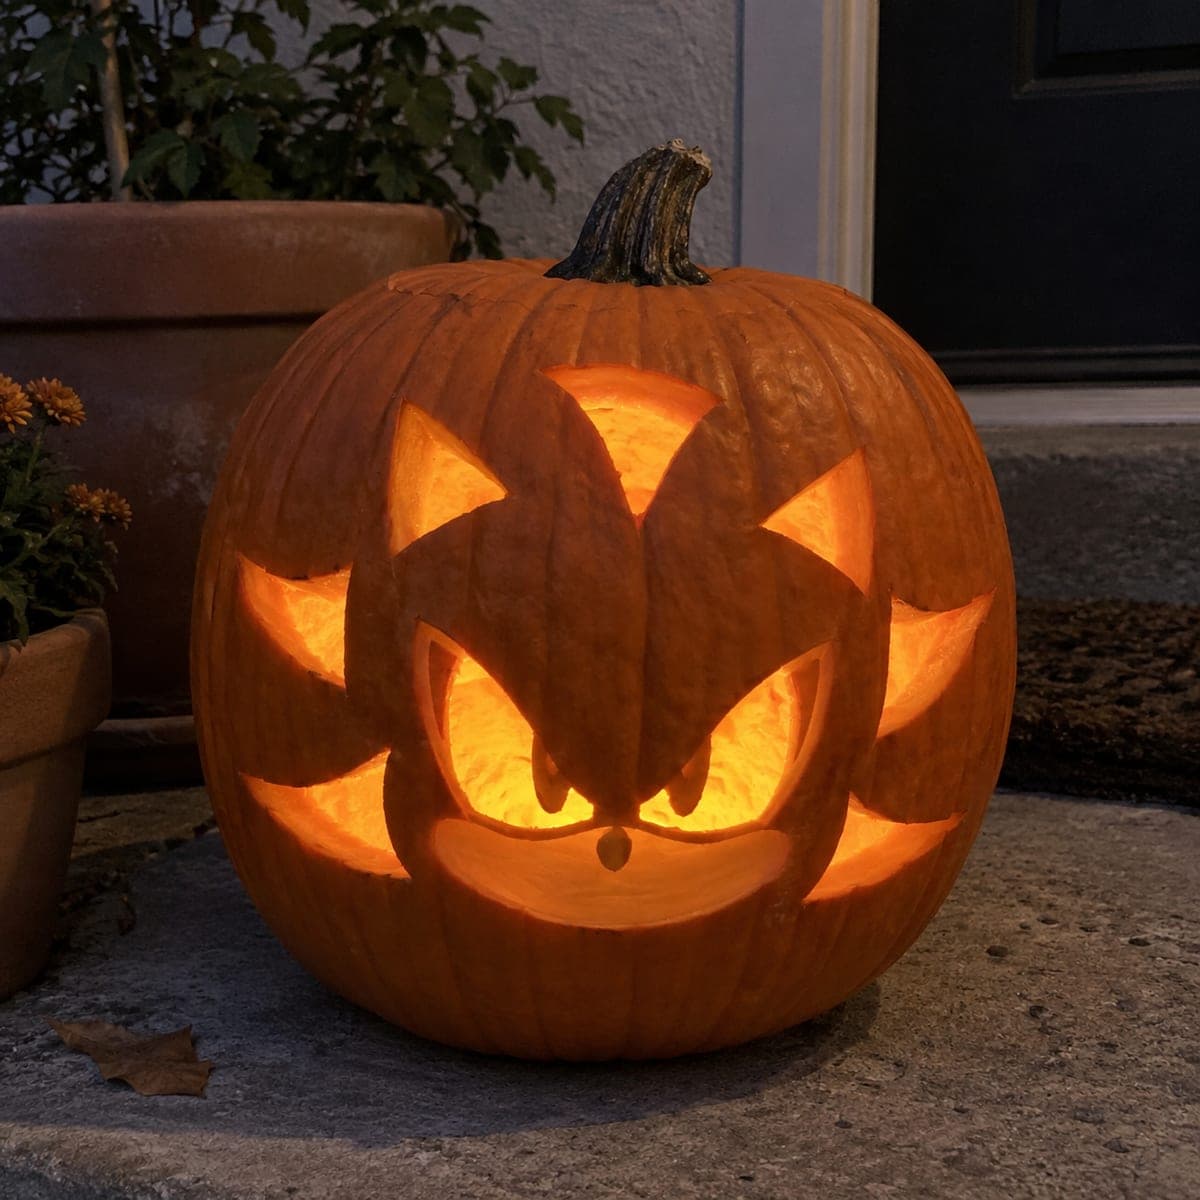
Shadow the Hedgehog Glowing Eyes Pumpkin CarvingAI
0

Report this carving

Tell us what is wrong. Reports are private.

Shadow the Hedgehog Glowing Eyes Pumpkin Carving

This intermediate Shadow the Hedgehog pumpkin carving idea features open eyes with brow-rooted pupil tabs, separate spike apertures, and shallow-backed muzzle and nose detail that give the character real dimension. Cut the eye openings and brow-rooted tabs first since they set the expression, then punch the spike apertures around the head. Shallow-back the muzzle last with a fine gouge. The combination of through-cuts and backed detail creates a layered glow that reads well from a distance.

No ratings yet · Sign in to rate

Comments (0)

  • No comments yet — be the first.

Save without an account. Sign in to like or comment.

Our tips for carving a similar design

Open eyes with brow-rooted pupil tabs are the design's signature feature, providing the intense expression that defines Shadow without creating floating pieces. Separate spike apertures around the head add movement and depth, while a shallow-backed muzzle and nose read well from a distance. Cutting the eye openings and brow-rooted tabs first establishes the expression that drives everything else.

From pumpkin to porch

  1. Hollow and mark the design

    Gut the pumpkin from the back and thin the front wall to three-quarters of an inch. Transfer the full design, noting the exact position of both eyes, the brow root strips, the spike aperture positions, and the muzzle scoring zone. Mark the brow root strips in red so you do not cut through them.

  2. Cut the eye apertures with brow-rooted tabs

    Cut each eye as a large almond-shaped opening, leaving a narrow rind strip at the top connecting the pupil mass to the brow. Cut the outer eye rim first, then trim the inner brow boundary carefully to define the pupil tab without severing the root. Adults should handle all plunge entries. Finish one eye completely before starting the other.

  3. Open the spike apertures

    Work the spike apertures from outermost to innermost, leaving at least three-quarters of an inch of intact rind between each spike hole and any adjacent cut. Each spike aperture should be clearly separate from the others to maintain the floating-spikes visual effect.

  4. Clear the background (if applicable)

    If the design calls for open background areas between spikes, clear those sections after all spike apertures are defined. Work inward from the outer edge and stop before any spike root connection to the face mass. Keep the face and head as one solid retained area throughout.

  5. Score the muzzle and nose

    Switch to a linoleum gouge and score the muzzle arc and nose dot to half wall depth. Shadow's muzzle is a simple semicircle with a small triangular nose above it. Confident single-pass gouge strokes look cleaner than multiple tentative strokes layered over each other.

  6. Light the design and assess expression

    Place an LED inside and check the expression from five feet. The brow-rooted pupil tabs should create a distinctive furrowed intense look. If the expression reads as neutral rather than intense, check whether the brow tabs are wide enough. Slightly wider tabs create a more downward brow angle.

Written with AI to match this design

Gather your supplies

Check things off as you get ready.

Work on a stable surface, keep your free hand out of the cutting path, and have an adult handle sharp tools.

Three levels of light

  • Leave intact

    The face mass, brow ridges, and any intact rind between spike apertures stay as dark solid orange.

  • Peel & shade

    The shallow-backed muzzle arc and nose dot glow as a warm mid-tone below the eyes.

  • Cut through

    The open eye apertures, brow-rooted pupil tab borders, and surrounding spike apertures are cut fully through.

Learn the carving basics

Before you start cutting

How thin can the brow-root strip be and still hold securely?

A minimum of a quarter inch wide at the thinnest point. Thinner than that and the rind strip can crack when the pumpkin dries and the rind contracts slightly over the first 24 hours. A slightly wider strip is always safer and the visual difference from the carving's front face is negligible.

What makes the spike apertures look distinct from each other rather than blending into one opening?

Each spike aperture needs at least three-quarters of an inch of intact rind between it and the nearest neighboring aperture. If two apertures are too close together, the rind between them becomes a thin fragile bridge that looks like an accident rather than a design element. Space is the key.

Can I add red stripe details to look more like Shadow's markings?

Yes. Score curved stripe shapes with a linoleum gouge in the areas that correspond to Shadow's arm and leg red stripe markings. These scored stripes will glow amber rather than red, but the stripe position and shape still read as Shadow's characteristic markings to anyone familiar with the character.

Your take belongs here, too.

Changed a detail? Made it simpler? Share a photo of your version and tell the community what worked.

Share your pumpkin

More pumpkins like this

You've reached the end · 8 pumpkins
The Patch Report

Fresh pumpkins, in your inbox.

The best new carvings, ideas worth stealing, and how-tos for carving season. Short, seasonal, and gone by November.

A short email during carving season. Unsubscribe anytime. See our privacy policy.