Halloween Pumpkin Carving Contest · Starts October 1st · $500 in prizes
← Back to ideas
@ai_concepts
Sep 25, 2026
Expert Enderman Pumpkin Carving with Pixel Tree SceneAI
0

Report this carving

Tell us what is wrong. Reports are private.

Expert Enderman Pumpkin Carving with Pixel Tree Scene

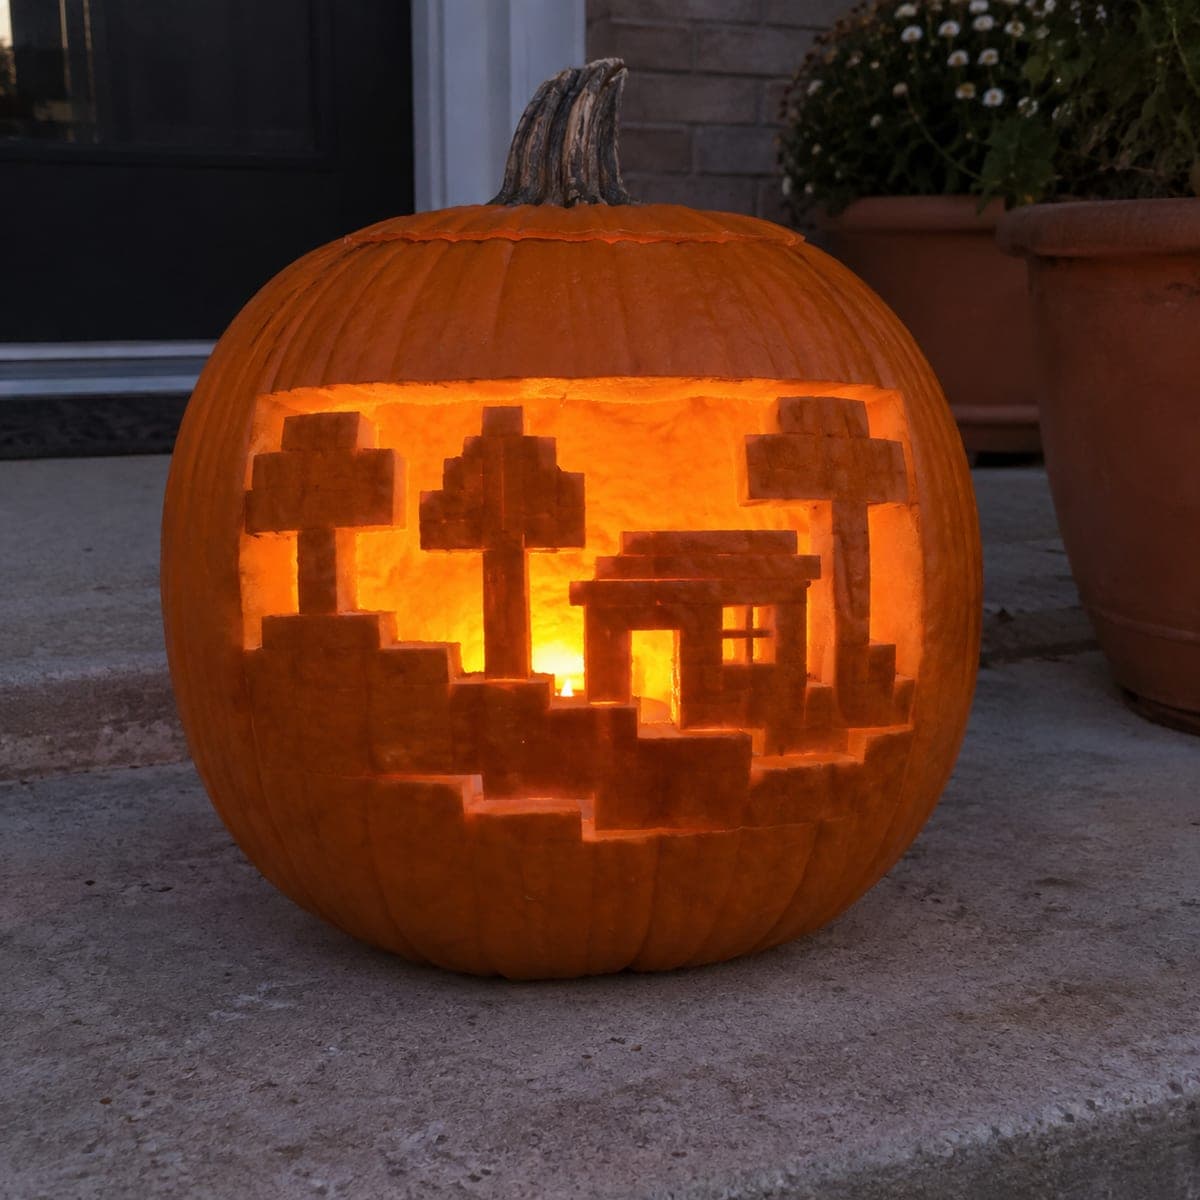
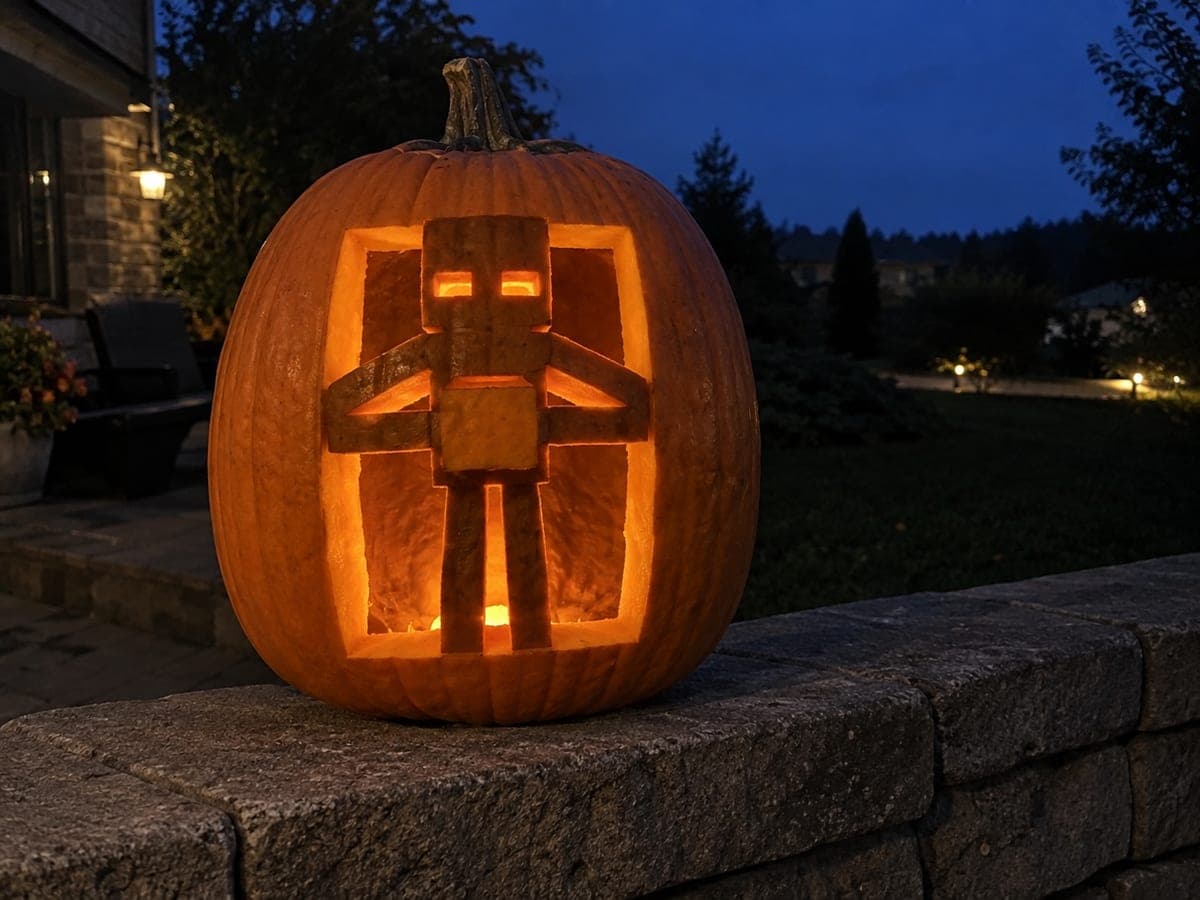
At the expert level, this enderman pumpkin carving retains a flat orange rind Enderman and flanking pixel trees against a fully open background, with all elements rooted to a broad lower shell. The Enderman's head carries a broad top bridge and bent arms frame a square aperture at the figure's center. Cut the open background first to define the silhouette edges before thinning any rind. Rectangular open eyes in the head finish the Minecraft pumpkin carving idea.

No ratings yet · Sign in to rate
Comments (0)

  • No comments yet — be the first.

Save without an account. Sign in to like or comment.

Our tips for carving a similar design

The flat orange rind Enderman and flanking pixel trees are retained as positive shapes inside a completely open background, so every piece of the design must connect to the broad lower shell or the pumpkin rim. The head carries a wide top bridge to the rim, and the bent arms frame a central square aperture without becoming detached. Clearing the open background before any fine detail work is essential to avoid cracking a nearly free-floating piece.

From pumpkin to porch

  1. Template and connection point mapping

    Gut the pumpkin and thin the front wall evenly. Transfer the full scene template, then use a red marker to circle every connection point where a retained element meets the frame or shell. These marked spots are absolute no-cut zones. Brief yourself on each one before picking up the blade.

  2. Remove the open background in sections

    Divide the open background into at least four manageable sections and cut them out one at a time. Start with sections farthest from the connection points. Use a keyhole blade and cut slightly inside your final outline on the first pass, then trim back to the exact line when the section is loose.

  3. Define the pixel tree silhouettes

    With the background open, use a fine detail blade to sharpen the blocky tree edges. Each tree must stay rooted at the lower shell. Keep tree branch protrusions wide and short rather than thin and long to prevent snapping. Work from the outer edge of each tree toward the center of the design.

  4. Refine the Enderman figure

    Tighten the Enderman's head, torso, and arm geometry with straight precise cuts. The square aperture framed by the bent arms is an interior opening surrounded by retained rind, so cut its four sides cleanly without enlarging it beyond the template boundary. Confirm the broad top bridge is still intact before proceeding.

  5. Cut the rectangular eye holes

    The two rectangular eye openings inside the Enderman's head are the last cuts. Plunge cleanly into each corner and saw each side in a single controlled stroke. An adult must handle plunge cuts. These are small, so the risk of structural damage is low as long as the head bridge above them is still solid.

  6. Light the scene and display

    Position an LED puck on the bottom of the pumpkin angled upward. The fully open background means light floods the entire scene, silhouetting the retained orange Enderman and trees dramatically. Display at or slightly above eye level so viewers look into the open cavity and see the figures cleanly.

Written with AI to match this design

Gather your supplies

Check things off as you get ready.

Work on a stable surface, keep your free hand out of the cutting path, and have an adult handle sharp tools.

Three levels of light

  • Leave intact

    The Enderman figure, pixel trees, lower shell base strip, and upper rim bridge remain as intact dark orange rind.

  • Peel & shade

    None. All contrast is full-cut.

  • Cut through

    The entire open background surrounding the figures and the two rectangular eye holes in the Enderman head are cut fully through.

Learn the carving basics

Before you start cutting

How do I stop the retained elements from sagging as the pumpkin ages?

The broad lower base connection is the key support. Make sure it spans the full width of the scene rather than narrowing at any point. Sealing all cut edges with petroleum jelly immediately after carving slows moisture loss and keeps the rind firm longer. Refrigerating the pumpkin between display nights also helps considerably.

Is there a safe order for clearing the four background sections?

Cut the two side sections first (left of the left tree and right of the right tree), then clear the upper background above the head bridge, and finish with any small interior background gaps. This order keeps the center mass supported by uncut rind for as long as possible.

What should I do if a pixel tree branch breaks during carving?

Do not force it back into position. If it is still partially attached, back it with a small piece of toothpick and a dab of white craft glue on the interior side. If it has separated completely, the tree silhouette often still reads well with a shorter branch. Minor simplification is far better than a cracked section mid-display.

Your take belongs here, too.

Changed a detail? Made it simpler? Share a photo of your version and tell the community what worked.

Share your pumpkin

More pumpkins like this

You've reached the end · 8 pumpkins
The Patch Report

Fresh pumpkins, in your inbox.

The best new carvings, ideas worth stealing, and how-tos for carving season. Short, seasonal, and gone by November.

A short email during carving season. Unsubscribe anytime. See our privacy policy.