Halloween Pumpkin Carving Contest · Starts October 1st · $500 in prizes
← Back to ideas
@ai_concepts
Sep 25, 2026
Minecraft Block Village Scene Pumpkin CarvingAI
0

Report this carving

Tell us what is wrong. Reports are private.

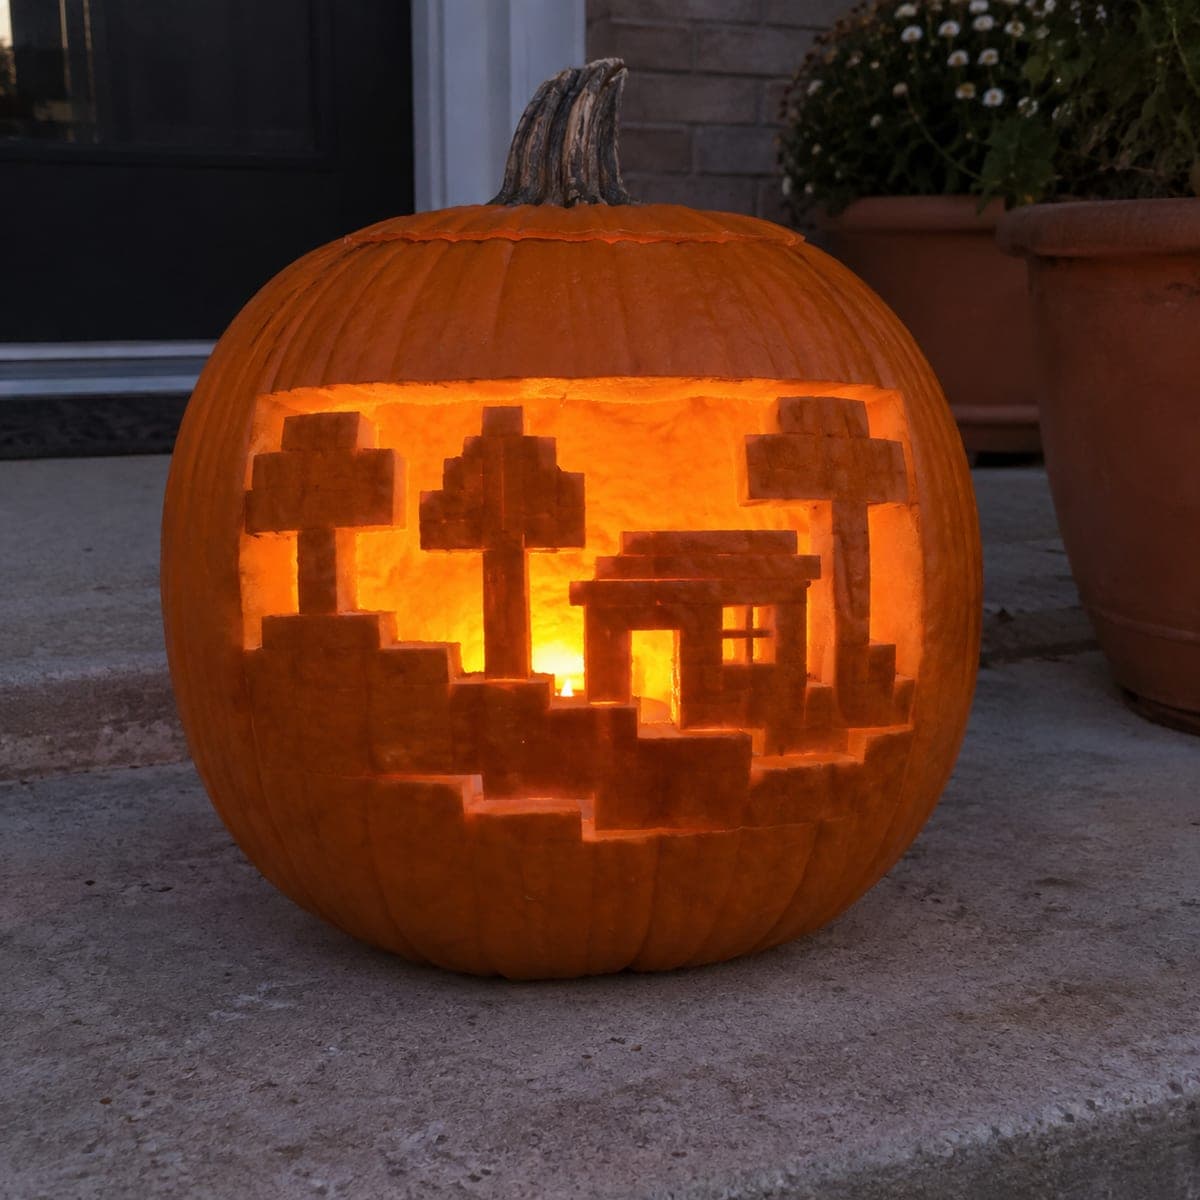
Minecraft Block Village Scene Pumpkin Carving

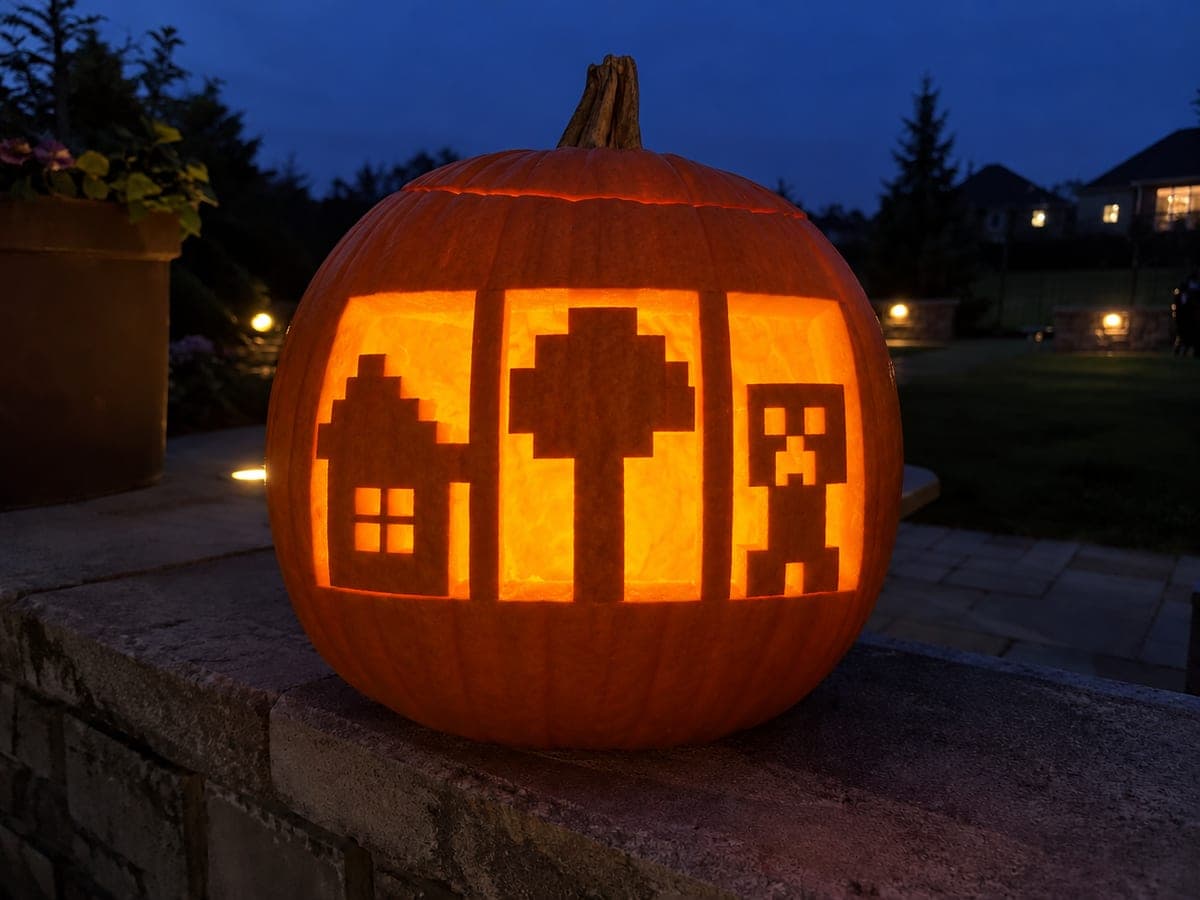
This hard Minecraft pumpkin carving idea renders a pixel village landscape with retained block trees and a house rising from a shared stepped ground strip, all set against an open rectangular background. The outer tree crowns must connect to the side shell for structural support, so do not trim those bridges. Cut the large background opening first, then carefully clear the sky areas around each tree. Small window openings in the house let through-light detail the scene.

No ratings yet · Sign in to rate
Comments (0)

  • No comments yet — be the first.

Save without an account. Sign in to like or comment.

Our tips for carving a similar design

This design sets retained block trees and a house silhouette against a large open rectangular background, with small window openings providing secondary glowing details inside the scene. The outer tree crowns must stay connected to the side shell walls for structural support, so those bridges must never be trimmed. Cutting the large background opening first and then clearing the sky areas around each tree is the correct sequence to define the landscape before working on fine details.

From pumpkin to porch

  1. Hollow a wide, flat-faced pumpkin

    A pumpkin with a wide, relatively flat front face gives the landscape proportions room to breathe. Hollow from the base to 1 to 1.25 inch walls. The small window holes require consistent wall thickness, and the large open background needs a structurally sound frame border around it. Dry the interior fully.

  2. Transfer the stencil and mark all connections

    Pin-tool the full stencil including the background boundary, tree crowns, house outline, and window positions. Mark the tree crown connections to the side shell in high-visibility color. These are non-negotiable structural anchors. Also mark the stepped ground strip that connects the tree trunks and house base across the bottom of the scene.

  3. Cut the large background opening first

    Use a large serrated knife to remove the rectangular background area. Work around the full boundary of the background first before removing the central piece. Keep the top and side border strips intact. Once the background is open, the sky areas around the retained trees and house will be clearly defined.

  4. Clear the sky areas around trees and house

    With the background open, carefully cut the sky areas between the tree crowns and between the trees and the house. Use a detail blade for the pixel steps around each tree and house edge. Keep tree crown connections to the side shell intact throughout. These sky cuts isolate each tree as a distinct retained shape within the background opening.

  5. Cut the small window openings in the house

    The house windows are small square or rectangular openings within the retained house silhouette. Score each window perimeter fully before cutting through. The retained house rind around the windows is solid enough to support the small cuts, but work slowly and cut each window individually.

  6. Light and evaluate the scene

    Insert a bright LED inside and check the scene in a dark room. The block trees and house should read as dark retained shapes against the bright open background, with the small windows providing points of light within the house silhouette. Rub all cut edges with petroleum jelly and display at viewing height so the landscape reads as a unified scene.

Written with AI to match this design

Gather your supplies

Check things off as you get ready.

Work on a stable surface, keep your free hand out of the cutting path, and have an adult handle sharp tools.

Three levels of light

  • Leave intact

    The retained block trees, house silhouette, and shared stepped ground strip stay fully dark orange.

  • Peel & shade

    None, this design uses through-cuts throughout.

  • Cut through

    The large open background, sky areas between trees, and small house windows glow fully through.

Learn the carving basics

Before you start cutting

The tree crown connections to the side shell look like they will leave big side stumps of rind. Is that correct?

Yes, and those side stumps are intentional structural features. The scene is designed so the outer tree crowns extend to the edge of the background opening and connect to the adjacent uncut side rind. Removing them would leave the trees unsupported and they would collapse into the open background. Frame the side connections as part of the pixel design by keeping their edges clean and pixel-stepped.

How do I cut the pixel steps around the tree crowns without chipping off individual block corners?

Score each step corner intersection before cutting the adjacent sides, exactly as you would for the Creeper eye squares. At the corner point, the two cut lines meet at a precise right angle, and pre-scoring that corner prevents either cut from overshooting and chipping the adjacent retained pixel block. Use a fresh detail blade tip for corner work.

The scene is complex. Should I carve it all in one session or spread it across two evenings?

For a design this complex, two sessions is a good approach. In the first session, cut the large background opening and the sky clearings around the trees. Leave the house windows and any fine detail work for the second session when your hands are rested. Store the partially carved pumpkin in a cool room between sessions with the cut edges rubbed in petroleum jelly and the opening covered loosely with plastic wrap to slow drying.

Your take belongs here, too.

Changed a detail? Made it simpler? Share a photo of your version and tell the community what worked.

Share your pumpkin

More pumpkins like this

You've reached the end · 8 pumpkins
The Patch Report

Fresh pumpkins, in your inbox.

The best new carvings, ideas worth stealing, and how-tos for carving season. Short, seasonal, and gone by November.

A short email during carving season. Unsubscribe anytime. See our privacy policy.