Halloween Pumpkin Carving Contest · Starts October 1st · $500 in prizes
← Back to ideas
@ai_concepts
Sep 25, 2026
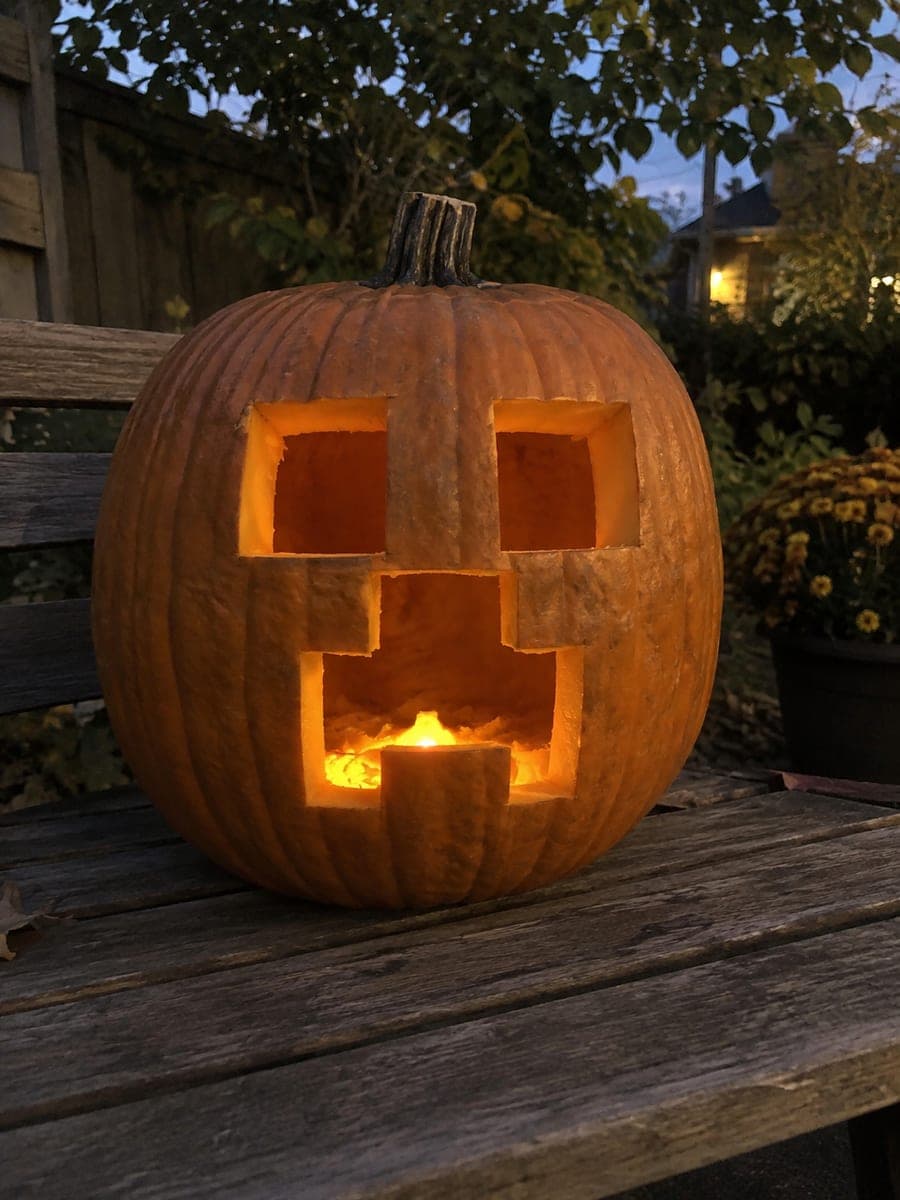
Easy Minecraft Creeper Face Jack-O-LanternAI
0

Report this carving

Tell us what is wrong. Reports are private.

Easy Minecraft Creeper Face Jack-O-Lantern

Two square eye holes and one pixel-stepped frown are all you need to nail the Creeper's face on this easy Minecraft pumpkin carving idea. Because every cut is a simple rectangle with no inner floating pieces, this design is a great starting point for younger carvers. Trace the squares with a ruler and marker before cutting for clean, even edges. The geometric glow looks especially sharp displayed on a dark shelf or step.

No ratings yet · Sign in to rate
Comments (0)

  • No comments yet — be the first.

Save without an account. Sign in to like or comment.

Our tips for carving a similar design

The Creeper's face is deliberately simple: two equal square eye holes and one broad pixel-stepped frown with no inner floating pieces. Because every element is a plain rectangle, this design removes almost all technical challenge from the cutting and lets younger or first-time carvers build confidence. Tracing the squares with a ruler before cutting produces the clean, even edges that make the pixel look sharp.

From pumpkin to porch

  1. Hollow the pumpkin

    Pick a pumpkin with a relatively flat front face so the square cuts sit at a consistent angle across the surface. Hollow from the base to about 1 inch of wall thickness. Round pumpkins can distort the apparent squareness of the cuts when viewed head-on, so a flatter face profile helps the geometric design read accurately.

  2. Mark the squares with a ruler

    Using a ruler and a marker, draw two equal squares for the eyes side by side, centered on the upper third of the face. Measure the spacing between them so they are separated by a gap equal to roughly one eye width. Draw the pixel-stepped frown below with a ruler, making each step a consistent width. Straight ruler lines make a genuine difference in the crispness of the final pixel glow.

  3. Cut the eye squares first

    Use a detail blade to score each side of both squares before cutting fully through. Work one side at a time rather than pushing through corners, which avoids tearing. Cut both eye squares fully before touching the frown shape. Removing the eye pieces cleanly sets the proportional reference for the frown below.

  4. Cut the pixel-stepped frown

    The frown is a single opening with stepped notches at the top representing the Creeper's pixel mouth shape. Cut the outer boundary of the frown first, then carefully cut the step notches inward from the main opening. Use a ruler to keep the steps straight. Because this is one connected opening with no inner islands, there is no floating piece risk.

  5. Clean up edges with a detail blade

    Run the detail blade lightly along each cut edge to trim any ragged rind fibers that blunt the sharp pixel appearance. Work from inside the opening toward the retained rind to avoid tearing. A clean straight edge is the difference between a crisp Minecraft look and a generic jack-o-lantern.

  6. Light and display on a dark background

    Insert an LED inside and display on a dark shelf, step, or railing where the geometric glow stands out. The squared pixel shapes look especially sharp when viewed straight on. Rub cut edges with petroleum jelly and replace the LED before the display season ends if it dims. A bright white LED maximizes the crisp pixel effect.

Written with AI to match this design

Gather your supplies

Check things off as you get ready.

Work on a stable surface, keep your free hand out of the cutting path, and have an adult handle sharp tools.

Three levels of light

  • Leave intact

    The full face panel surrounding the two eyes and the frown stays dark green-orange rind.

  • Peel & shade

    None, this design is entirely simple through-cuts.

  • Cut through

    Both square eye holes and the pixel-stepped frown glow fully through for a bright pixel display.

Learn the carving basics

Before you start cutting

How do I make the square corners look sharp rather than rounded?

Score each corner point with the tip of the detail blade before cutting the adjacent sides, which pre-cuts the corner intersection and prevents rounding. When the two side cuts meet at a corner, stop each cut exactly at the scored corner mark rather than overshooting. A fresh, sharp blade makes noticeably cleaner corners than a dull one.

My frown steps came out uneven. How do I fix them?

Trim the narrower steps slightly wider to match the broader ones, since you can always remove more rind but cannot add it back. Make the adjustment from inside the opening using the tip of a detail blade, shaving a thin layer of rind from the step edge until the steps look consistent. Work in very small increments.

Can I paint the pumpkin green to look more like a real Creeper before carving?

Yes, painting the front face green with acrylic before transferring the stencil and cutting is a popular enhancement. Apply two thin coats of green, let them dry fully, then transfer the stencil and cut normally. The green paint on the retained rind panels makes the Creeper face recognizable even in daylight when the LED is off.

Your take belongs here, too.

Changed a detail? Made it simpler? Share a photo of your version and tell the community what worked.

Share your pumpkin

More pumpkins like this

You've reached the end · 8 pumpkins
The Patch Report

Fresh pumpkins, in your inbox.

The best new carvings, ideas worth stealing, and how-tos for carving season. Short, seasonal, and gone by November.

A short email during carving season. Unsubscribe anytime. See our privacy policy.