Halloween Pumpkin Carving Contest · Starts October 1st · $500 in prizes
← Back to ideas
@ai_concepts
Sep 25, 2026
Fortnite Battle Bus Pumpkin With Balloon PanelsAI
0

Report this carving

Tell us what is wrong. Reports are private.

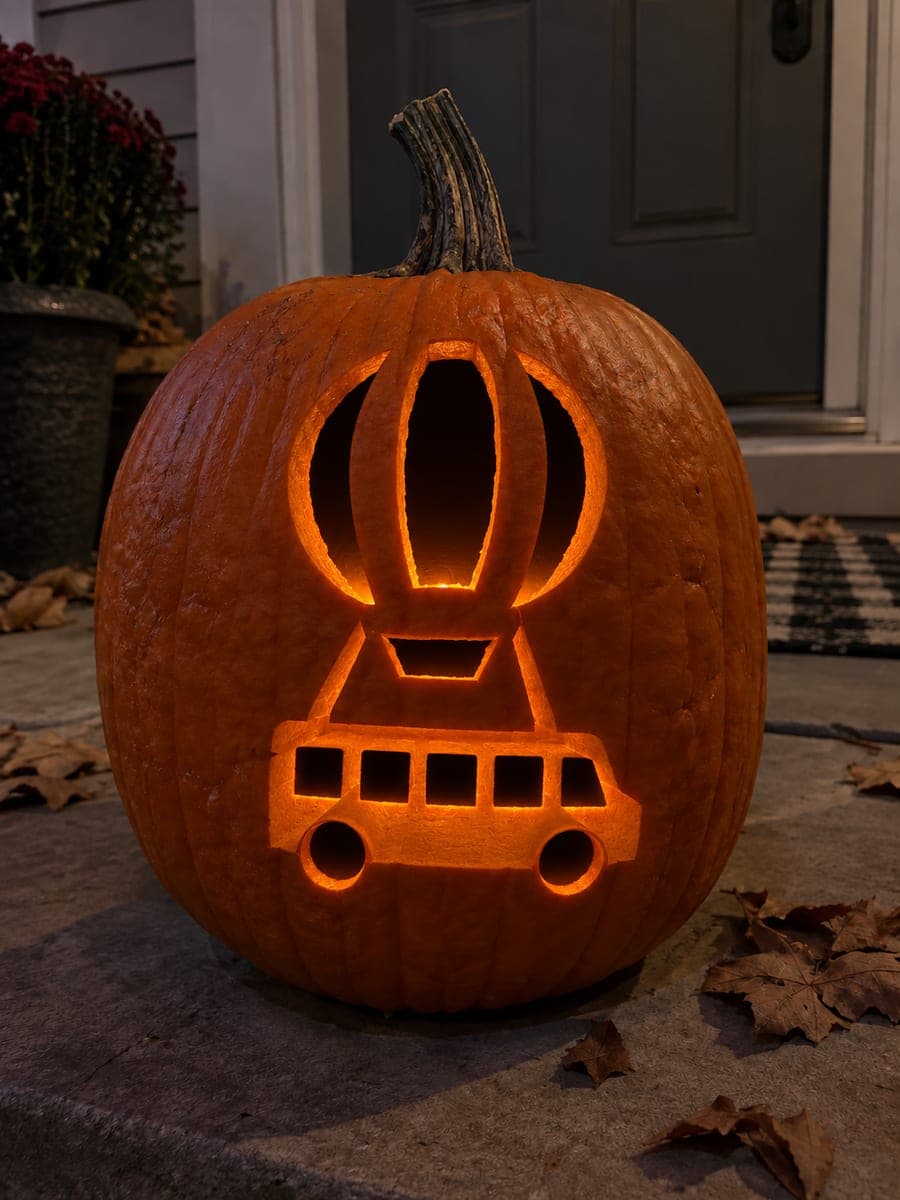
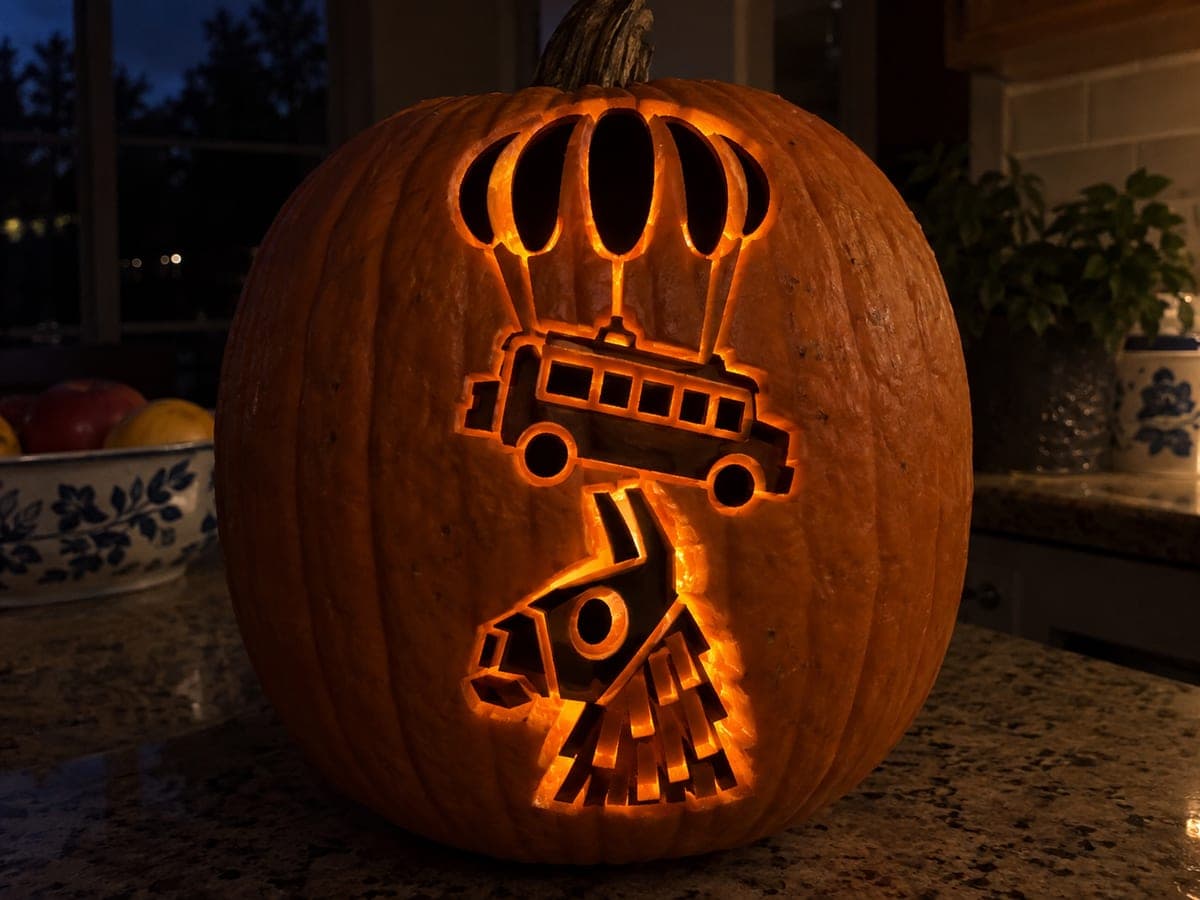
Fortnite Battle Bus Pumpkin With Balloon Panels

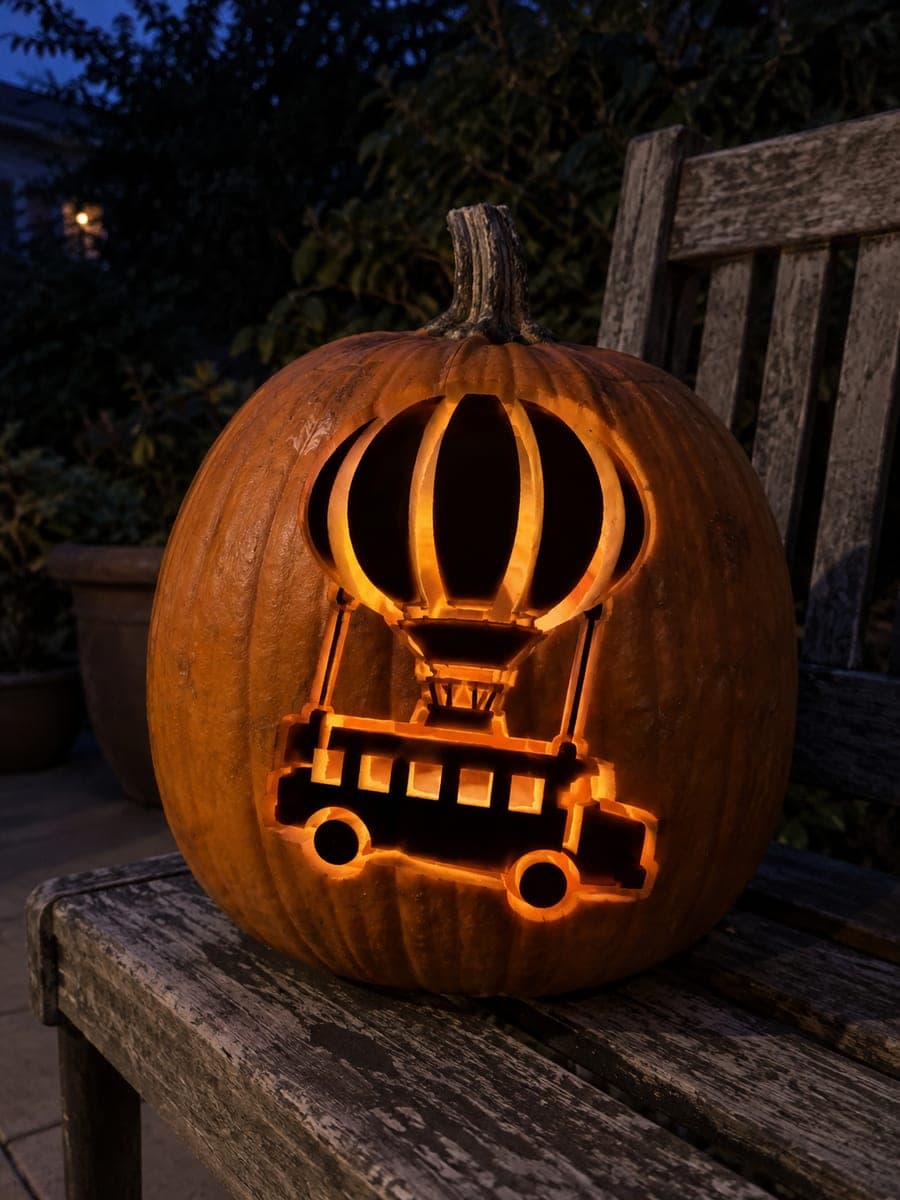
This easy fortnite pumpkin carving recreates the iconic Battle Bus with three hollow balloon panels separated by broad rind ribs, plus open bus windows and wheel holes that glow warmly from inside. Cut the balloon panel openings first, keeping the ribs between them at least half an inch wide so nothing collapses. Because the bus body and suspension are backed rather than fully open, the overall shape reads even in low-porch lighting.

No ratings yet · Sign in to rate
Comments (0)

  • No comments yet — be the first.

Save without an account. Sign in to like or comment.

Our tips for carving a similar design

Three hollow balloon panel openings separated by broad rind ribs are the visual core of this design, with open bus windows and wheel holes adding detail below. The bus body and suspension are backed rather than fully cut, so the overall shape reads even in low-light conditions. Cutting the balloon panels first establishes the spacing and keeps the ribs wide and safe.

From pumpkin to porch

  1. Prep and gut the pumpkin

    Bottom-cut and gut the pumpkin, scraping the interior walls to about an inch thick. The balloon panels are wide openings and benefit from a thin, even wall for bright, clean glow. Dry the interior before transferring the stencil.

  2. Transfer the Battle Bus stencil

    Pin-poke the stencil onto the pumpkin face, clearly marking the three balloon panel openings, the bus window shapes, wheel holes, and the backed body zones. Use two different marker colors to distinguish cut zones from scrape zones before lifting the stencil.

  3. Cut the three balloon panels

    Open each balloon panel as a full hollow cut, starting with the center panel and working outward. Keep the ribs between panels at least half an inch wide. Cut with a pumpkin saw using smooth, arcing strokes to follow the curved balloon edges cleanly.

  4. Cut the bus windows and wheel holes

    Open the rectangular bus window shapes and small round wheel holes as full cuts. For the windows, use a sharp pointed knife to score the corners before sawing to prevent tearing. Keep each wheel hole circular by rotating the blade rather than sawing back and forth.

  5. Scrape the bus body and suspension

    Switch to a flat gouge to shallow-back the bus body outlines and suspension details, keeping a consistent 3-millimeter depth. These backed sections add visible bus shape around the bright openings and give the finished piece dimension even before it is lit.

  6. Light and display

    Insert an LED tea light through the bottom opening and position it so light spreads evenly across all three balloon panels. The panels should glow at equal brightness. Display on an elevated surface so the wheel holes and windows are visible at eye level.

Written with AI to match this design

Gather your supplies

Check things off as you get ready.

Work on a stable surface, keep your free hand out of the cutting path, and have an adult handle sharp tools.

Three levels of light

  • Leave intact

    The outer bus frame and rib areas stay fully dark, defining the rectangular bus shape.

  • Peel & shade

    The bus body panels and suspension details are shallow-backed for a mid-glow.

  • Cut through

    The three balloon panels, bus windows, and wheel holes are cut fully through for the brightest glow.

Learn the carving basics

Before you start cutting

The ribs between the balloon panels look thinner after I made the cuts. Is the design still safe?

If the ribs are at least a half inch wide they should hold safely for the display period. Coat the cut edges with petroleum jelly to slow moisture loss and reduce shrinkage-related cracking. Avoid picking up the pumpkin by the carved face, and always lift from the bottom to reduce stress on the ribs.

My wheel holes came out oval instead of circular. How do I fix them?

Score a perfect circle with a compass tool or round cookie cutter pressed into the rind before cutting to give yourself a clean guide line. If the hole is already cut oval, carefully trim one side to restore symmetry, removing only a thin sliver at a time. A slightly imperfect wheel hole is not very noticeable once the pumpkin is lit.

Can I add color to the balloon panels by placing colored cellophane inside?

Yes, taping colored cellophane to the inside of the pumpkin behind each panel is an easy way to give each balloon a different hue. Use low-tack painter's tape to hold the cellophane flat against the interior rind without puncturing the wall. Blue and yellow panels reading together look especially close to the in-game Battle Bus design.

Your take belongs here, too.

Changed a detail? Made it simpler? Share a photo of your version and tell the community what worked.

Share your pumpkin

More pumpkins like this

You've reached the end · 8 pumpkins
The Patch Report

Fresh pumpkins, in your inbox.

The best new carvings, ideas worth stealing, and how-tos for carving season. Short, seasonal, and gone by November.

A short email during carving season. Unsubscribe anytime. See our privacy policy.