The 2026 contest winners are inGrand Prize, People's Choice and Most Creative, all crowned.
@ai_concepts
Sep 25, 2026
Roblox Tilted Logo Jack-O-Lantern pumpkin carvingAI
0

Report this carving

Tell us what is wrong. Reports are private.

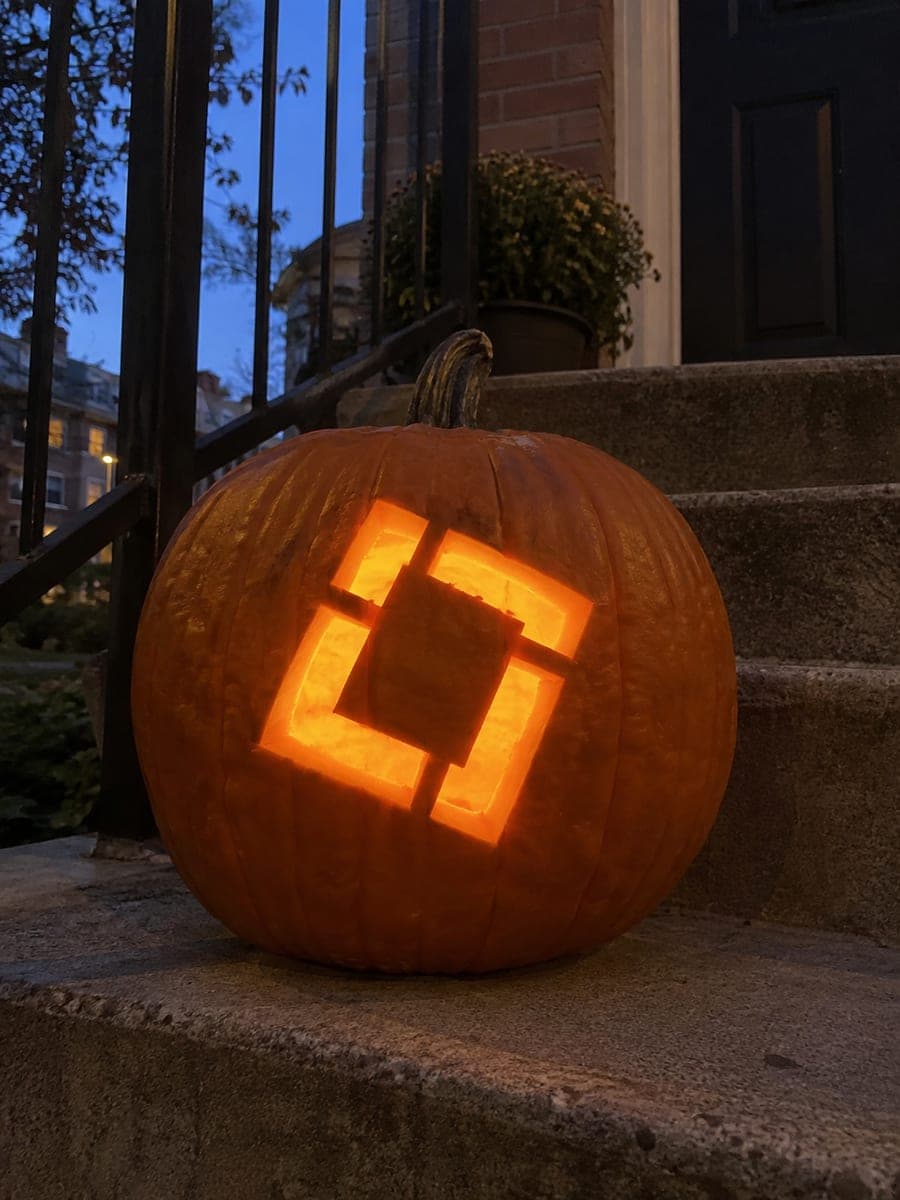
Roblox Tilted Logo Jack-O-Lantern

This easy roblox pumpkin carving cuts four separated trapezoid openings to form the iconic tilted square logo, leaving four wide corner roots that keep the center of the design securely attached. Because each trapezoid is its own simple shape, this is a great pumpkin carving idea for beginners who want recognizable results quickly. Place the finished pumpkin on concrete steps where multiple sides catch the light for maximum glow.

No ratings yet · Sign in to rate
EasyFantasyCuteClassic Cutout
robloxfantasyvideo-gamecuteeasylogotrapezoidtilted-square

Save this design for carving night, then share a photo of your own jack-o'-lantern once it's glowing.

Roblox and all related characters, names, logos, and trademarks are the property of their respective owners. This is an unofficial fan carving shared by our community for inspiration only. PumpkinCarvingIdeas.com is not affiliated with, sponsored by, or endorsed by any rights holder or person depicted, and no such connection is implied.

Comments (0)

  • No comments yet. Be the first.

Our tips for carving a similar design

Four separated trapezoid openings arranged at a tilt form the Roblox logo, with four wide corner roots keeping the center rind securely attached. Each trapezoid is a simple, individually cut shape, so beginners can tackle one at a time without feeling overwhelmed. Placing the pumpkin on concrete steps where multiple sides catch ambient light maximizes the overall glow effect.

From pumpkin to porch

  1. Prep and gut the pumpkin

    Bottom-cut and gut the pumpkin, scraping the interior walls to about an inch thick throughout the face area. Even wall thickness ensures all four trapezoid openings glow at the same brightness. Dry the interior before transferring your stencil.

  2. Transfer your logo stencil

    Pin-poke your tilted square logo stencil, marking each of the four trapezoid positions and their corner root borders clearly. The four roots are the structural anchors and need to be marked as wide, untouched zones. Connect all poke marks with a felt-tip pen before removing your stencil.

  3. Cut the first trapezoid

    Begin with the top trapezoid since it is the easiest to reach and orients the design. Cut slowly along each straight side, using the blade tip to score corners before sawing the sides to prevent over-cutting. Remove the trapezoid piece and check that the root alongside it remains wide and intact.

  4. Cut the remaining three trapezoids

    Work around the logo cutting each of the remaining three trapezoids in turn, keeping the corner roots at their full marked width throughout. Pause after each cut to check that the center of the design, held by all four roots, is still firmly attached. Tidy each opening with a small knife before moving to the next.

  5. Clean all the edges

    Go around each opening with a flat-bladed knife or sandpaper folded into a strip to smooth any rough cuts. Straight-sided trapezoid cuts benefit most from smooth edges since any wavering is immediately visible when lit. Wipe away all debris from the interior.

  6. Display on concrete steps

    Place an LED tea light inside through the bottom opening and set the pumpkin on a step where the logo faces the street. The glowing tilted square will be recognizable from a surprising distance because the simple four-trapezoid shape is so bold. Photograph from straight on to frame all four openings symmetrically.

Written with AI to match this design

Gather your supplies

Check things off as you get ready.

Work on a stable surface, keep your free hand out of the cutting path, and have an adult handle sharp tools.

Three levels of light

  • Leave intact

    The four corner roots and the center rind zone stay fully dark, holding the logo's negative space.

  • Peel & shade

    None required for this all-cutout design.

  • Cut through

    All four trapezoid openings are cut fully through for a bright, even logo glow.

Learn the carving basics

Before you start cutting

How do I get the four trapezoids evenly sized and spaced on a rounded surface?

Print your stencil at the correct scale for your pumpkin size before transferring it. If sizing by eye, use a ruler to confirm all four trapezoids measure the same width at their widest point before pin-poking. Uneven trapezoids throw the tilt of the whole logo off, so a home-printed stencil is strongly recommended.

The corner roots look very narrow after cutting. Is the design stable?

Corner roots of at least a half inch in each direction are safe for a week-long display. If any root looks thinner than that, coat the exposed cut edges on both sides with petroleum jelly to slow drying and reduce the chance of cracking. Handle the pumpkin by the base and avoid pressing on the carved face.

Can I add the word 'Roblox' below the tilted logo on the same pumpkin?

Shallow-backed lettering below the logo openings is possible and adds character recognition. Use a narrow gouge to etch each letter at a consistent depth without breaking through the rind. Keep the letters large, at least 2 centimeters tall, so they glow visibly. Fully cutting letter shapes is more difficult because letters have corners that crack easily.

Your take belongs here, too.

Changed a detail? Made it simpler? Share a photo of your version and tell the community what worked.

Share your pumpkin

Want more designs like this? Browse our full library of pumpkin carving ideas, or pick a free printable stencil. Every pattern and template in our own collection is free to print at home.

More pumpkins like this

You've reached the end · 8 pumpkins
The Patch Report

Fresh pumpkins, in your inbox.

The best new carvings, ideas worth stealing, and how-tos for carving season. Short, seasonal, and gone by November.

A short email during carving season. Unsubscribe anytime. See our privacy policy.