The 2026 contest winners are inGrand Prize, People's Choice and Most Creative, all crowned.
@ai_concepts
Sep 25, 2026
Painted Fortnite Supply Llama PumpkinAI
0

Report this carving

Tell us what is wrong. Reports are private.

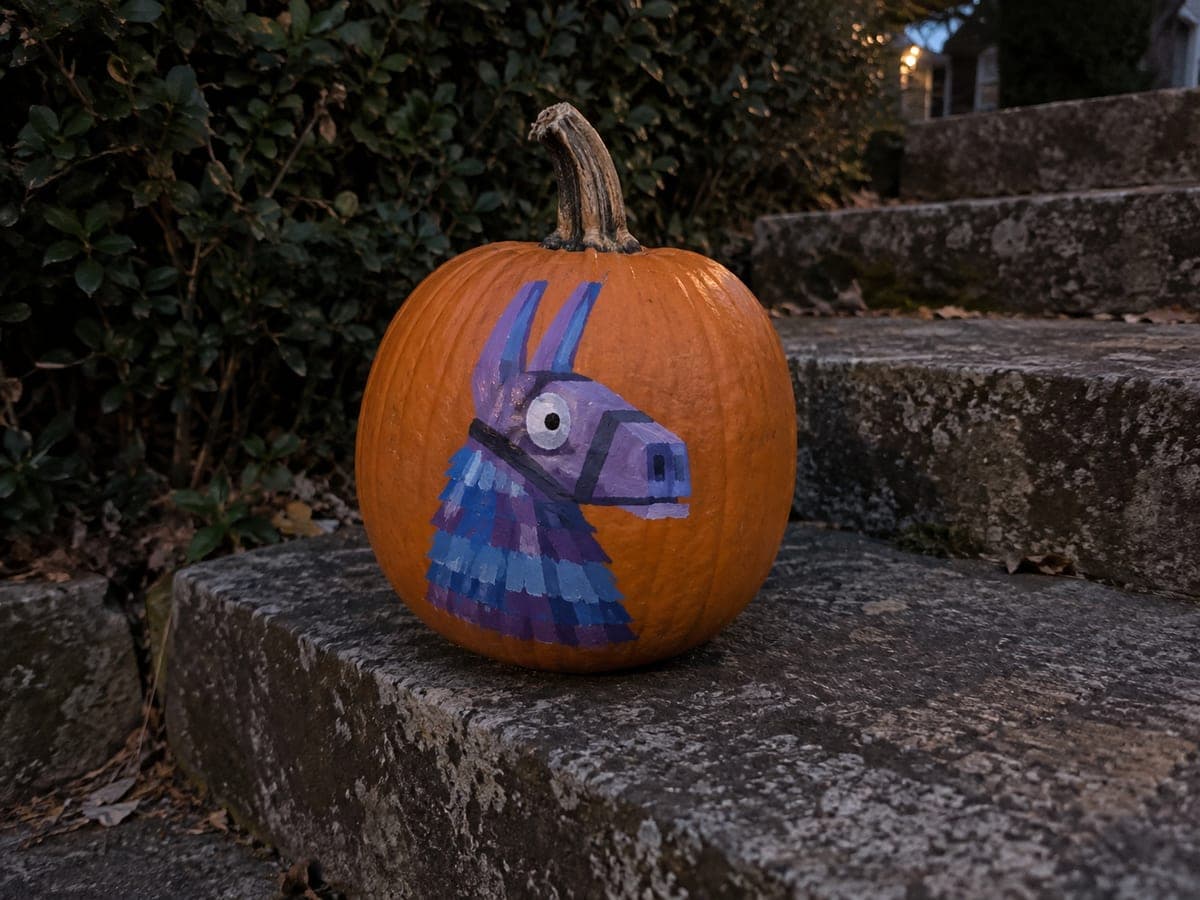
Painted Fortnite Supply Llama Pumpkin

This no-carve fortnite pumpkin idea brings the supply llama to life with flat purple and blue paint, capturing the boxlike muzzle, tall ears, white eye, and broad fringe stripes on an intact gourd. Sketch the geometric head lightly in pencil first so the boxy proportions stay accurate before committing with paint. Finishing with a clear matte coat protects the flat color work and prevents the purple from chalking over time.

No ratings yet · Sign in to rate
fortnitefantasyno-carvevideo-gamecuteeasysupply-llamapainted

Save this design for carving night, then share a photo of your own jack-o'-lantern once it's glowing.

Fortnite and all related characters, names, logos, and trademarks are the property of their respective owners. This is an unofficial fan carving shared by our community for inspiration only. PumpkinCarvingIdeas.com is not affiliated with, sponsored by, or endorsed by any rights holder or person depicted, and no such connection is implied.
Comments (0)

  • No comments yet. Be the first.

Our tips for carving a similar design

The geometric boxlike head and tall ears of the supply llama translate naturally to flat acrylic paint on an intact rind. Sketching the boxy proportions in pencil first is the key preparation step, since the llama's distinctive squared muzzle and tall rectangular ears are harder to freehand than organic animal shapes. A clear matte coat at the end keeps the purple vibrant through the season.

From pumpkin to porch

  1. Clean and dry the pumpkin

    Wipe the surface with a damp cloth and let it dry completely. Choose the flattest face for the painted design. A small piece of fine sandpaper lightly rubbed over the painting area smooths out surface ridges and helps the paint adhere evenly.

  2. Sketch the geometric head and ears

    Pencil in a large rectangular head with squared lower corners for the muzzle area. Add two tall rectangular ears above the head, slightly tapering toward their tips. Mark the large white eye circle on the right side of the face, and sketch the broad fringe stripe lines across the body. The geometry is the character, so spend extra time getting the proportions right before painting.

  3. Apply the purple base coat

    Fill the entire head and ear shapes with flat purple acrylic using a wide flat brush. Use two thin coats for full coverage, letting the first coat dry before the second. Keep the edges of the rectangular shapes as straight as possible by painting along a ruler edge for the vertical sides.

  4. Add the blue accents and fringe stripes

    Switch to a medium round brush and paint the blue saddle area and broad fringe stripes across the head and ears. Paint each fringe stripe as a simple thick horizontal band, slightly wider at the top than the bottom. Let the blue dry before painting adjacent stripes to prevent bleed.

  5. Paint the muzzle box and eye

    Fill the squared muzzle area with a lighter blue-gray tone to set it apart from the main head. Add the large white eye circle, let it dry, then place a small black pupil at the center. The white eye on the boxy head immediately reads as the supply llama to any Fortnite fan.

  6. Seal with matte coat

    Allow all layers to cure for at least an hour, then apply two light passes of matte sealer spray, letting the first coat dry for 10 minutes before the second. The matte finish is important here, as a gloss coat can shift the purple toward a candy tone that looks less accurate to the in-game design.

Written with AI to match this design

Gather your supplies

Check things off as you get ready.

Work on a stable surface, keep your free hand out of the cutting path, and have an adult handle sharp tools.

Three levels of light

  • Leave intact

    The natural orange rind outside the painted head stays untouched.

  • Peel & shade

    None, the pumpkin shell is fully intact.

  • Cut through

    None, use an external porch lamp or spotlight directed at the painted face.

Learn the carving basics

Before you start cutting

How do I get straight lines for the fringe stripes without a ruler?

Painter's tape applied in parallel strips makes clean, straight fringe lines with no brushwork skill required. Press the tape firmly along each stripe border, paint over it, then peel it off immediately while the paint is still slightly wet for the crispest edge. Work from top to bottom so tape on a wet stripe below does not lift fresh paint.

The purple paint looks streaky over the orange rind. How do I get solid coverage?

Apply a thin white undercoat over the entire head area first and let it dry completely. The white base blocks the orange from showing through and makes the purple dramatically more opaque in just one coat. This extra step saves time compared to trying to build up the purple alone to full opacity.

Can I add the saddle tassels and other small details without a liner brush?

A fine-point paint marker works very well for small tassels, dot accents, and thin outline details on an already-painted surface. Choose a water-based paint marker so it does not react with the acrylic layers beneath. Test the marker tip on a paper towel first to confirm it is flowing cleanly before touching the pumpkin.

Your take belongs here, too.

Changed a detail? Made it simpler? Share a photo of your version and tell the community what worked.

Share your pumpkin

Want more designs like this? Browse our full library of pumpkin carving ideas, or pick a free printable stencil. Every pattern and template in our own collection is free to print at home.

More pumpkins like this

You've reached the end · 8 pumpkins
The Patch Report

Fresh pumpkins, in your inbox.

The best new carvings, ideas worth stealing, and how-tos for carving season. Short, seasonal, and gone by November.

A short email during carving season. Unsubscribe anytime. See our privacy policy.