Halloween Pumpkin Carving Contest · Starts October 1st · $500 in prizes
← Back to ideas
@ai_concepts
Aug 14, 2026
Golf Club and Ball No-Carve Painted PumpkinAI
0

Golf Club and Ball No-Carve Painted Pumpkin

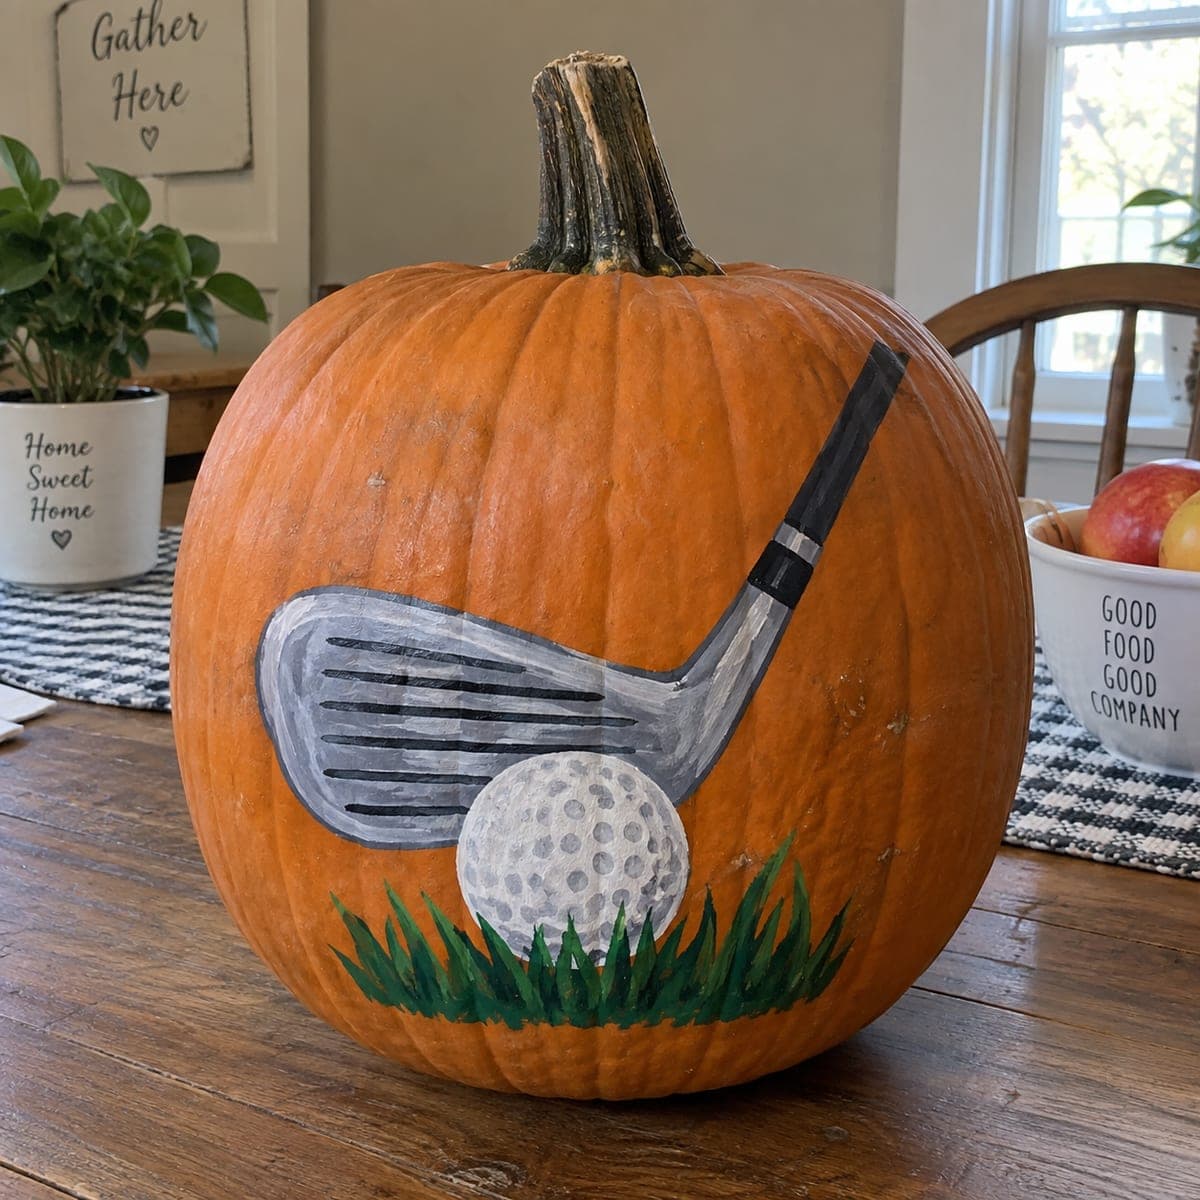
A painted iron golf club at address behind a white golf ball resting on a tuft of green grass makes this a standout no-carve pumpkin idea for sports fans. Acrylic craft paints applied with a medium flat brush let you build up the metallic club face and dimpled ball surface without any carving tools. Paint the grass first, then the ball, and finish with the silver club head using a small detail brush for the grooves. This pumpkin holds up for weeks and works beautifully as a fall mantel decoration or office desk display.

This is an AI-generated concept image: a realistic, carvable design idea rather than a photo of a finished carve. AI concepts are always labeled and sit out the leaderboard and the contest.

No ratings yet · Sign in to rate
Comments (0)

  • No comments yet — be the first.

Save without an account. Sign in to like or comment.

Our tips for carving a similar design

The whole trick here is layering flat opaque acrylics so a metallic club head and a dimpled white ball read clearly against the orange skin. Since nothing gets cut, you build the image in order from back to front, letting each color dry before the next. Work biggest shapes first and save the thin grooves and dimples for a small detail brush at the end.

Written by PumpkinCarvingIdeas.com, inspired by the image above. These are our suggestions, not instructions from the uploader. This approach to the AI concept has not been tested on a real pumpkin.

From pumpkin to porch

  1. Clean and sketch

    Wipe the pumpkin with a damp cloth and let it dry fully so paint grips the skin. Lightly pencil in the three main shapes: a low band of grass, the round ball sitting in it, and the angled club head with its shaft rising toward the upper right. Keep the ball centered near the base and let the shaft run off the side. A soft pencil line brushes off easily if you want to reposition.

  2. Paint the grass base

    Load a medium flat brush with green and lay in a ragged band across the bottom. Pull short upward strokes to make blade tips, mixing a darker and lighter green so it looks layered. This sits behind the ball, so extend it a little past where the ball will go. Let it dry completely before moving on.

  3. Block the white ball

    Paint a solid white circle overlapping the top edge of the grass so the ball looks like it rests in it. Give it two coats for full coverage, drying between each. Once dry, dab a slightly gray white in soft rows to suggest the dimpled surface, keeping one side lighter as a highlight. Do not outline every dimple, just hint at the pattern.

  4. Build the silver club head

    Mix a light gray and block in the wedge shaped head angled behind the ball. Add a lighter gray or white streak along the top for a metal shine and a darker gray along the bottom edge for depth. Let it dry, then switch to a small detail brush and paint the thin horizontal groove lines across the face. Keep the grooves evenly spaced and parallel.

  5. Add the shaft and finish

    Paint the gray shaft rising off the upper corner of the club head, then add the black grip near the top with a thin white band across it. Touch up any wobbly edges and let everything cure for a few hours. Seal with a clear matte spray if you want it to last for weeks. Set it on a mantel or desk and snap your photo in good daylight.

Gather your supplies

Check things off as you get ready.

Work on a stable surface, keep your free hand out of the cutting path, and have an adult handle sharp tools.

Three levels of light

  • Leave intact

    The bare orange pumpkin skin around the design stays untouched as the background.

  • Peel & shade

    If you want a subtle glow, you could lightly skin-peel a thin halo behind the ball so it appears backlit at dusk.

  • Cut through

    This is a no-carve design, so nothing is cut through, but a small vent hole hidden near the back would let you drop in an LED for gentle evening light.

Learn the carving basics

Before you start cutting

Do I need to carve anything for this design?

No, this is a fully painted pumpkin. All the detail comes from layered acrylic craft paint, so you only need brushes and a clean dry pumpkin. That makes it a great low-mess project for kids or a shared table.

How do I keep the club head looking metallic?

Start with a flat medium gray, then add a lighter gray or white streak along the top edge and a darker gray along the bottom. That contrast between light and shadow is what tricks the eye into seeing polished metal. A thin black outline around the head sharpens it further.

Will the paint last through the season?

Acrylic on a clean pumpkin can hold up for several weeks indoors. Let each layer dry fully and finish with a light coat of clear matte sealer to protect against scuffs and moisture. Keep it out of direct sun and off cold porches for the longest life.

Your take belongs here, too.

Changed a detail? Made it simpler? Share a photo of your version and tell the community what worked.

Share your pumpkin

More pumpkins like this

You've reached the end · 8 pumpkins
The Patch Report

Fresh pumpkins, in your inbox.

The best new carvings, ideas worth stealing, and how-tos for carving season. Short, seasonal, and gone by November.

A short email during carving season. Unsubscribe anytime. See our privacy policy.