Halloween Pumpkin Carving Contest · Starts October 1st · $500 in prizes
← Back to ideas
@ai_concepts
Aug 5, 2026
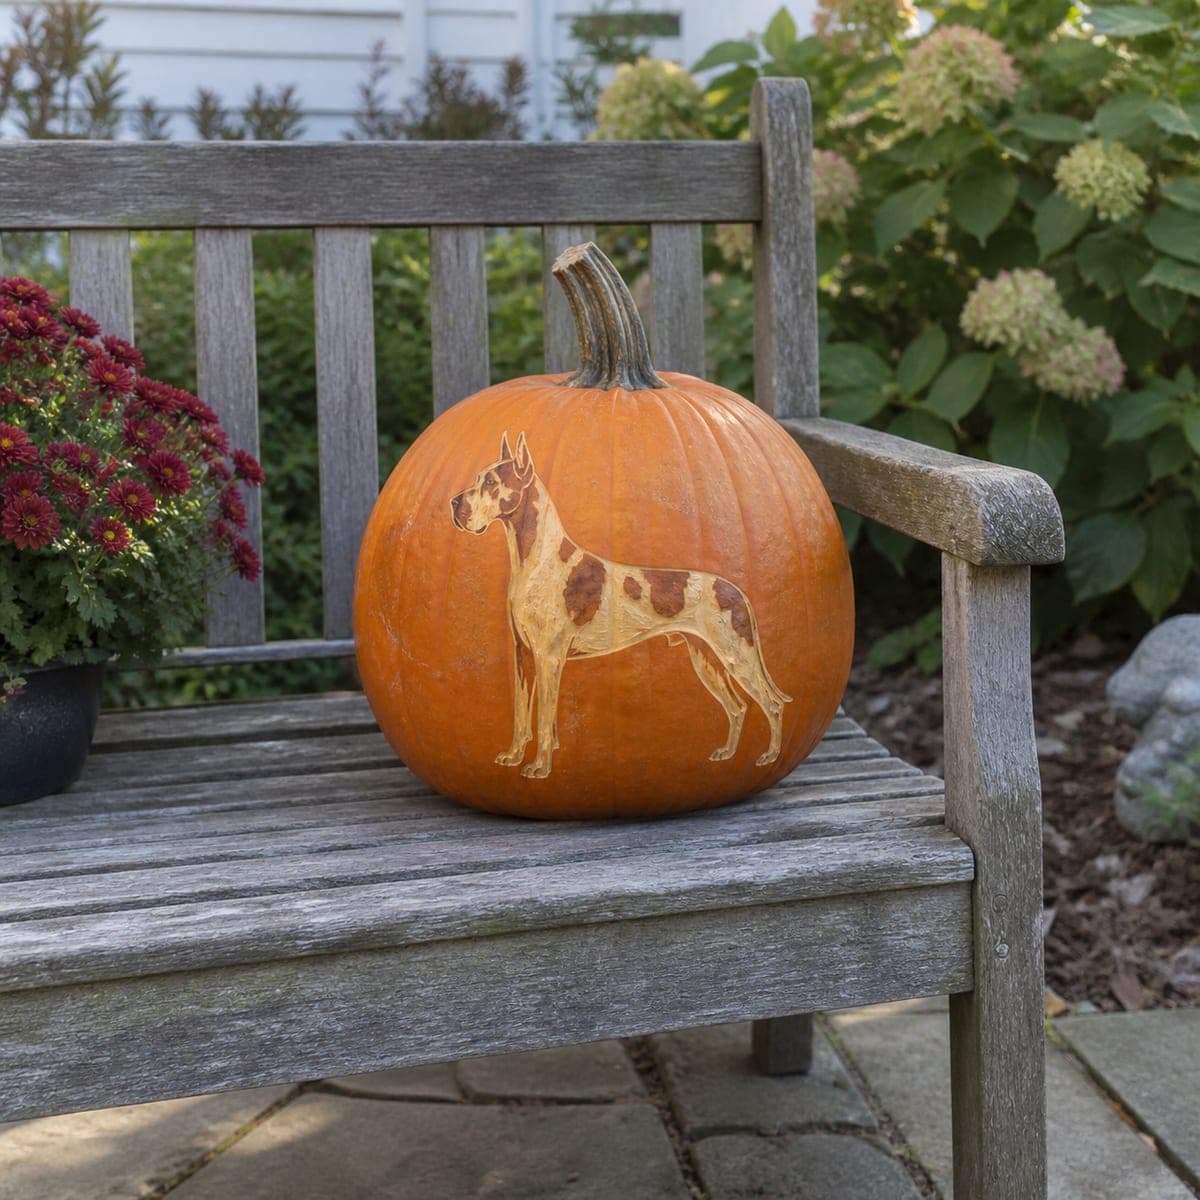
Great Dane Painted Pumpkin for Dog LoversAI
0

Great Dane Painted Pumpkin for Dog Lovers

A stately Great Dane in full show stance, complete with fawn patches and cropped ears, turns this pumpkin into daytime porch art. Because it is a painted no-carve pumpkin, it will last for weeks on a bench or entry table. Chalk the outline, block the white base coat, then dab the patches with a small sponge for soft edges, and set it somewhere the profile reads from the street.

This is an AI-generated concept image: a realistic, carvable design idea rather than a photo of a finished carve. AI concepts are always labeled and sit out the leaderboard and the contest.

No ratings yet · Sign in to rate
Comments (0)

  • No comments yet — be the first.

Save without an account. Sign in to like or comment.

Our tips for carving a similar design

The core trick here is painting rather than carving, so the whole pumpkin stays intact and lasts for weeks. You block a smooth fawn base coat for the body, then dab darker patches with a small sponge for soft, natural edges. Keeping the dog in a full side profile makes the shape read clearly from the sidewalk.

Written by PumpkinCarvingIdeas.com, inspired by the image above. These are our suggestions, not instructions from the uploader. This approach to the AI concept has not been tested on a real pumpkin.

From pumpkin to porch

  1. Pick and clean your canvas

    Choose a tall, evenly colored pumpkin with a broad flat side facing out. Wipe the surface with a damp cloth and let it dry fully so paint grips well. A smooth panel gives the profile room to sit without wrapping around a rib. Set it on the bench or table where it will finally live so you can judge the viewing angle.

  2. Chalk the outline

    Sketch the Great Dane in profile with chalk or a washable pencil, starting with the back line, chest, and legs. Keep the cropped ears upright and the stance square so the dog looks stately. Chalk wipes off easily, so redraw until the proportions feel right. Step back a few feet to check that the shape reads at a distance.

  3. Block the base coat

    Fill the whole dog with a light fawn or cream acrylic using a flat brush. Let this first coat dry, then add a second coat for solid, even coverage. Painting the base fully before any detail keeps the patches from bleeding into thin spots. Keep a small brush handy to tidy the edges of the legs and muzzle.

  4. Dab the patches

    Once the base is dry, load a small sponge with brown paint, blot most of it off on a paper towel, and press gently to build the fawn or brindle patches. Soft dabbing gives the mottled coat its natural edges better than a brush would. Work from light to dark and let layers dry between passes. Add a few darker spots on the ears and back for depth.

  5. Add face and finishing details

    With a fine brush, paint the eye, nose, and a suggestion of the collar and toenails. Keep these marks small and dark so they pop against the pale coat. A thin outline along the back and legs sharpens the profile from the street. Seal with a clear matte spray to protect the paint from dew.

  6. Stage and photograph

    Place the finished pumpkin on a weathered bench or entry table with the dog facing the walkway. Add a potted mum or a few gourds nearby to frame it without hiding the profile. Because nothing is cut, it holds up for weeks in daytime light. Snap your photo in soft morning or late afternoon light for the truest color.

Gather your supplies

Check things off as you get ready.

Work on a stable surface, keep your free hand out of the cutting path, and have an adult handle sharp tools.

Three levels of light

  • Leave intact

    The bare orange pumpkin skin around the dog stays untouched as the background.

  • Peel & shade

    For a subtle glow option, lightly scrape the skin inside the coat before painting so evening backlight softly warms the body.

  • Cut through

    This is a no-carve design, so nothing is cut through; if you want night light, add a single small vent hole in the back out of view.

Learn the carving basics

Before you start cutting

Do I have to carve anything for this design?

No, this is a painted no-carve pumpkin, so the whole shell stays solid. That is what lets it last for weeks as daytime porch art. If you later want a nighttime glow, you can add a small hidden vent hole and an LED, but it is not needed for the look.

How do I get the soft mottled patches instead of hard edges?

Dab with a barely loaded sponge rather than painting solid shapes with a brush. Blot most of the paint off first, then build the patches in light layers. Working from light to dark keeps the coat looking natural and blended.

Will the paint hold up outside?

Acrylic on a clean, dry pumpkin is fairly durable, and a clear matte sealer helps it shrug off morning dew. Keep the pumpkin out of direct rain and off hot pavement to extend its life. Under a covered porch it can stay looking sharp for several weeks.

Your take belongs here, too.

Changed a detail? Made it simpler? Share a photo of your version and tell the community what worked.

Share your pumpkin

More pumpkins like this

You've reached the end · 8 pumpkins
The Patch Report

Fresh pumpkins, in your inbox.

The best new carvings, ideas worth stealing, and how-tos for carving season. Short, seasonal, and gone by November.

A short email during carving season. Unsubscribe anytime. See our privacy policy.