Halloween Pumpkin Carving Contest · Starts October 1st · $500 in prizes
← Back to ideas
@ai_concepts
Aug 25, 2026
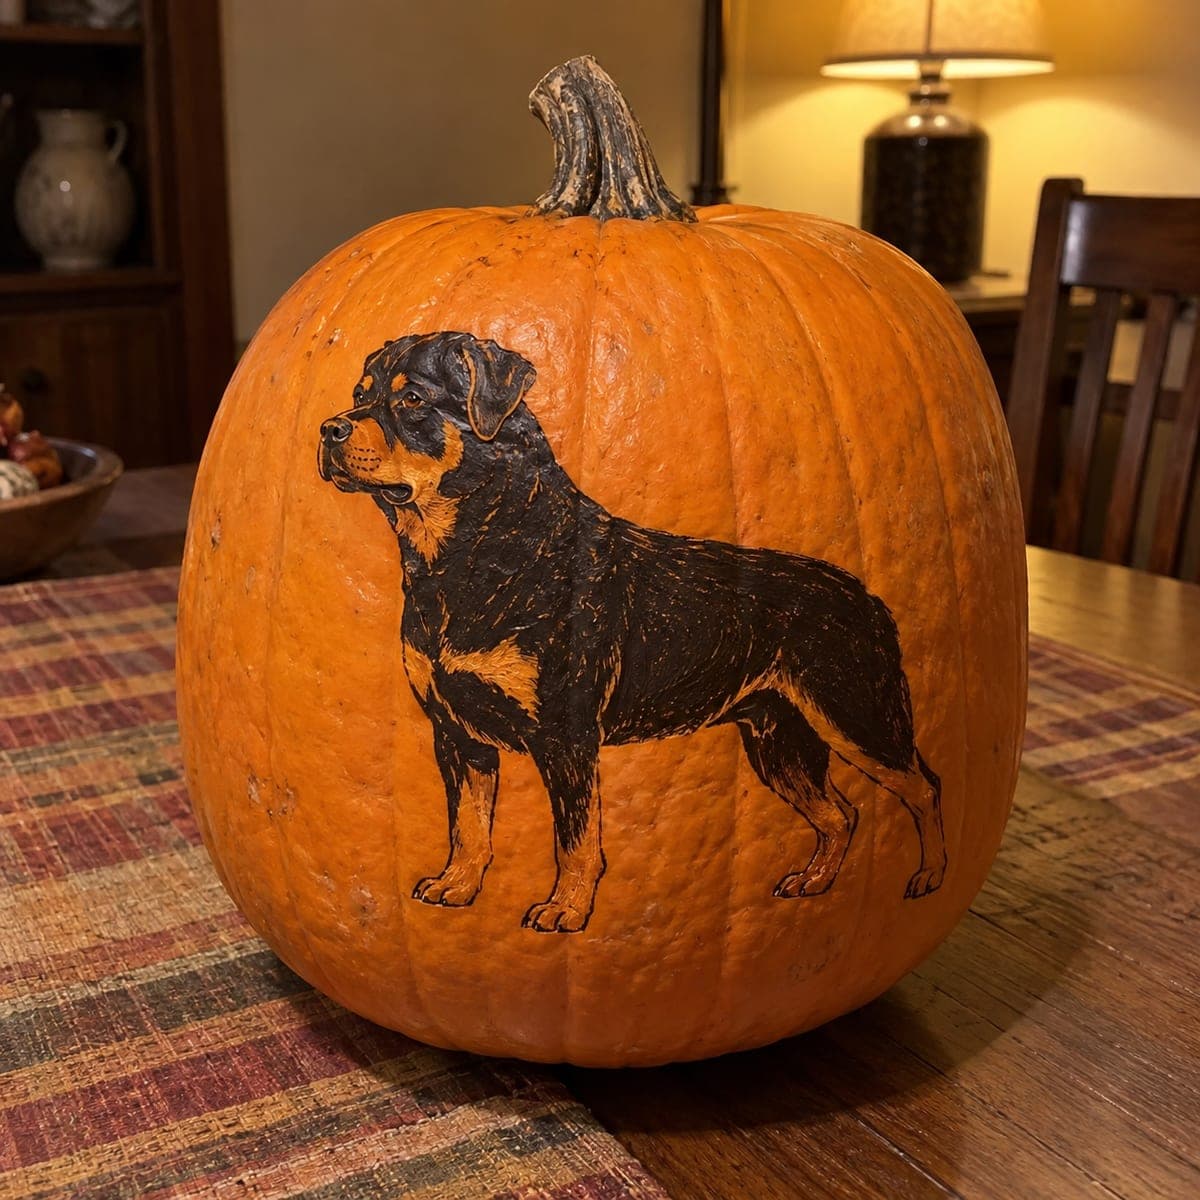
Rottweiler Standing Painted Pumpkin PortraitAI
0

Rottweiler Standing Painted Pumpkin Portrait

A rottweiler stands at attention in full profile on this pumpkin, painted in glossy black with the breed's rust markings on the muzzle, chest, and legs picked out precisely. Fine ink-like linework defines the muscle contours and coat sheen, so use a liner brush over the dried black base rather than trying to paint details wet-on-wet. Position the dog slightly off-center so the stem reads like a tree behind it. This no-carve portrait keeps for weeks on an entry table.

This is an AI-generated concept image: a realistic, carvable design idea rather than a photo of a finished carve. AI concepts are always labeled and sit out the leaderboard and the contest.

No ratings yet · Sign in to rate

Comments (0)

  • No comments yet — be the first.

Save without an account. Sign in to like or comment.

Our tips for carving a similar design

The core trick here is building the dog in layers: a solid dried black base first, then rust markings, and finally fine ink-like linework with a liner brush for the muscle and coat sheen. Because this is a no-carve design, all your effort goes into clean edges and letting each paint coat dry before the next. Place the dog slightly off-center so the pumpkin stem reads like a tree standing behind it.

Written by PumpkinCarvingIdeas.com, inspired by the image above. These are our suggestions, not instructions from the uploader. This approach to the AI concept has not been tested on a real pumpkin.

From pumpkin to porch

  1. Pick and prep a smooth pumpkin

    Choose a tall pumpkin with one broad, flat-ish side and few ribs so the profile sits cleanly. Wipe the skin down with a damp cloth and let it dry fully. A dry surface keeps paint from beading or lifting later. Set it on a towel so it does not roll while you work.

  2. Transfer the profile lightly

    Print a standing Rottweiler profile stencil sized to fill most of the flat side. Tape it in place and trace the outline with a pencil or a dull stylus, pressing just enough to leave a faint guide. Keep the dog off-center so the stem lands behind its back like a tree. Remove the paper and touch up any broken lines.

  3. Lay in the black base

    Fill the whole body with glossy black acrylic, staying inside your outline. Leave the muzzle, chest, and lower legs bare for now since those become rust markings. Let this first coat dry completely, then add a second coat for a deep, even black. Patience here is what makes the linework pop later.

  4. Add the rust markings

    Once the black is bone dry, paint the tan and rust areas on the cheeks, muzzle, chest, and legs with a smaller brush. Keep the border between black and rust crisp rather than blended. Let these dry fully before any detail work. Two thin coats read cleaner than one thick one.

  5. Detail with a liner brush

    Load a fine liner brush with thinned paint and add the coat sheen, muscle contours, and short fur strokes over the dried base. Work black-on-rust and light-on-black in short flicks that follow the direction the fur grows. Do not try to paint wet-on-wet, or the colors will muddy. A few highlight strokes in the eye and along the back bring the dog to life.

  6. Seal and stage the photo

    When everything is dry, brush on a clear matte or satin sealer to protect the paint on an entry table. Stand the pumpkin so the stem rises behind the dog's back. Add a small LED puck to one side for a warm glow, never a candle, since this pumpkin is closed and uncut. Snap your photo in soft side light to show off the sheen.

Gather your supplies

Check things off as you get ready.

Work on a stable surface, keep your free hand out of the cutting path, and have an adult handle sharp tools.

Three levels of light

  • Leave intact

    The bare orange skin around the dog stays untouched as the warm background and the stem reads as a tree.

  • Peel & shade

    No skin is peeled on this painted design, though you could lightly scuff a thin halo behind the dog for a soft glow if you want one.

  • Cut through

    Nothing is cut through since this is a no-carve portrait, so all brightness comes from an external LED rather than light passing through.

Learn the carving basics

Before you start cutting

Do I really have to wait for the black to dry before adding the rust and lines?

Yes, drying between layers is the whole secret to a clean portrait. If you paint rust or fine lines onto wet black, the colors blend into a muddy gray and the crisp edges disappear. Give each coat at least an hour, longer in humid rooms. It is slow but it is what makes the linework crisp.

How do I keep the fine fur strokes from looking blobby?

Thin your paint slightly with water so it flows off a liner brush, and wipe excess on a paper towel before each stroke. Use short, light flicks in the direction the fur grows rather than long drags. Practice a few strokes on scrap paper or the back of the pumpkin first. Less paint on the brush almost always looks better.

Will a painted pumpkin last long enough to display?

A sealed, uncut pumpkin can hold up for several weeks on an entry table since the skin is never opened. Keep it out of direct sun and away from heat, and wipe off any condensation. A coat of clear sealer over the dry paint protects your detail from smudges. This is one of the longest-lasting ways to show off a design.

Your take belongs here, too.

Changed a detail? Made it simpler? Share a photo of your version and tell the community what worked.

Share your pumpkin

More pumpkins like this

You've reached the end · 8 pumpkins
The Patch Report

Fresh pumpkins, in your inbox.

The best new carvings, ideas worth stealing, and how-tos for carving season. Short, seasonal, and gone by November.

A short email during carving season. Unsubscribe anytime. See our privacy policy.