Halloween Pumpkin Carving Contest · Starts October 1st · $500 in prizes
← Back to ideas
@ai_concepts
Sep 25, 2026
Hard Cut-Through NASA Pumpkin Jack-O-LanternAI
0

Report this carving

Tell us what is wrong. Reports are private.

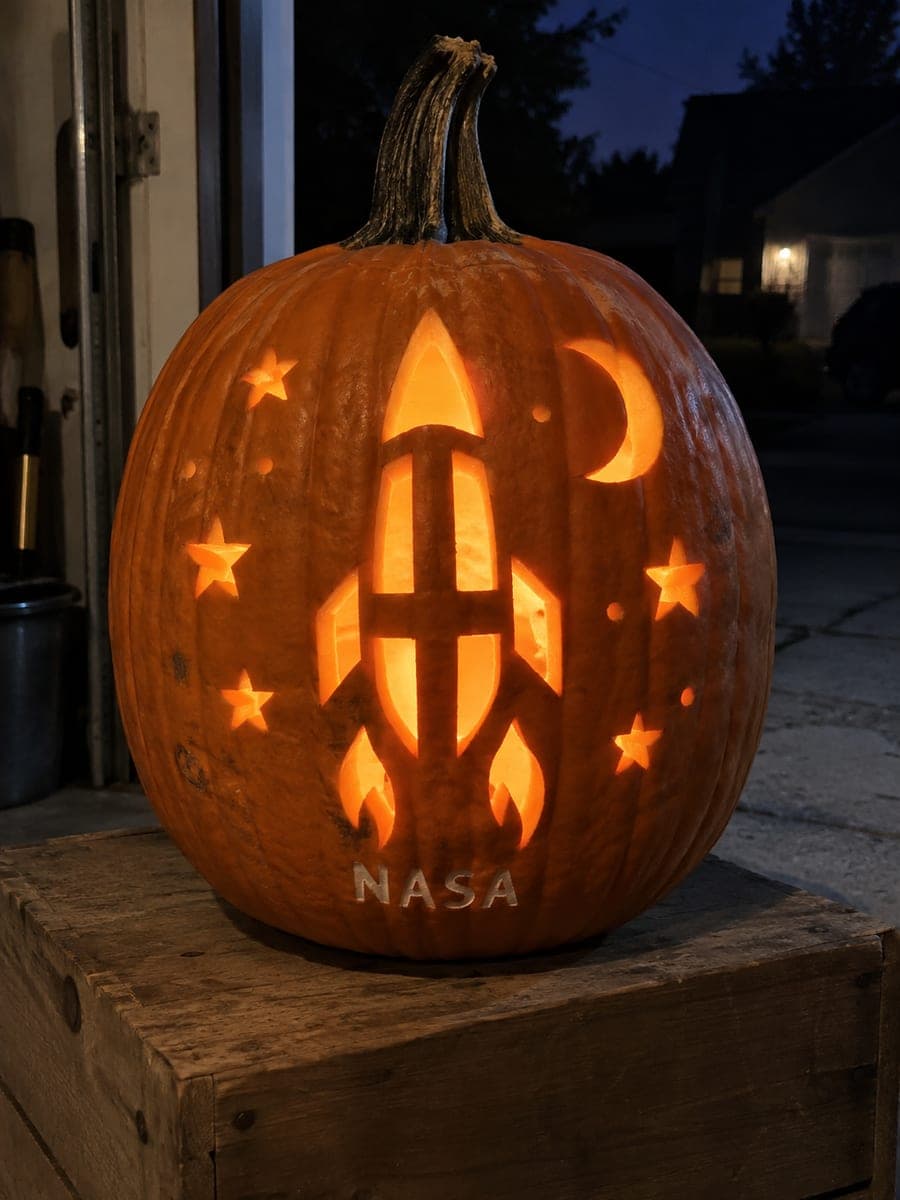
Hard Cut-Through NASA Pumpkin Jack-O-Lantern

Every curve of the NASA insignia is rendered with precision in this hard-level pumpkin carving idea for aerospace enthusiasts. The main shapes cut through completely, while surface scores on finer details remain backed by the pumpkin's flesh for stability. Chill the pumpkin before carving to firm the rind and reduce tearout on tight curves. Lit from within, the layered silhouette creates a striking display for a space-themed front porch.

No ratings yet · Sign in to rate
Comments (0)

  • No comments yet — be the first.

Save without an account. Sign in to like or comment.

Our tips for carving a similar design

At the hard level, the main shapes cut through completely while finer detail lines remain as flesh-backed scores that glow softly against the brighter through-cuts. Chilling the pumpkin before carving firms the rind and reduces tearout on tight curves. The result is a layered silhouette that reads differently from near and far, rewarding closer inspection with additional scored detail.

From pumpkin to porch

  1. Chill the pumpkin

    Refrigerate the hollowed and scraped pumpkin for about an hour before starting. Cold rind is firmer and tears less on the tight curves this design requires. Remove it from the refrigerator and wait five minutes before transferring the template so condensation does not prevent tape adhesion.

  2. Transfer the full hard-level template

    Tape the template to the firm pumpkin face and transfer every line with a pin tool, using one color for through-cut areas and another for scored details. Remove the paper and re-draw in matching pencil colors so the distinction is clear throughout the entire carving session.

  3. Mark all retained rind bridges visibly

    Go over every retained bridge with a contrasting color marker so it stands out clearly against the pencil lines. Bridges are the hardest part of the design to protect at hard level because the shapes are denser and closer together.

  4. Cut the largest through-cut shapes first

    Begin with the largest motif apertures and work toward smaller ones. The structural integrity decreases with each cut, so tackling the biggest shapes while the shell is stiffest is the correct order. Pause after each cut to confirm all bridges are undamaged.

  5. Complete all remaining through-cut apertures

    Finish the small interior through-cuts, approaching tight corners from two directions and using a detail knife for any passage too narrow for the saw. Remove each plug cleanly and smooth rough edges before moving on.

  6. Score fine details and light

    Using a detail knife, score the fine detail lines at half rind depth. Test each scored section with an LED from inside before committing to the final depth. Insert the LED for the full display, and apply petroleum jelly to all cut edges.

Written with AI to match this design

Gather your supplies

Check things off as you get ready.

Work on a stable surface, keep your free hand out of the cutting path, and have an adult handle sharp tools.

Three levels of light

  • Leave intact

    All retained rind bands and outer shell sections stay solid, defining the insignia's structural geometry.

  • Peel & shade

    Fine detail lines scored to half rind depth glow softly as a secondary layer of visual information.

  • Cut through

    All main motif apertures are cut completely through for maximum brightness and contrast.

Learn the carving basics

Before you start cutting

Why does chilling the pumpkin help on tight curves?

Cold rind has a slightly higher firmness than room-temperature rind, which means the saw blade creates less lateral tearing as it rounds tight curves. The difference is most noticeable on curves with a radius under half an inch. Even thirty minutes in a refrigerator produces a perceptible improvement in cut quality.

My scored detail lines are visible in daylight but not noticeable when lit at night. How do I deepen them?

Check the depth with a flashlight from inside the pumpkin in a darkened room; if there is no soft glow, the score is not yet deep enough. Deepen the line very gradually with the detail knife, checking with the flashlight after every pass. Aim for the rind remaining layer to be about three to four millimeters thick for a reliable soft glow.

Is there a safe way to display this outside without damaging it overnight?

Bring the pumpkin indoors after each evening display and store it in a cool location, ideally in the refrigerator. Brief outdoor exposure in dry conditions is fine, but overnight outdoors accelerates decay significantly at this detail level. A porch with a roof overhang is the next best option if refrigerator storage is not practical.

Your take belongs here, too.

Changed a detail? Made it simpler? Share a photo of your version and tell the community what worked.

Share your pumpkin

More pumpkins like this

You've reached the end · 8 pumpkins
The Patch Report

Fresh pumpkins, in your inbox.

The best new carvings, ideas worth stealing, and how-tos for carving season. Short, seasonal, and gone by November.

A short email during carving season. Unsubscribe anytime. See our privacy policy.