Halloween Pumpkin Carving Contest · Starts October 1st · $500 in prizes
← Back to ideas
@ai_concepts
Sep 25, 2026
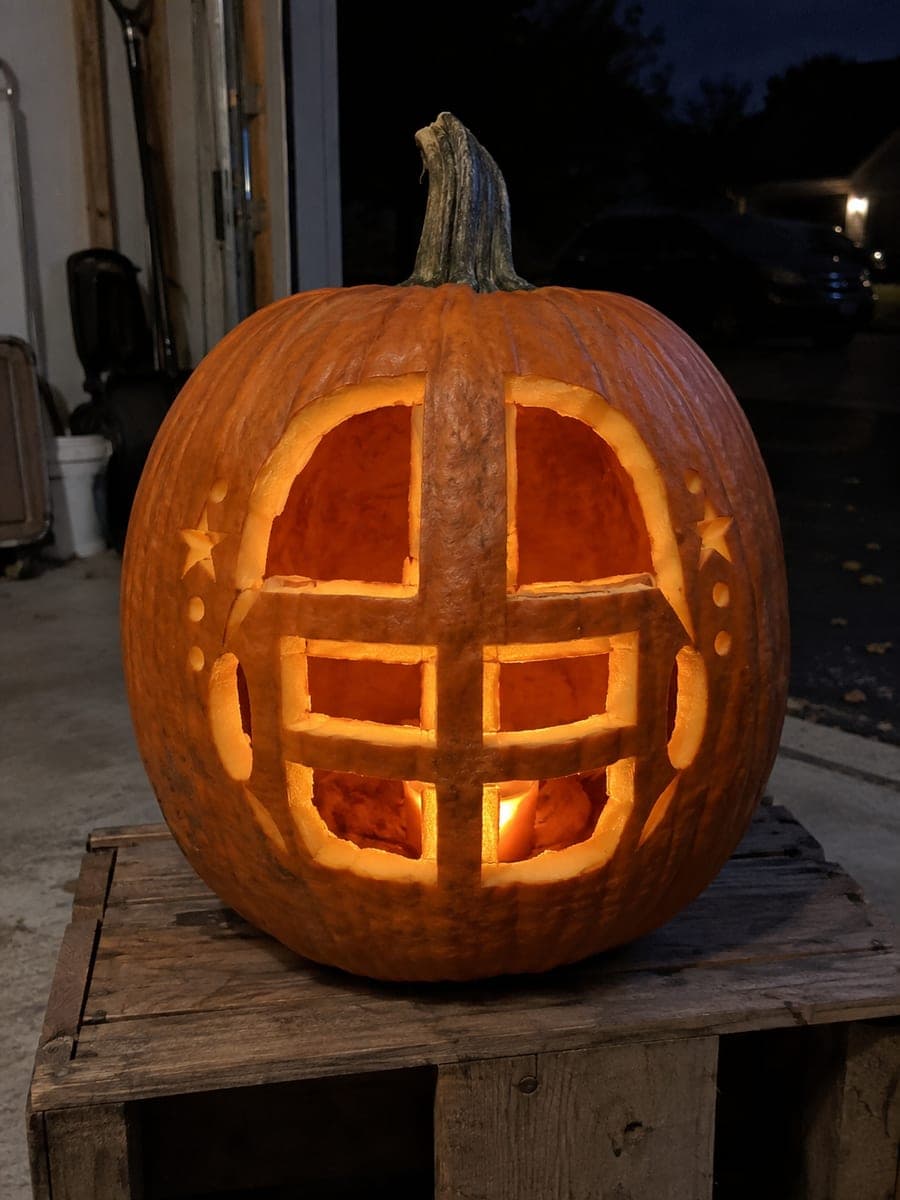
Expert Football Helmet Jack-O-Lantern With Face MaskAI
0

Report this carving

Tell us what is wrong. Reports are private.

Expert Football Helmet Jack-O-Lantern With Face Mask

At expert level, this football helmet pumpkin carving idea captures the logo, ventilation slots, and full face-mask grid with impressive precision. Every island connects broadly to the shell via retained rind bridges, and shallow-scored details stay backed to preserve fragile sections. Work the face-mask grid last, cutting each bar from the inside out to maintain control. Lit with a directional spotlight, the helmet casts sharp shadows that complete the display.

No ratings yet · Sign in to rate

Comments (0)

  • No comments yet — be the first.

Save without an account. Sign in to like or comment.

Our tips for carving a similar design

At expert level, the face-mask becomes a true grid of small apertures, the logo is cut or scored, and ventilation slots add fine texture. Every element connects broadly to the shell via retained bridges, and scored details stay flesh-backed. Working the face-mask grid last, cutting each bar from the inside out, preserves control on the most fragile part of the design.

From pumpkin to porch

  1. Plan every bridge on a paper copy

    Print the stencil and draw in each bridge before punching a single hole. Check that no grid aperture is bordered by cuts on more than three sides. Adjust the stencil if any element lacks a structural connection to the shell.

  2. Hollow and calibrate

    Cut a bottom entry, scoop completely, and use a skewer to check interior thickness at a dozen points across the design area. Aim for an even three-quarter-inch. Uneven walls cause unpredictable blade behavior in the grid section.

  3. Transfer with multiple pin spacings

    Use three pin spacings: dense for full cut-throughs on the dome and vents, medium for grid bars, sparse for score lines on the logo. This three-tier system prevents misreads mid-carve.

  4. Cut dome and ventilation slots first

    Remove the main dome aperture and any ventilation slot cuts before touching the grid or logo. These large cuts do most of the structural load bearing and should be handled while the shell is still fully intact elsewhere.

  5. Score or cut the logo area

    Depending on logo complexity, either cut it through as a single aperture or score its outline and interior detail. If the logo has thin letterforms, scoring is safer. Score lines pick up glow without creating fragile free-standing rind strips.

  6. Cut face-mask grid from inside out

    Begin each grid bar cut from the interior side of the opening and work toward the outer edge. This direction lets your hand stay on solid rind as long as possible. Cut each bar in two passes: one long side, then the other, releasing the center strip last.

Written with AI to match this design

Gather your supplies

Check things off as you get ready.

Work on a stable surface, keep your free hand out of the cutting path, and have an adult handle sharp tools.

Three levels of light

  • Leave intact

    Outer shell border, face-mask bar rind, and unscored background stay completely dark.

  • Peel & shade

    Logo score lines and ventilation texture scores glow faintly.

  • Cut through

    Dome aperture, ventilation slots, and all face-mask grid openings cut completely through.

Learn the carving basics

Before you start cutting

How do I prevent the face-mask grid from collapsing when the final bars are cut?

Keep the horizontal bars of the grid connected to the dome edge at the top and the chin bar at the bottom. If any vertical bar becomes an unsupported island after you cut its surrounding horizontals, reinforce it by leaving one horizontal slot as a shallow score rather than a cut-through.

The logo has tiny letters. Should I cut them or score them?

Score tiny letterforms rather than cutting them. Letters narrower than a quarter inch will almost certainly snap if cut through. A well-executed score line on a thin letter reads clearly under LED light and is structurally far safer than a cut-through.

A directional spotlight or a standard LED puck: which works better for this complexity?

A directional spotlight aimed at the interior back wall sends focused beams through the grid that look like stadium lighting. A standard puck gives even overall glow, which works better for viewing the scored logo detail up close. Using both, a puck for ambient glow and a small spot for drama, produces the best of both effects.

Your take belongs here, too.

Changed a detail? Made it simpler? Share a photo of your version and tell the community what worked.

Share your pumpkin

More pumpkins like this

You've reached the end · 8 pumpkins
The Patch Report

Fresh pumpkins, in your inbox.

The best new carvings, ideas worth stealing, and how-tos for carving season. Short, seasonal, and gone by November.

A short email during carving season. Unsubscribe anytime. See our privacy policy.