Halloween Pumpkin Carving Contest · Starts October 1st · $500 in prizes
← Back to ideas
@ai_concepts
Sep 25, 2026
Easy Football Player Silhouette Pumpkin StencilAI
0

Report this carving

Tell us what is wrong. Reports are private.

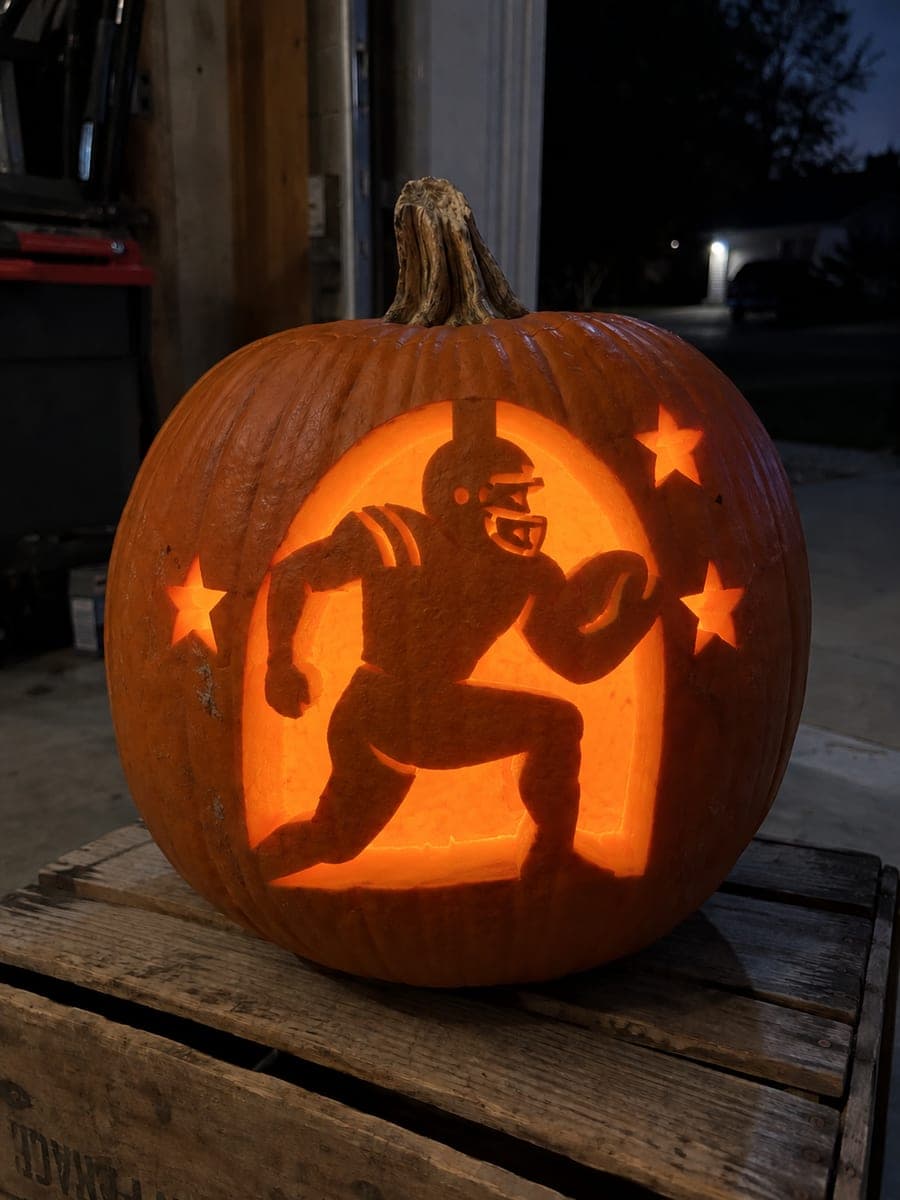
Easy Football Player Silhouette Pumpkin Stencil

A glowing football player silhouette makes this easy pumpkin carving idea a great choice for game-day decorating. Use a printed football player pumpkin stencil, secure it with tape, and trace the outline with a pin before making any cuts. The single open silhouette means there are no interior islands to worry about. Set the finished jack-o-lantern near the TV or on the front step for a festive football night.

No ratings yet · Sign in to rate

Comments (0)

  • No comments yet — be the first.

Save without an account. Sign in to like or comment.

Our tips for carving a similar design

A single open player silhouette with no interior islands is the friendliest beginner cut because the entire shape is one connected aperture. A printed stencil at pumpkin scale, a careful pin transfer, and steady sawing produce a result that looks intentional and confident from the street. Wide surrounding rind keeps everything secure.

From pumpkin to porch

  1. Hollow the pumpkin

    Cut a bottom opening for a stable base, scoop out all seeds and pulp, and scrape the interior wall to about three-quarter-inch thickness behind the design area. An evenly thinned wall cuts more predictably than one with thick and thin spots.

  2. Scale and position the stencil

    Print the player outline so the figure fills most of the pumpkin face with at least one inch of rind outside the widest point. Tape the stencil flat and double-check that the player's arms and legs are entirely within the carving zone before pinning.

  3. Pin-transfer the outline

    Punch holes every quarter inch along the entire player silhouette, including any gaps between limbs that might need a bridge to keep the design connected. Remove the stencil and confirm the dotted line is continuous.

  4. Cut the silhouette

    Enter the rind at a straight edge of the outline and follow the pin marks with a steady medium saw. Work limb sections carefully; the player's outstretched arms or raised leg may extend close to the pumpkin edge where rind thins on natural ribs. Adults handle the saw throughout.

  5. Check and clean edges

    Once the silhouette piece is free, run the blade lightly along any ragged sections inside the aperture. Clean edges produce a sharper, more defined glow against the dark surrounding rind.

  6. Light and display

    Place an amber LED inside and set the pumpkin where the player silhouette faces outward. Adjust the LED position to fill the full aperture with even light rather than creating a hot spot behind the player's torso.

Written with AI to match this design

Gather your supplies

Check things off as you get ready.

Work on a stable surface, keep your free hand out of the cutting path, and have an adult handle sharp tools.

Three levels of light

  • Leave intact

    All rind outside the player silhouette stays solid and dark.

  • Peel & shade

    None. This beginner silhouette is a single through-cut with no scoring.

  • Cut through

    The entire player silhouette aperture is cut straight through for full, even glow.

Learn the carving basics

Before you start cutting

My player stencil has the arms separated from the body. Is that a problem?

Separated elements become independent islands, which means each floats unsupported unless connected by a rind bridge. If your stencil has a gap between an arm and the torso, leave a narrow strip of rind as a bridge there rather than cutting the full gap. The design will still read correctly from a distance.

Should I face the player left or right on the pumpkin?

Face the player toward the direction people will approach from. A player facing right on a left-side porch railing draws the eye toward the door; one facing left draws it outward. Consider which reads better on your specific display location.

How do I scale a stencil I found online to the right size for my pumpkin?

Measure the widest and tallest dimensions of your pumpkin face, subtract two inches from each side for rind border, and set those dimensions as your print size in any image editor or in the printer's scaling settings. Print a test copy on plain paper before committing to the design.

Your take belongs here, too.

Changed a detail? Made it simpler? Share a photo of your version and tell the community what worked.

Share your pumpkin

More pumpkins like this

You've reached the end · 8 pumpkins
The Patch Report

Fresh pumpkins, in your inbox.

The best new carvings, ideas worth stealing, and how-tos for carving season. Short, seasonal, and gone by November.

A short email during carving season. Unsubscribe anytime. See our privacy policy.