Halloween Pumpkin Carving Contest · Starts October 1st · $500 in prizes
← Back to ideas
@ai_concepts
Sep 25, 2026
Hard Football Player Stencil Pumpkin CarvingAI
0

Report this carving

Tell us what is wrong. Reports are private.

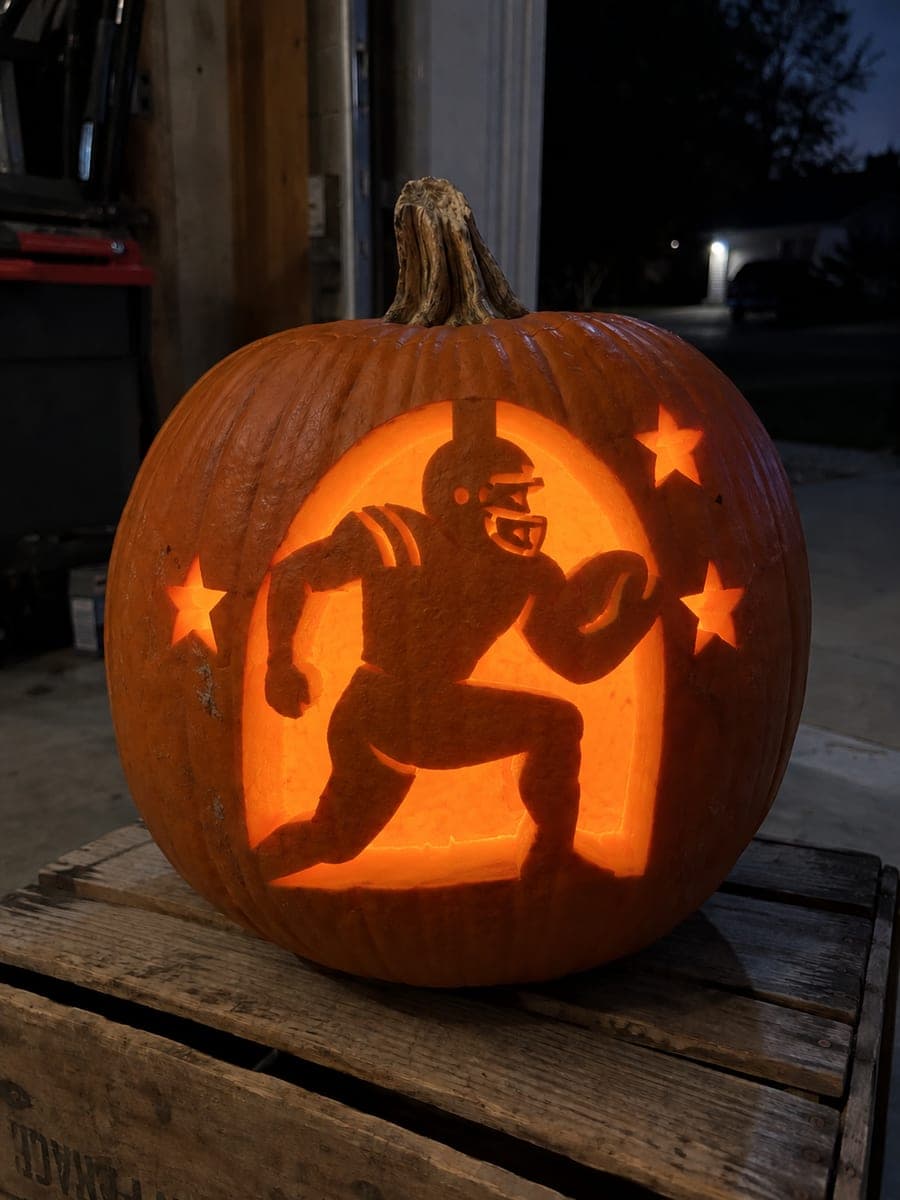
Hard Football Player Stencil Pumpkin Carving

This hard football player pumpkin carving idea features a dynamic pose with jersey detail, helmet, and cleats rendered as separate glowing shapes connected by retained rind bridges. Pin-transfer every outline before cutting, paying close attention to where the arm and torso silhouettes merge. Work from the center of the design outward so the shell maintains rigidity throughout. A focused LED spotlight inside brings out the full depth of the carved player.

No ratings yet · Sign in to rate

Comments (0)

  • No comments yet — be the first.

Save without an account. Sign in to like or comment.

Our tips for carving a similar design

At the hard level, arm and torso silhouettes merge at a junction that must be carefully preserved as a broad bridge, and fine jersey texture, helmet slots, and boot outlines appear as smaller secondary apertures. Working from the center of the design outward ensures the shell maintains rigidity throughout the session. A focused LED spotlight inside brings out the full figure depth.

From pumpkin to porch

  1. Prep for complexity

    Refrigerate the pumpkin briefly to firm the flesh, then cut a bottom entry and scoop completely. Scrape to an even three-quarter-inch thickness, paying extra care at the areas where limbs are close together. Lay out all tools before starting.

  2. Plan arm-torso junction bridges

    On a printed stencil copy, mark every junction where an arm, leg, or piece of equipment connects to the body. These junctions must retain at least three-quarters of an inch of rind. Draw the bridges in before transferring so they are explicitly marked on the pumpkin.

  3. Transfer and verify

    Tape the stencil firmly, pin-transfer all outlines, and then compare the pin dots to the original stencil before removing the paper. Correcting a missed line before cutting costs nothing; discovering it mid-carve is costly.

  4. Cut torso and main figure first

    Work the central body aperture with a medium saw, stopping at every bridge mark. Once the torso is established, the overall proportions are locked in and subsequent limb cuts can be judged against it.

  5. Work limb apertures from center outward

    Cut arm and leg apertures starting from where they meet the torso and working outward toward hands and feet. This direction keeps maximum rind support behind the blade as you move into thinner extremity sections.

  6. Add fine equipment details last

    Use a detail blade for helmet face-mask slots, jersey panel lines, and boot laces. Score any elements narrower than a quarter inch. A focused LED spotlight inside makes the fine detail layers visible at normal display distance.

Written with AI to match this design

Gather your supplies

Check things off as you get ready.

Work on a stable surface, keep your free hand out of the cutting path, and have an adult handle sharp tools.

Three levels of light

  • Leave intact

    Outer shell border, all rind bridges between figure elements, and background stay dark.

  • Peel & shade

    Scored jersey panel lines and boot lace marks glow faintly.

  • Cut through

    Torso, arm, leg apertures, and all major equipment apertures cut completely through.

Learn the carving basics

Before you start cutting

The arm and torso sections of my stencil are very close. How much bridge rind do I really need?

Three-quarters of an inch is the practical minimum for a structural junction under carving stress. If your stencil has the arm closer than that to the torso, widen the bridge by shifting one outline slightly on the transfer. The change is invisible from viewing distance.

How do I cut outward on a limb without the shell flexing?

Support the shell from the outside with your non-cutting hand while the saw is inside. As you move the blade outward on a limb, the remaining rind around the aperture provides support; just make sure you are not pressing inward on the opposite wall with too much force.

Is a spotlight necessary or will a standard LED puck work?

A standard puck works, but positioning it toward the carved face rather than flat on the bottom floor of the pumpkin produces better shadowing on the equipment details. A focused spotlight is the upgrade; a repositioned puck is a good free alternative.

Your take belongs here, too.

Changed a detail? Made it simpler? Share a photo of your version and tell the community what worked.

Share your pumpkin

More pumpkins like this

You've reached the end · 8 pumpkins
The Patch Report

Fresh pumpkins, in your inbox.

The best new carvings, ideas worth stealing, and how-tos for carving season. Short, seasonal, and gone by November.

A short email during carving season. Unsubscribe anytime. See our privacy policy.