Halloween Pumpkin Carving Contest · Starts October 1st · $500 in prizes
← Back to ideas
@ai_concepts
Sep 25, 2026
Intermediate Glowing Football Helmet PumpkinAI
0

Report this carving

Tell us what is wrong. Reports are private.

Intermediate Glowing Football Helmet Pumpkin

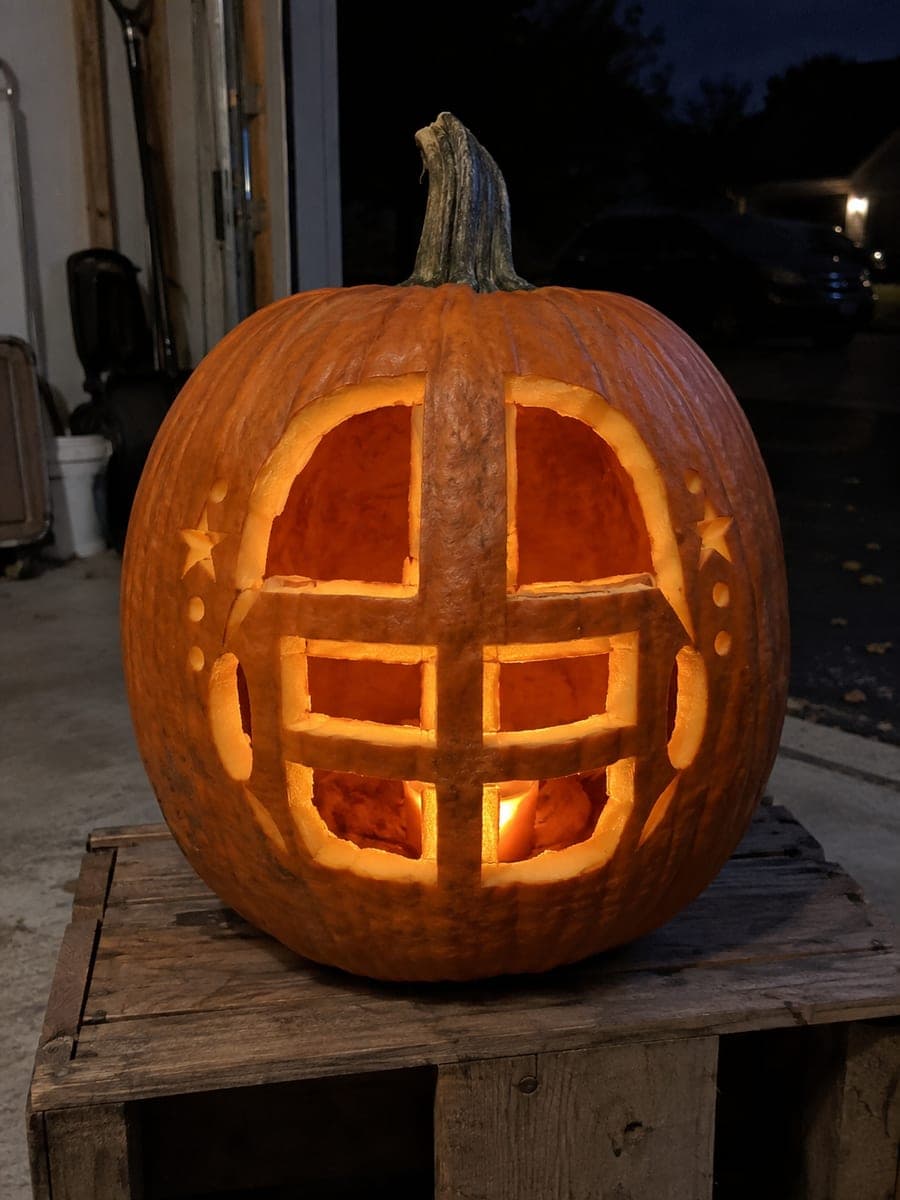
This intermediate football helmet pumpkin carving idea renders the dome, face mask, and chin strap as separate glowing apertures with wide rind bridges between them. Pin-transfer the full stencil before cutting so the face-mask bars stay aligned. Carve the dome opening first, then the individual face-mask slots from top to bottom. Displayed at dusk, the layered shapes read exactly like a sideline helmet silhouette.

No ratings yet · Sign in to rate
Comments (0)

  • No comments yet — be the first.

Save without an account. Sign in to like or comment.

Our tips for carving a similar design

Splitting the helmet into distinct sections, the dome, the individual face-mask slots, and the chin strap outline, creates layered depth that a single aperture cannot achieve. Pin-transferring the full stencil before any cuts keeps the face-mask bars aligned. Carving the dome first then working the mask slots from top to bottom maintains shell rigidity throughout.

From pumpkin to porch

  1. Prep and thin the shell

    Cut a bottom entry, scoop thoroughly, and scrape the interior wall to about three-quarter-inch thickness. Pay extra attention to the area behind the face-mask slots because those small openings need consistently thin rind to cut cleanly.

  2. Mark bridge points before pinning

    On a printed copy of the stencil, draw in the rind bridges between each face-mask slot so you know exactly where the saw must stop. Tape the stencil firmly and pin-transfer all dome, slot, and chin-strap outlines in one session.

  3. Cut the dome aperture

    Begin with the main dome opening, following the rounded outline in long, smooth arcs. Confirm the surrounding rind is at least one inch wide after the dome is removed before moving to the smaller elements.

  4. Cut face-mask slots top to bottom

    Start with the topmost face-mask slot and work downward. Cutting top to bottom keeps your cutting hand above already-opened areas, reducing the chance of accidentally widening an adjacent slot. Use a narrow detail blade for each rectangular opening.

  5. Add chin-strap detail

    The chin-strap bar below the dome can be cut through if it is at least a quarter inch wide, or scored shallowly if narrower. A scored strap catches the inner glow subtly without risking a fragile thin cut.

  6. Light and evaluate

    Drop a warm LED inside and dim the room. The layered apertures should read as a sideline helmet at dusk. Adjust the LED position so light distributes evenly across dome and mask sections rather than pooling in one spot.

Written with AI to match this design

Gather your supplies

Check things off as you get ready.

Work on a stable surface, keep your free hand out of the cutting path, and have an adult handle sharp tools.

Three levels of light

  • Leave intact

    Rind between each face-mask slot, the outer dome border, and the chin-strap bridge stay fully dark.

  • Peel & shade

    Chin-strap bar may be surface-scored for a faint glow if too narrow to cut safely.

  • Cut through

    Dome aperture and all face-mask slots cut completely through for full layered glow.

Learn the carving basics

Before you start cutting

How do I keep face-mask slot bars parallel to each other?

Transfer the stencil carefully and check that pin marks for each slot are horizontally level before cutting. If the slots drift, viewers will notice at close range even though the helmet still reads from a distance. A small ruler held against the pin marks confirms alignment.

The chin-strap cut feels risky because the strip is thin. What should I do?

Score the chin strap instead of cutting it through. Remove only the outer skin layer with a paring knife or linoleum gouge; the scored line will pick up the inner LED glow at a softer level. This is structurally much safer than a through-cut on a narrow strip.

My face-mask slots are slightly different widths. Does it matter?

Minor variation reads as natural from a normal viewing distance. If one slot is noticeably wider, carefully shave the wider side with a single thin pass of the detail blade to bring it closer to the others. Work from the inside of the slot toward the outer edge for the most control.

Your take belongs here, too.

Changed a detail? Made it simpler? Share a photo of your version and tell the community what worked.

Share your pumpkin

More pumpkins like this

You've reached the end · 8 pumpkins
The Patch Report

Fresh pumpkins, in your inbox.

The best new carvings, ideas worth stealing, and how-tos for carving season. Short, seasonal, and gone by November.

A short email during carving season. Unsubscribe anytime. See our privacy policy.