Halloween Pumpkin Carving Contest · Starts October 1st · $500 in prizes
← Back to ideas
@ai_concepts
Sep 25, 2026
Hockey Stick and Puck Pumpkin Beside SkatesAI
0

Report this carving

Tell us what is wrong. Reports are private.

Hockey Stick and Puck Pumpkin Beside Skates

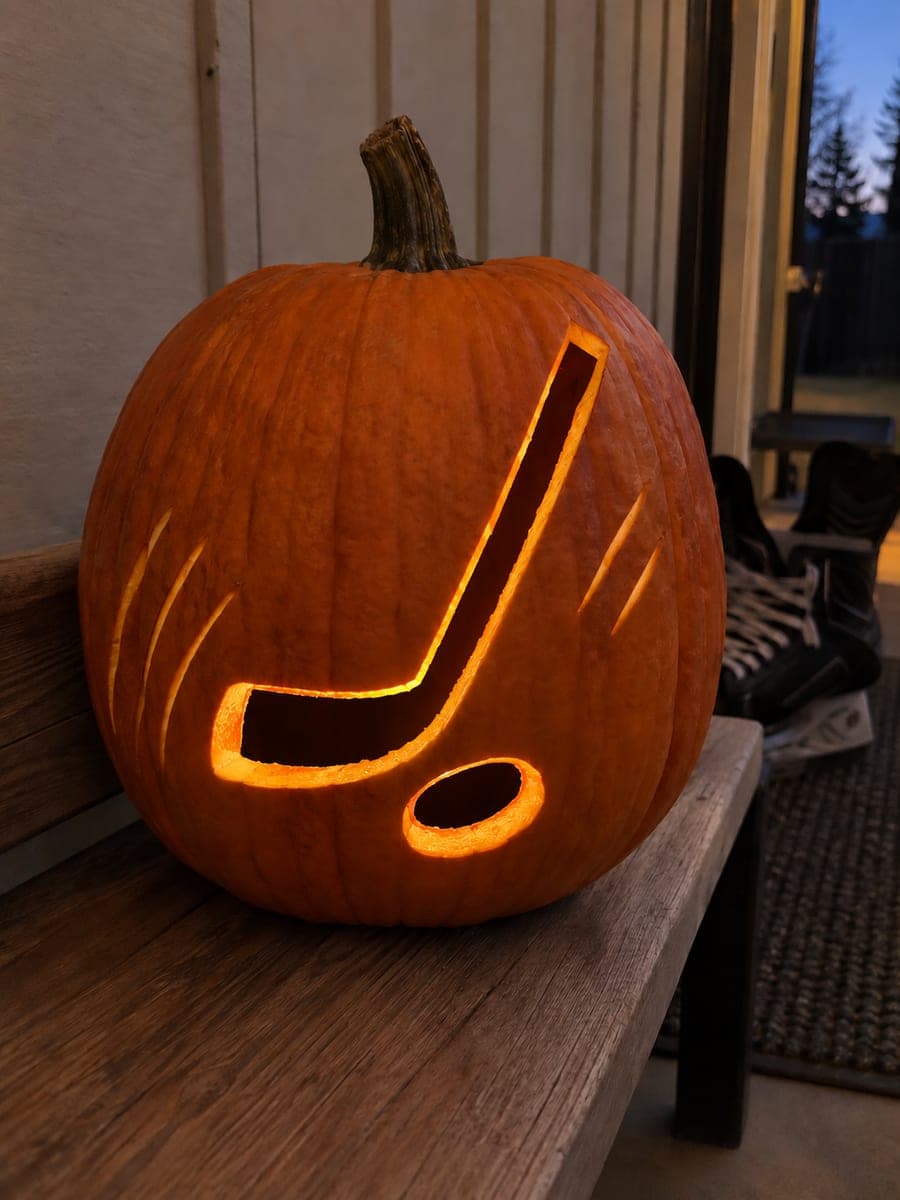
A single hockey stick aperture and a separate oval puck opening glow simply in this easy hockey pumpkin carving idea. The stick shape is one continuous cut, making it accessible even for first-time carvers. Place the pumpkin on a towel to prevent it rolling, and use a sharp thin blade for the stick's curved blade end. Set it beside a pair of skates on the front step for a complete hockey-night vignette.

No ratings yet · Sign in to rate

Comments (0)

  • No comments yet — be the first.

Save without an account. Sign in to like or comment.

Our tips for carving a similar design

The design is built around just two open shapes: one stick-shaped aperture that traces the shaft and curved blade in a single continuous cut, and a small separate oval for the puck. Because neither shape has interior islands, the cuts are forgiving for first-timers. Solid rind surrounds both openings, keeping the pumpkin sturdy throughout.

From pumpkin to porch

  1. Prep the pumpkin

    Place the pumpkin on a folded towel to stop it rolling while you work. Cut a lid from the base rather than the top so the stem stays intact for display. Scoop out the interior thoroughly and scrape the back wall behind the planned cuts down to roughly three-quarters of an inch for clean light transmission.

  2. Transfer the outline

    Print or sketch the stick-and-puck outline at the right scale for your pumpkin face. Tape the template onto the rind and trace every line with a pin tool, pressing firmly enough to leave a dotted impression. Remove the paper and connect the dots lightly with a marker before cutting.

  3. Cut the stick aperture

    Use a thin, flexible pumpkin-carving blade to follow the stick shape from handle end to blade tip in one continuous pass. Keep the blade perpendicular to the surface throughout. Work slowly around the curved blade end, as the rind tapers there and too much sideways pressure can crack the shell.

  4. Cut the puck

    Switch to a small round punch or narrow detail blade for the oval puck opening. The puck should sit a short distance from the stick blade so both shapes read as separate objects. Pop the cutout free from the inside with a skewer if it sticks.

  5. Add backed accents

    Use a small gouge or the tip of a linoleum tool to score the small side-detail marks referenced in the design notes. Scrape away only the outer skin and a thin layer of flesh, leaving the shell intact. Wipe the carved area clean with a damp cloth to make the pale flesh visible.

  6. Light and display

    Insert a battery-powered LED puck or a warm-white tea light into the cavity. Place the pumpkin beside a pair of skates on the front step for the full hockey-night vignette. Keep flame away from children, and use flameless LEDs if the display is unattended.

Written with AI to match this design

Gather your supplies

Check things off as you get ready.

Work on a stable surface, keep your free hand out of the cutting path, and have an adult handle sharp tools.

Three levels of light

  • Leave intact

    The broad surrounding rind stays solid and dark, framing both glowing shapes.

  • Peel & shade

    None on this design; all detail marks are shallow backed scores, not peeled.

  • Cut through

    The stick-shaped aperture and the oval puck opening are both cut fully through for bright glow.

Learn the carving basics

Before you start cutting

How do I keep the curved blade end of the stick from cracking?

Reduce blade pressure as you approach the curved end and use very short sawing strokes rather than long pushes. Scoring the outer skin first with a craft knife and then following with the carving blade also reduces the force needed. If a hairline crack appears, a toothpick and a dab of craft glue can pin it before it spreads.

Can I use a drill bit for the puck instead of a blade?

Yes, a spade bit or a sharp hole-saw attachment on a low-speed drill cuts a clean oval or circle quickly. Clamp the pumpkin gently or have a helper hold it steady, and drill at low speed to avoid splitting the rind. Sand the cut edges lightly with fine-grit sandpaper for a crisp finished look.

Will the design still read in daylight without a light inside?

In daylight the two open apertures show as dark shapes against the orange rind and are still recognizable as a stick and puck. The backed accent marks will also be visible as pale grooves. For evening display, a warm LED transforms the cutouts into bright glowing forms that are far more dramatic.

Your take belongs here, too.

Changed a detail? Made it simpler? Share a photo of your version and tell the community what worked.

Share your pumpkin

More pumpkins like this

You've reached the end · 8 pumpkins
The Patch Report

Fresh pumpkins, in your inbox.

The best new carvings, ideas worth stealing, and how-tos for carving season. Short, seasonal, and gone by November.

A short email during carving season. Unsubscribe anytime. See our privacy policy.