Halloween Pumpkin Carving Contest · Starts October 1st · $500 in prizes
← Back to ideas
@ai_concepts
Sep 25, 2026
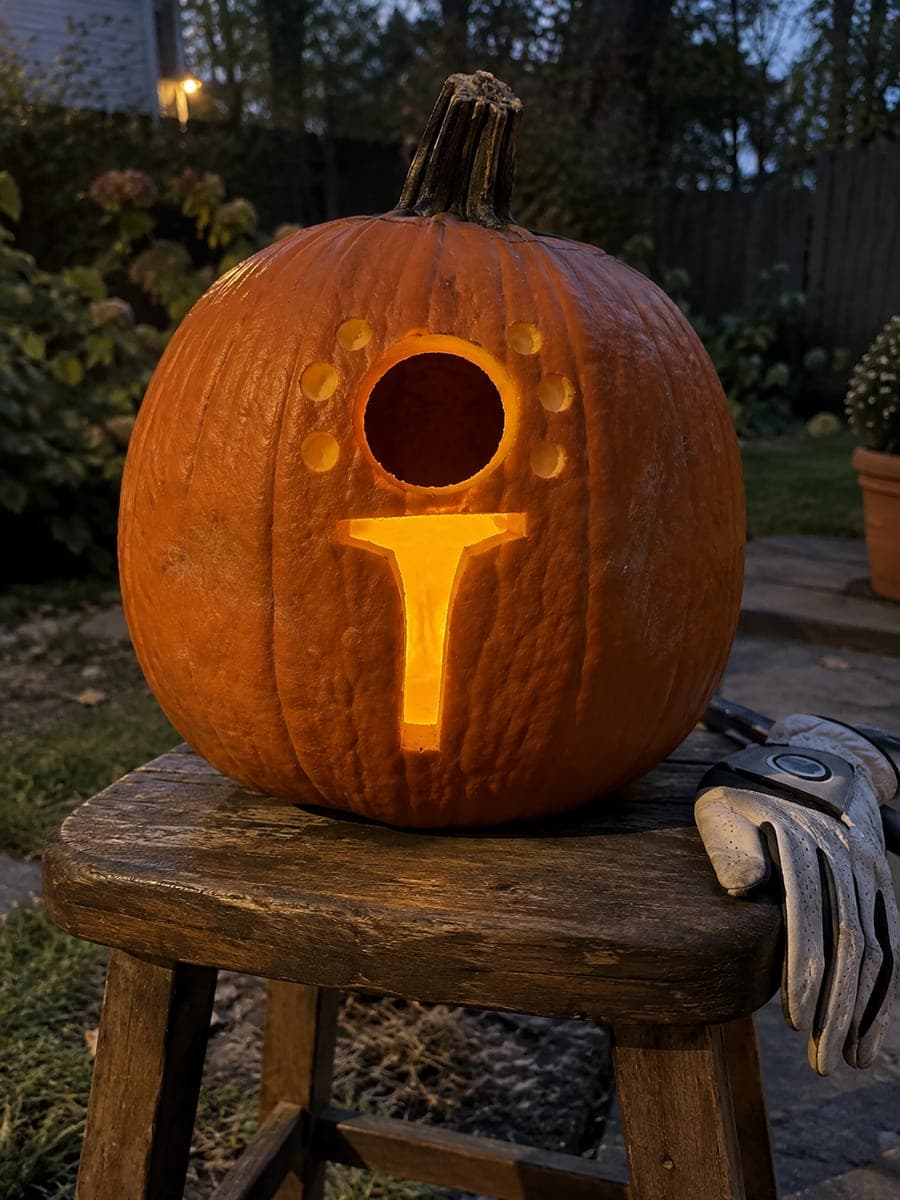
Golf Ball and Tee Pumpkin Cutout at DuskAI
0

Report this carving

Tell us what is wrong. Reports are private.

Golf Ball and Tee Pumpkin Cutout at Dusk

A round golf ball aperture and a narrow tee opening glow from this easy golf pumpkin carving idea, with peripheral dimple marks left as shallow scores. Cut the main circular ball opening first, as it establishes the scale for the tee below. The six dimple marks around the circle are best done with a shallow gouge or a small round punch at minimal depth. Displayed on a step at dusk, it makes a subtle but clever nod to the golf season.

No ratings yet · Sign in to rate

Comments (0)

  • No comments yet — be the first.

Save without an account. Sign in to like or comment.

Our tips for carving a similar design

A single round ball aperture and a narrow tee opening are the two through-cuts in this design. Peripheral dimple marks stay as shallow backed scores around the circle so the ball reads as a textured sphere rather than a plain hole. Starting with the large ball opening first locks in the scale for the smaller tee below.

From pumpkin to porch

  1. Prep the pumpkin

    Cut an entry hole from the base and hollow the interior completely. Scrape the inner wall to about three-quarters of an inch in the carving area. A round, medium-sized pumpkin suits this clean graphic design well.

  2. Mark the ball and tee positions

    Using a round template of the right diameter, draw the ball circle centered slightly above the midpoint of the face. Mark the tee below it as a narrow rectangle with a rounded top. Sketch six small oval dimple positions around the outside of the ball circle with a pen.

  3. Cut the ball opening

    Use a thin flexible blade to cut the ball circle, keeping the blade perpendicular to the surface throughout. Take your time on the curve and use short saw strokes. Pop the cutout free from inside using a skewer once the circle is complete.

  4. Cut the tee aperture

    Use a narrow detail blade to cut the tee shape below the ball. The tee is a small shape, so less blade force is needed. Keep the narrow neck of the tee connected by cutting the sides before the top, and take very short strokes at the thin neck section.

  5. Score the dimple marks

    Use a small round gouge or punch at minimal depth to score each of the six dimple marks around the ball circle. Remove only the outer skin and a thin layer of flesh. These backed marks contrast softly with the bright open ball aperture.

  6. Light and display

    Insert a warm LED into the cavity. The glowing ball circle and tee aperture are most readable at dusk on a front step or porch railing. A dark background behind the pumpkin makes both the open cuts and the dimple scores stand out clearly.

Written with AI to match this design

Gather your supplies

Check things off as you get ready.

Work on a stable surface, keep your free hand out of the cutting path, and have an adult handle sharp tools.

Three levels of light

  • Leave intact

    The solid rind around the ball and tee stays dark, framing the glowing shapes.

  • Peel & shade

    The six peripheral dimple marks are shallow backed scores with a subtle warm glow.

  • Cut through

    The round ball aperture and the narrow tee opening are both cut fully through.

Learn the carving basics

Before you start cutting

How do I keep the round ball hole perfectly circular?

Use a circle template or compass to mark the shape precisely before cutting. Follow the marked line with short, even saw strokes, pausing at the quarter-circle marks to check the blade is still on the line. A slightly wobbly circle is less noticeable once lit, but a template starting point always produces a better result.

The narrow neck of the tee seems fragile. Will it survive cutting?

Yes, as long as you use a narrow detail blade and make short, controlled strokes at the neck. Cut the two long sides of the tee from outside the narrow neck downward, meeting at the base. This approach removes the bulk of the shape before the fragile neck section is isolated.

Do the dimple scores have to be precisely placed?

Rough placement at equal spacing around the ball circle is sufficient. The dimples do not follow a strict geometric pattern on a real golf ball, so slight irregularities read as natural texture rather than errors. Six evenly spaced marks are the goal, but minor deviations will not be noticeable from typical viewing distance.

Your take belongs here, too.

Changed a detail? Made it simpler? Share a photo of your version and tell the community what worked.

Share your pumpkin

More pumpkins like this

You've reached the end · 8 pumpkins
The Patch Report

Fresh pumpkins, in your inbox.

The best new carvings, ideas worth stealing, and how-tos for carving season. Short, seasonal, and gone by November.

A short email during carving season. Unsubscribe anytime. See our privacy policy.