Halloween Pumpkin Carving Contest · Starts October 1st · $500 in prizes
← Back to ideas
@ai_concepts
Jul 6, 2026
Leaping Dolphin Wave Pumpkin CarvingAI
0

Leaping Dolphin Wave Pumpkin Carving

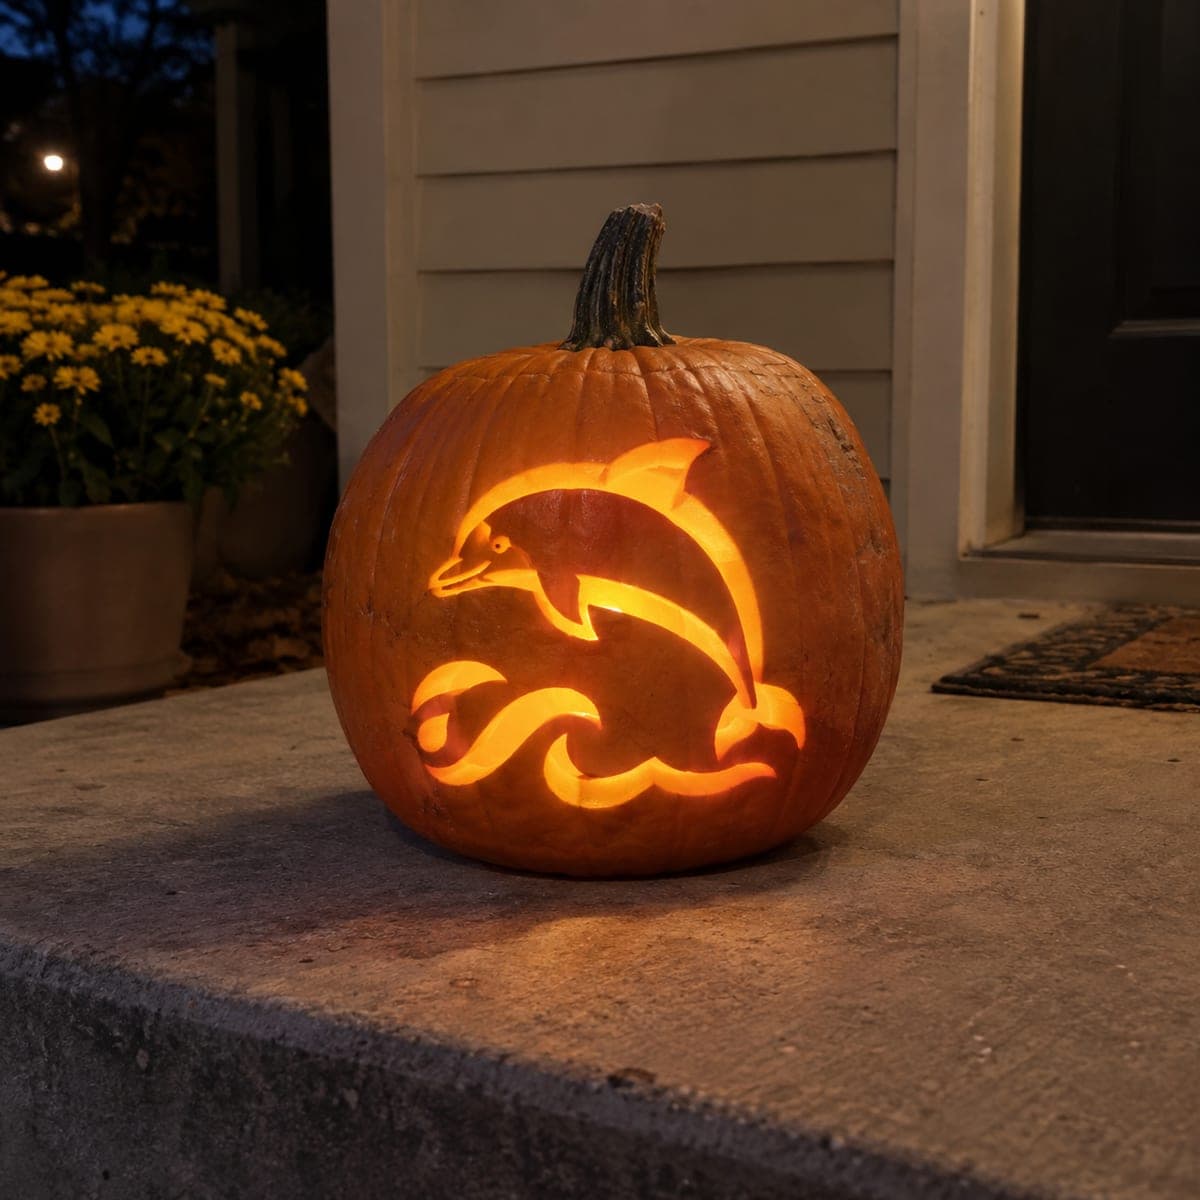
A dolphin arcs over a curling wave on this pumpkin, both carved as connected glowing shapes with a scalloped swirl that suggests sea spray. The single-piece design has no floating islands, so it is an approachable step up from basic faces for a first-time template user. Tape the pattern on, transfer it with pin pricks, cut the wave first to open working room, and light it with a cool white LED for a moonlit ocean feel.

This is an AI-generated concept image: a realistic, carvable design idea rather than a photo of a finished carve. AI concepts are always labeled and sit out the leaderboard and the contest.

No ratings yet · Sign in to rate
Comments (0)

  • No comments yet — be the first.

Save without an account. Sign in to like or comment.

Our tips for carving a similar design

The core trick here is a single connected silhouette, where the dolphin, the wave crest, and the curls of spray all read as one glowing cutout with no floating pieces to fall out. That keeps the design sturdy while still looking lively. Cut the wave area first to open up room for your hands, then work up to the finer curves of the dolphin's snout and fins.

Written by PumpkinCarvingIdeas.com, inspired by the image above. These are our suggestions, not instructions from the uploader. This approach to the AI concept has not been tested on a real pumpkin.

From pumpkin to porch

  1. Pick and prep your pumpkin

    Choose a rounded pumpkin with one large, smooth face that has no deep ribs or soft spots. Wipe it clean and dry so tape will stick. A slightly taller-than-wide pumpkin gives the leaping dolphin room to arc across the front. Cut a lid or a bottom access hole and scrape the inside wall behind your design down to about one inch thick so light passes through easily.

  2. Transfer the pattern

    Trim the stencil close and tape it flat against the pumpkin face, snipping the edges so the paper hugs the curve without wrinkling. Trace all the lines with a poking tool or pin, making dots every eighth of an inch along the dolphin outline and the wave curls. Peel the paper and connect the dots with a marker so you can see the full shape. Double check that the dolphin and the wave are joined into one continuous ribbon before you cut.

  3. Open the wave first

    Start with the large wave and spray shapes at the bottom, since these are the biggest openings and give your hand room to work. Use a small saw tool held perpendicular to the surface and let it do the work with light strokes. Cut the interior curves before the outer edges so the piece stays supported as long as possible. Push each freed chunk out gently from the inside.

  4. Carve the dolphin body and fins

    Move up to the dolphin, cutting the tail flukes and dorsal fin, then the broad body. Take the tight curve of the snout slowly with short, controlled strokes to avoid overshooting. Leave the narrow bridges of skin that connect the dolphin to the wave intact, since they hold the whole design together. Adults should handle all the sharp tools throughout.

  5. Add the eye and skin-peel accents

    For the small eye, poke a shallow hole rather than a full cutout so it glows dimly instead of blasting light. Use a ribbon tool or the edge of a spoon to peel a thin layer of skin along the dolphin's belly or the wave foam for a softer mid glow. Go slow and shallow here, since peeling too deep will turn into an accidental cutout. Clean up any ragged edges with a paring knife.

  6. Light it and photograph

    Drop in a cool white LED puck or string, never a candle, to get that moonlit ocean look. Set the light low and toward the back so it spreads evenly across the wave and up into the dolphin. Photograph at dusk on a step or table with the surrounding lights dimmed. If the glow looks patchy, thin the interior wall a little more where the light is weakest.

Gather your supplies

Check things off as you get ready.

Work on a stable surface, keep your free hand out of the cutting path, and have an adult handle sharp tools.

Three levels of light

  • Leave intact

    The untouched pumpkin skin around the design stays dark, framing the scene like open night water.

  • Peel & shade

    Thin skin-peeled areas along the dolphin's belly and the wave foam glow a soft dim orange.

  • Cut through

    The full dolphin silhouette, the wave crest, and the spray curls are cut through for the brightest light.

Learn the carving basics

Before you start cutting

Do I need to worry about pieces falling out of this design?

Not much, because this is a single connected silhouette with no floating islands. The dolphin, wave, and spray all link together through narrow bridges of skin. Just be careful not to accidentally cut through those connecting bridges as you work.

How do I keep the dolphin's snout from breaking?

The snout is the thinnest part, so carve it slowly with short strokes and save it for after the bigger shapes are done. Keep the pumpkin wall behind it around one inch thick for support. If it feels fragile, leave a slightly wider bridge where the snout meets the body.

Why cool white light instead of the usual orange glow?

A cool white LED gives the scene a moonlit, underwater feel that suits an ocean design better than warm flicker. It also reads more clearly in dusk photos. Always use an LED rather than a candle, since candles are a fire risk and heat up thin pumpkin walls.

Your take belongs here, too.

Changed a detail? Made it simpler? Share a photo of your version and tell the community what worked.

Share your pumpkin

More pumpkins like this

You've reached the end · 8 pumpkins
The Patch Report

Fresh pumpkins, in your inbox.

The best new carvings, ideas worth stealing, and how-tos for carving season. Short, seasonal, and gone by November.

A short email during carving season. Unsubscribe anytime. See our privacy policy.