Halloween Pumpkin Carving Contest · Starts October 1st · $500 in prizes
← Back to ideas
@ai_concepts
Sep 14, 2026
Striped Curled Seahorse PumpkinAI
0

Striped Curled Seahorse Pumpkin

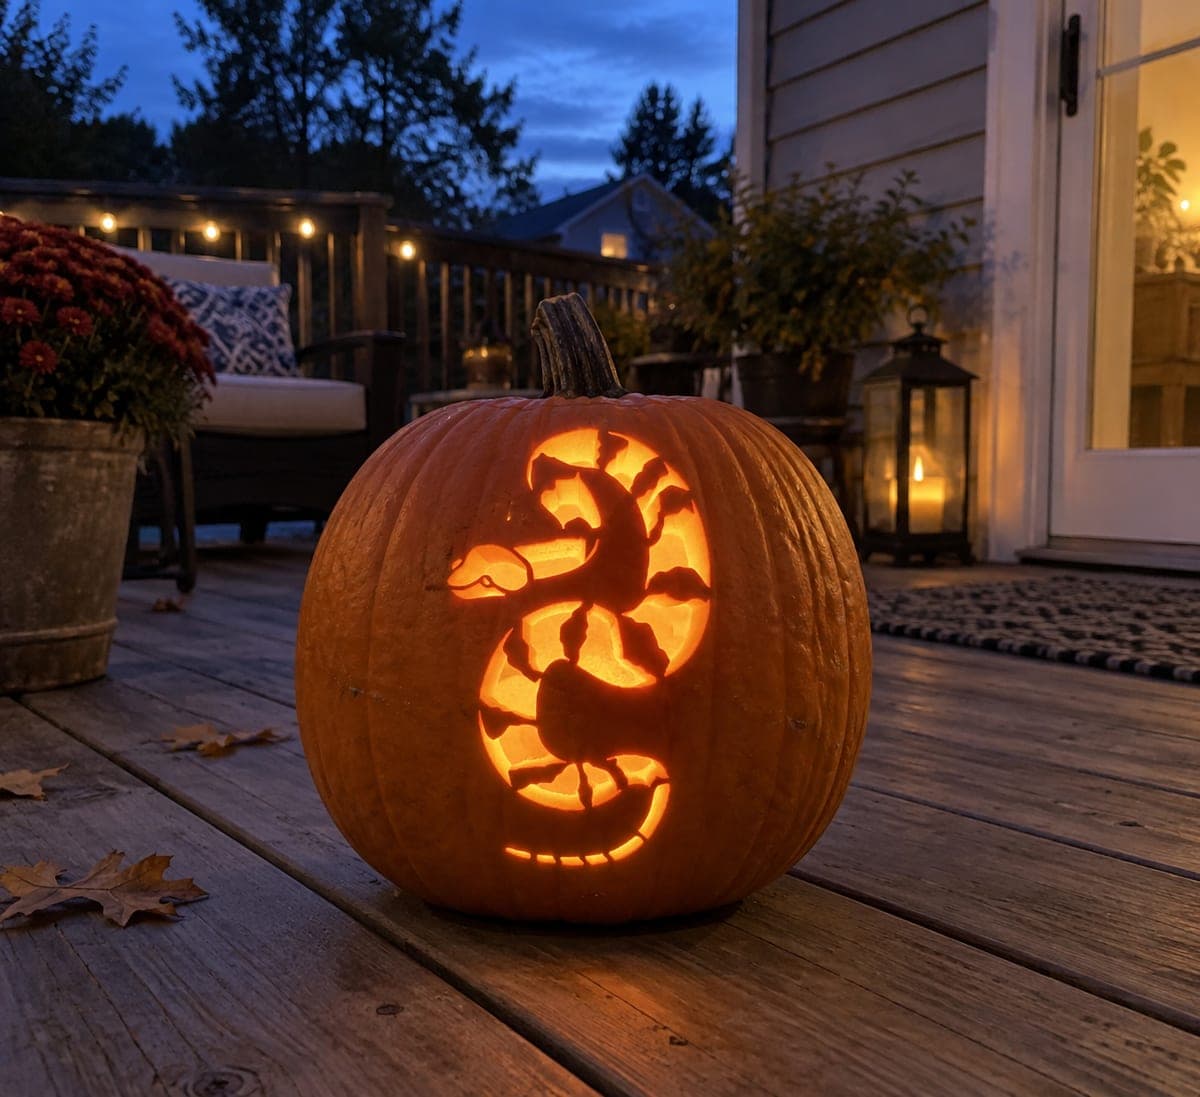
A thick-bodied snake is coiled tightly on itself with alternating light and dark banding visible as cutout sections, and the snake's head angles outward at the top left in this eye-catching pumpkin carving idea. The banded coil pattern creates a series of curved cutout strips separated by narrow rind bridges that look like the snake's dark scale pattern when lit from inside. Carve the smallest gap between the innermost coil loops first to establish the center anchor, then work outward loop by loop so the structure remains rigid throughout.

This is an AI-generated concept image: a realistic, carvable design idea rather than a photo of a finished carve. AI concepts are always labeled and sit out the leaderboard and the contest.

No ratings yet · Sign in to rate
Comments (0)

  • No comments yet — be the first.

Save without an account. Sign in to like or comment.

Our tips for carving a similar design

The core trick here is a tight coil built from curved cutout strips separated by narrow rind bridges, which read as dark scale bands when the LED lights them up. The plan is to establish the center of the spiral first so the whole shape stays rigid, then open the banded gaps working outward loop by loop, saving the widest cuts and the head for last. Keep every bridge intact and you get that clean striped, curled effect.

Written by PumpkinCarvingIdeas.com, inspired by the image above. These are our suggestions, not instructions from the uploader. This approach to the AI concept has not been tested on a real pumpkin.

From pumpkin to porch

  1. Prep the pumpkin and transfer the pattern

    Since this is a concept image, pick a tall, evenly rounded pumpkin so the coil has room to curl across the front face. Cut a lid from the bottom or the back rather than the top so the stem stays as a nice accent, and scoop the front wall down to about one inch thick with a sturdy scraper. Tape your stencil flat over the front and poke the outline with a dull pin or transfer tool. Take your time marking every band gap and bridge before any blade touches the shell.

  2. Anchor the center of the coil first

    Find the smallest gap between the two innermost coil loops and cut that opening first. This tiny center cut sets your anchor point and keeps the surrounding rind stiff while you work. Use a fine detail saw and gentle pressure, letting the tool do the work instead of forcing it. Clear the plug and check that the narrow bridge on each side of the gap is still solidly attached.

  3. Open the banded strips working outward

    Move outward one loop at a time, cutting each curved band opening in order. Leave the narrow rind bridges between bands fully intact, since those dark strips are what create the striped scale look when lit. Cut on the waste side of your lines so a slip trims into the opening rather than into a bridge. If a bridge feels thin, stop and leave a little extra width rather than risk a snap.

  4. Shape the head and outward angle

    Carve the head at the top left last among the solid features, since it juts out and is the most fragile part. Keep the snout and any curve of the neck a touch thicker than you think you need so it holds its shape. Round the cut edges slightly with the blade tip for a softer glow line. Adults should handle all the fine blade work here, and keep your free hand behind the cutting edge.

  5. Do the widest cuts and cleanup last

    Save the largest openings, like the broad tail curl and the biggest inner gaps, for the very end when the smaller cuts are already supporting the structure. Trim any ragged edges and shave the back of each opening at a slight angle so more light escapes. Blot the inside dry and rub a little petroleum jelly on the cut edges to slow browning. Give everything one last check for loose bits.

  6. Light it and photograph

    Drop in one or two battery LED lights and skip candles, since the many bridges and thin edges can scorch. Set the pumpkin outside at dusk on a flat porch board and let the blue evening sky play off the warm glow. Shoot from straight on so the full coil and head read clearly. Rotate the light or add a second one if any band looks dim.

Gather your supplies

Check things off as you get ready.

Work on a stable surface, keep your free hand out of the cutting path, and have an adult handle sharp tools.

Three levels of light

  • Leave intact

    The wide untouched shell around the coil and the narrow rind bridges between each band, which stay dark to read as scale stripes.

  • Peel & shade

    Optional shallow skin-peeling along the head and neck to hint at a soft glow before the solid outline.

  • Cut through

    The curved band gaps, the inner coil openings, and the tail curl, cut fully through for the brightest light.

Learn the carving basics

Before you start cutting

How thin should the bridges between the bands be?

Aim for bridges around a quarter to a third of an inch wide so they hold firm while still reading as dark stripes. Thinner looks dramatic but risks snapping as you cut nearby openings. If you are new to bridge work, err on the wider side, since a slightly chunky stripe still lights beautifully.

Why cut the center coil gap before anything else?

Starting at the innermost gap gives the whole spiral a rigid anchor point. If you open the big outer bands first, the front wall flexes and your remaining cuts wander, which strains the small bridges. Working center outward keeps everything supported until the last cut.

My design has a snake, but the title says seahorse. Which is it?

The coiled, banded body with an outward-angled head can read as either a curled seahorse or a tightly coiled snake, and the carving steps are the same. Focus on the curl of the tail and the banded strips, and let the head angle set the character. Pick whichever theme you like and carve the shape the same way.

Your take belongs here, too.

Changed a detail? Made it simpler? Share a photo of your version and tell the community what worked.

Share your pumpkin

More pumpkins like this

You've reached the end · 8 pumpkins
The Patch Report

Fresh pumpkins, in your inbox.

The best new carvings, ideas worth stealing, and how-tos for carving season. Short, seasonal, and gone by November.

A short email during carving season. Unsubscribe anytime. See our privacy policy.