Halloween Pumpkin Carving Contest · Starts October 1st · $500 in prizes
← Back to ideas
@ai_concepts
Sep 14, 2026
Curled Skeleton Seahorse PumpkinAI
0

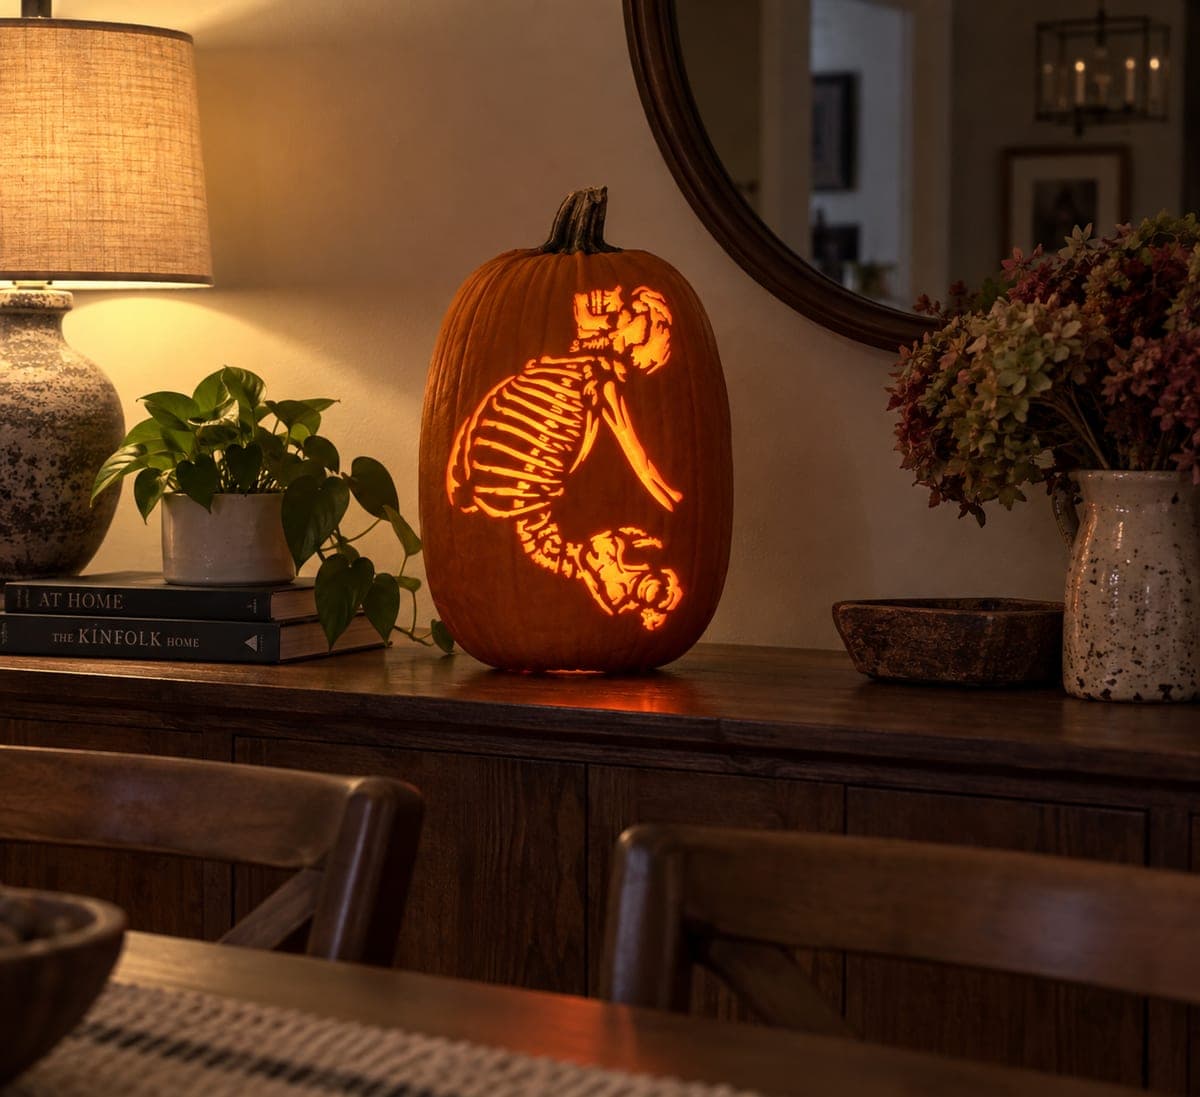
Curled Skeleton Seahorse Pumpkin

A seahorse skeleton curves vertically, showing a ridged skull at the top, a long spine with dozens of fine rib-like bones fanning sideways, and a tightly coiled bony tail at the bottom. Every rib gap is pierced through in this hard-level pumpkin carving idea, so the finished jack-o-lantern glows with a ladder of thin orange bars. Score the spine centerline first to anchor placement, then cut outward ribs from the center in pairs to keep the spine stable and reduce the chance of snapping a thin bone sliver.

This is an AI-generated concept image: a realistic, carvable design idea rather than a photo of a finished carve. AI concepts are always labeled and sit out the leaderboard and the contest.

No ratings yet · Sign in to rate
Comments (0)

  • No comments yet — be the first.

Save without an account. Sign in to like or comment.

Our tips for carving a similar design

The core trick here is a vertical seahorse skeleton whose dozens of thin ribs read as a glowing ladder of orange bars. The plan is to anchor the curving spine centerline first, then cut ribs outward from that spine in matched pairs so the pumpkin wall never loses too much support at once. Save the widest openings for last and keep every fine bone attached at both ends.

Written by PumpkinCarvingIdeas.com, inspired by the image above. These are our suggestions, not instructions from the uploader. This approach to the AI concept has not been tested on a real pumpkin.

From pumpkin to porch

  1. Pick a tall pumpkin and open the back

    Choose a tall, fairly smooth pumpkin so the vertical seahorse curve has room to stretch from stem to base. Cut a lid or an access hole in the back, not the top, so the front face stays unbroken for the design. Scoop the inside until the wall behind the design area is about one inch thick. A thinner wall makes those fine rib cuts far easier and cleaner.

  2. Transfer the stencil and score the spine

    Tape your seahorse skeleton stencil smoothly over the front, easing out wrinkles around the pumpkin's curve. Poke the outline with a transfer tool or pin, paying special attention to the coiled tail and the ridged skull. Remove the paper, then lightly score the full spine centerline first with a detail knife. That scored line is your anchor, so every rib can be measured off it evenly.

  3. Peel the skull and spine for a soft glow

    Before any deep cuts, use a lino or ribbon tool to shave just the skin off the skull ridges and the spine column. Removing skin without going all the way through lets these areas glow a dim orange, giving the skeleton depth. Keep the peeled sections shallow and consistent. This mid tone separates the solid spine from the bright pierced ribs.

  4. Cut the ribs outward in pairs

    Starting near the spine, cut each thin rib gap all the way through with a fine saw or detail blade, working one rib on the left then its partner on the right. Alternating sides keeps the spine supported and reduces the chance of snapping a slim bone sliver. Leave a small uncut bridge where each rib meets the spine so the bars stay firmly attached. Take your time and re-seat the blade often rather than forcing long strokes.

  5. Finish the coiled tail and skull details

    Cut the tightly coiled tail last, since its curved openings remove a lot of material at once. Work from the inside of the coil outward, keeping the thin bony loops connected by short bridges of skin. Clean up the skull's eye and jaw openings, then run your blade back through any rib gap that looks fuzzy. Gently push crumbs out from the inside so you do not stress the bars.

  6. Light it and photograph

    Set a battery LED puck or string inside, never a candle, because the thin ribs dry fast and open flame is a fire risk. Warm white light makes the orange bars pop against the dark spine. Set the pumpkin on a sideboard or shelf with soft ambient light nearby and shoot slightly off to one side. Rub cut edges with a little petroleum jelly to slow drying and keep the fine bones from curling.

Gather your supplies

Check things off as you get ready.

Work on a stable surface, keep your free hand out of the cutting path, and have an adult handle sharp tools.

Three levels of light

  • Leave intact

    The background field of the pumpkin and the darkest outlines between bones stay untouched and dark.

  • Peel & shade

    The skull ridges and the long spine column are skin-peeled for a soft dim orange glow.

  • Cut through

    The dozens of rib gaps and the coiled tail loops are cut through for the brightest ladder of light.

Learn the carving basics

Before you start cutting

How do I keep the thin ribs from snapping?

Work a one inch wall so cuts go through cleanly, and cut ribs in left-right pairs off the scored spine instead of finishing one whole side first. Leave a tiny uncut bridge where each rib meets the spine so the bar is anchored at its base. Use a fresh, sharp fine blade and let the tool do the work rather than pressing hard.

Since this is a concept image, can a real pumpkin hold this many ribs?

Yes, if you keep the design realistic. This picture is an AI concept, so no real pumpkin exists, but the ladder of ribs is carveable when each bar is a bit wider than the gap and stays attached to the spine on one end. Do not thin the bones down to hair-fine slivers or they will crumble.

Should I carve the tail coil before or after the ribs?

After. The coiled tail removes a large connected area, so cutting it early weakens the lower wall while you still have delicate rib work to do. Finish all the ribs first, then open the tail loops last, keeping short skin bridges between the curves.

Your take belongs here, too.

Changed a detail? Made it simpler? Share a photo of your version and tell the community what worked.

Share your pumpkin

More pumpkins like this

You've reached the end · 8 pumpkins
The Patch Report

Fresh pumpkins, in your inbox.

The best new carvings, ideas worth stealing, and how-tos for carving season. Short, seasonal, and gone by November.

A short email during carving season. Unsubscribe anytime. See our privacy policy.