Halloween Pumpkin Carving Contest · Starts October 1st · $500 in prizes
← Back to ideas
@ai_concepts
Sep 14, 2026
Melting Grin Jack-O-Lantern PumpkinAI
0

Melting Grin Jack-O-Lantern Pumpkin

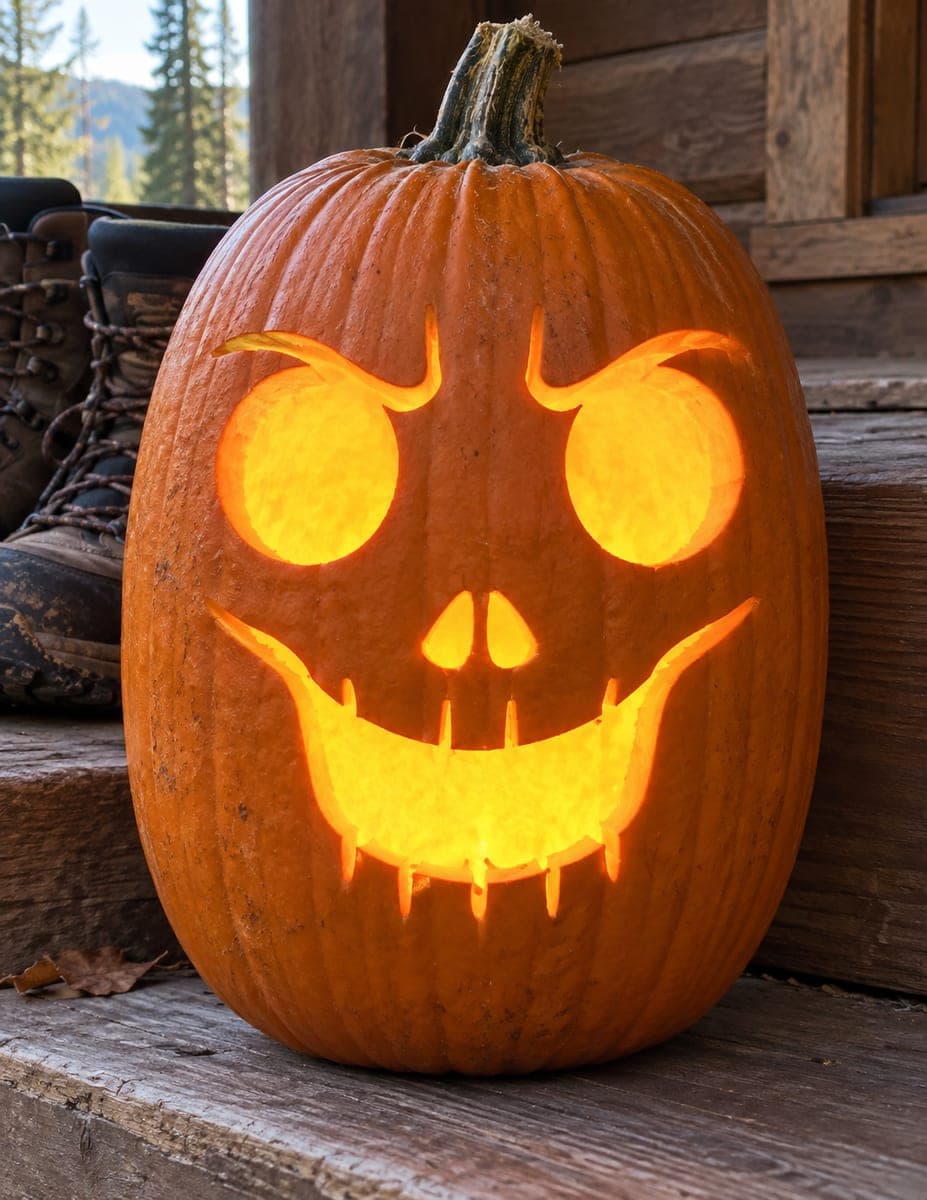
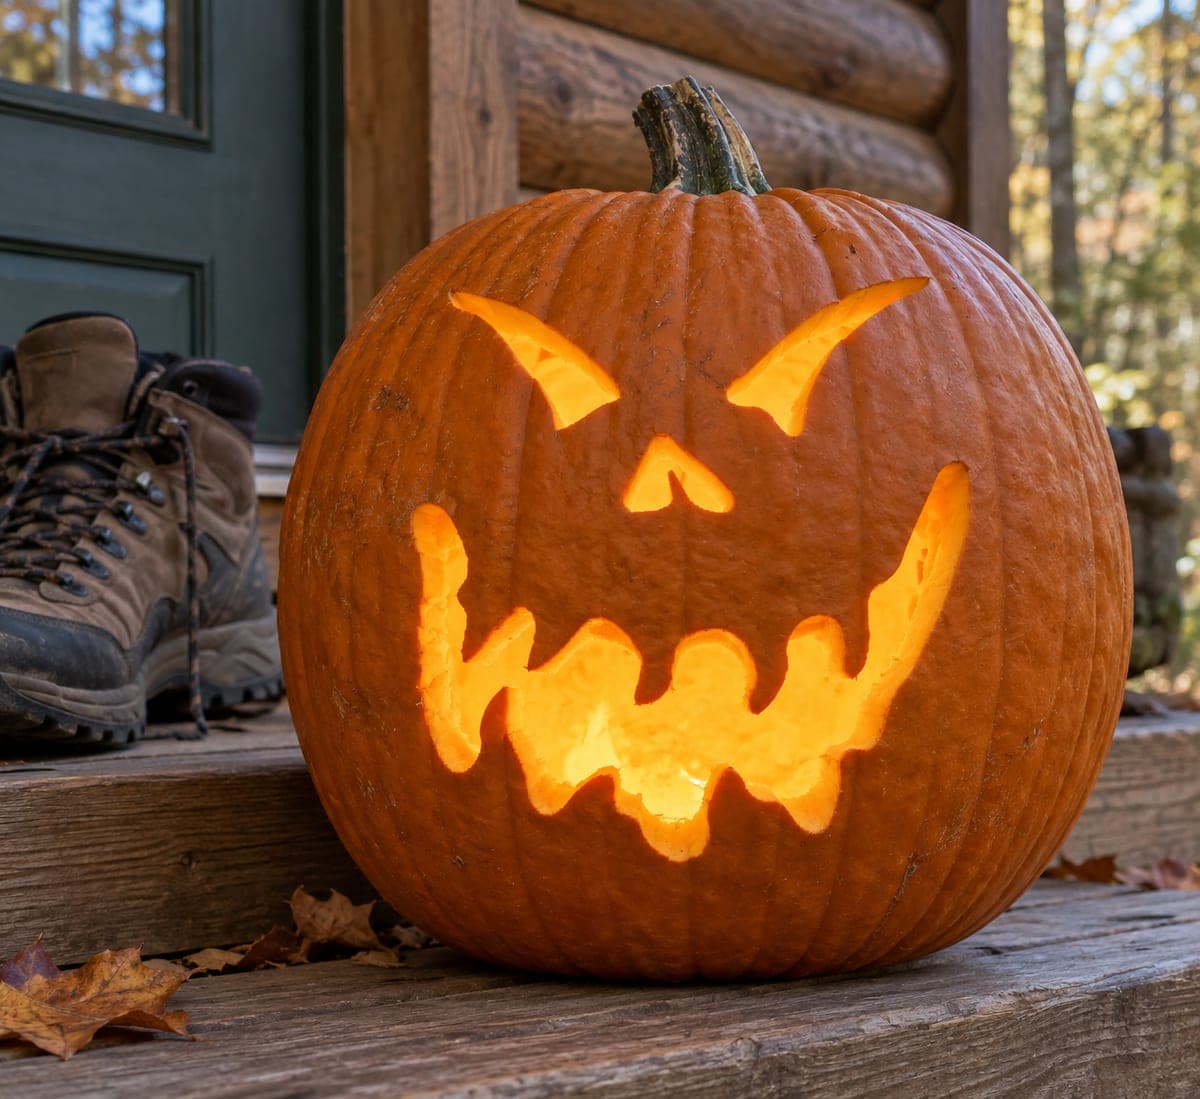
Two small, sharply angled horned eyebrows hover above a broad melting grin whose upper edge drips in irregular rounded waves that pool at the bottom. The horned brows are their own separate cuts, giving this jack-o-lantern a menacing, almost demonic quality. Carve the two small horn-brow pieces first since they are isolated and delicate, then open the large irregular smile, working outward from the center drips so each rounded peak stays supported until the last moment. Backlighting with an orange-tinted LED deepens the dripping effect by casting the wavy edge of the mouth in silhouette.

This is an AI-generated concept image: a realistic, carvable design idea rather than a photo of a finished carve. AI concepts are always labeled and sit out the leaderboard and the contest.

No ratings yet · Sign in to rate

Comments (0)

  • No comments yet — be the first.

Save without an account. Sign in to like or comment.

Our tips for carving a similar design

The core trick here is a wide grin whose upper edge drips down in rounded waves, paired with two small horned brows floating above as separate cuts. Plan it as three isolated openings so the sharp brow points and the wavy mouth peaks each stay supported until the very end. Since this is an AI concept and no real pumpkin exists, keep the drip peaks and brow horns a touch thicker than they look so they hold up in real pumpkin flesh.

Written by PumpkinCarvingIdeas.com, inspired by the image above. These are our suggestions, not instructions from the uploader. This approach to the AI concept has not been tested on a real pumpkin.

From pumpkin to porch

  1. Prep the pumpkin and light hole

    Pick a large, round pumpkin with a smooth front face for the grin. Cut a hole in the back or bottom rather than the top so the front stays clean for the design. Scoop the insides and thin the front wall to about one inch so cutting is easier. A thinner wall makes the wavy mouth edges much smoother to shape.

  2. Transfer the design

    Sketch or tape a stencil showing the two horned brows and the broad dripping grin. Keep the brows small, angled inward, and well above the mouth. Poke holes along all the lines with a pin or awl, then connect the dots with a marker. Double check the drip peaks are wide enough to survive before you cut.

  3. Cut the horned brows first

    Start with the two small brow shapes since they are isolated and delicate. Use a fine detail saw and cut with slow, steady strokes toward each sharp horn tip. Support the flesh with your free hand as pieces come loose. Getting these done first means you are not working near a fragile mouth later.

  4. Open the grin from the center out

    Move to the large smile and work outward from the center drips. Cut each rounded peak and valley one at a time so the neighboring flesh keeps supporting the piece you are working on. Leave the widest openings for last. Take your time on the wavy upper edge, since those curves create the melting effect.

  5. Clean the edges for silhouette

    Go back and bevel the inside edges of the mouth slightly so light spills out evenly. Smooth any rough spots on the drip peaks with the saw tip or a small loop tool. Crisp edges read better in silhouette when backlit. Wipe away pulp and pat the openings dry.

  6. Light it and photograph

    Set an orange-tinted LED inside, placed low and toward the back to throw the wavy mouth edge into silhouette. Never use an open candle, since the thin drips can scorch. Test in a dark room and nudge the light until the drips glow strongest. Photograph on a porch step at dusk for that warm cabin mood.

Gather your supplies

Check things off as you get ready.

Work on a stable surface, keep your free hand out of the cutting path, and have an adult handle sharp tools.

Three levels of light

  • Leave intact

    The main pumpkin skin around the face stays dark and untouched, keeping the grin bold against the body.

  • Peel & shade

    Lightly shave the skin just along the drip edges of the mouth for a soft dim halo that hints at melting.

  • Cut through

    Cut fully through the two horned brows and the broad grin so those shapes blaze brightest.

Learn the carving basics

Before you start cutting

How do I keep the drip peaks from snapping off?

Work outward from the center of the mouth so each rounded peak stays connected to solid flesh until the last moment. Keep the peaks a bit wider than they appear in the concept image, since real pumpkin is more fragile than a rendering. Thinning the front wall first also reduces stress on the tips.

Should the brows connect to the mouth?

No. The horned brows are their own separate cuts floating above the grin, which is what gives this face its demonic look. Keep a solid band of skin between the brows and the mouth. Carving them as isolated shapes keeps the whole design stronger.

Why cut the light hole in the back instead of the top?

A back or bottom hole keeps the front face clean and lets you place the LED low for that silhouette drip effect. It also avoids a top lid that can cast shadows over the grin. Just make the hole big enough to fit your hand and the light.

Your take belongs here, too.

Changed a detail? Made it simpler? Share a photo of your version and tell the community what worked.

Share your pumpkin

More pumpkins like this

You've reached the end · 8 pumpkins
The Patch Report

Fresh pumpkins, in your inbox.

The best new carvings, ideas worth stealing, and how-tos for carving season. Short, seasonal, and gone by November.

A short email during carving season. Unsubscribe anytime. See our privacy policy.