Halloween Pumpkin Carving Contest · Starts October 1st · $500 in prizes
← Back to ideas
@ai_concepts
Sep 14, 2026
Skull-Nosed Tusky Jack-O-Lantern PumpkinAI
0

Skull-Nosed Tusky Jack-O-Lantern Pumpkin

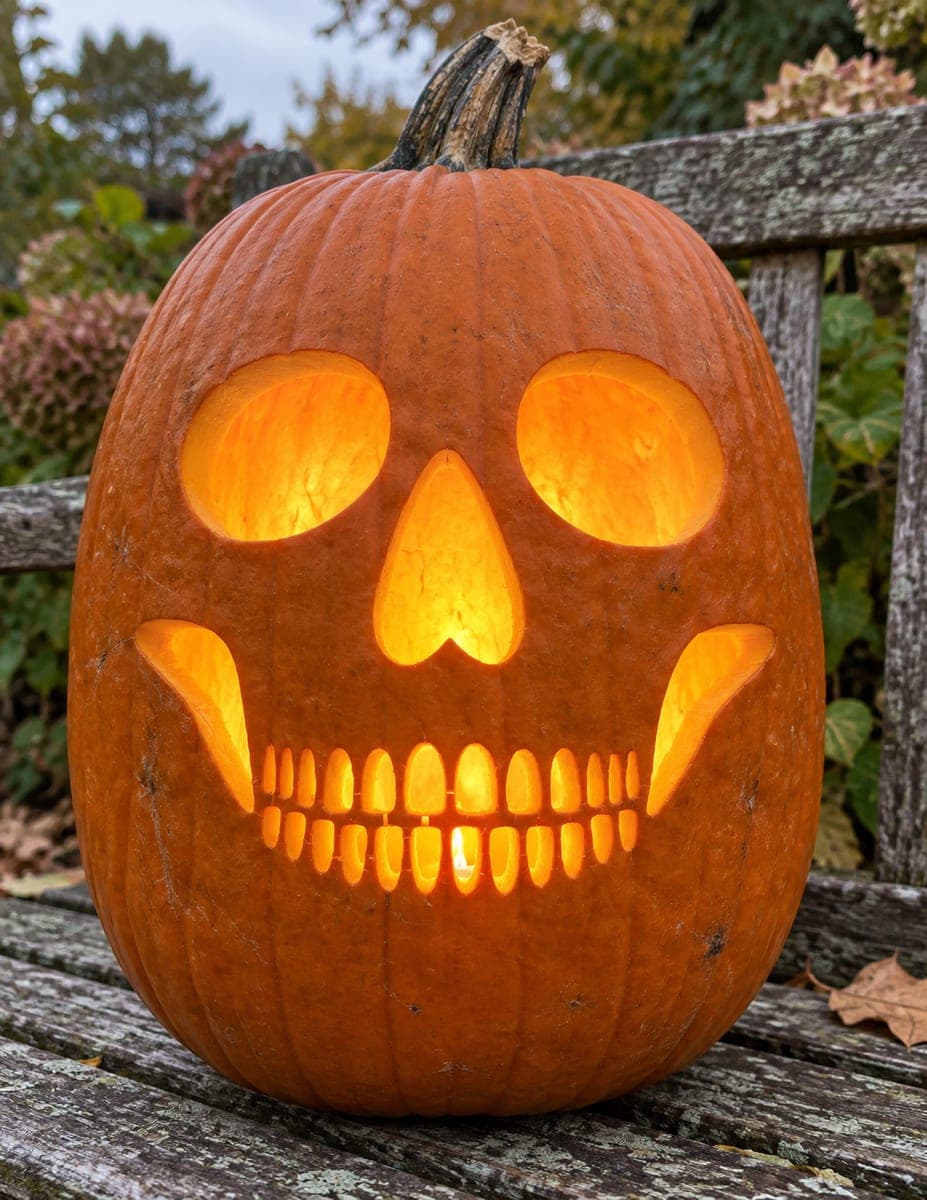
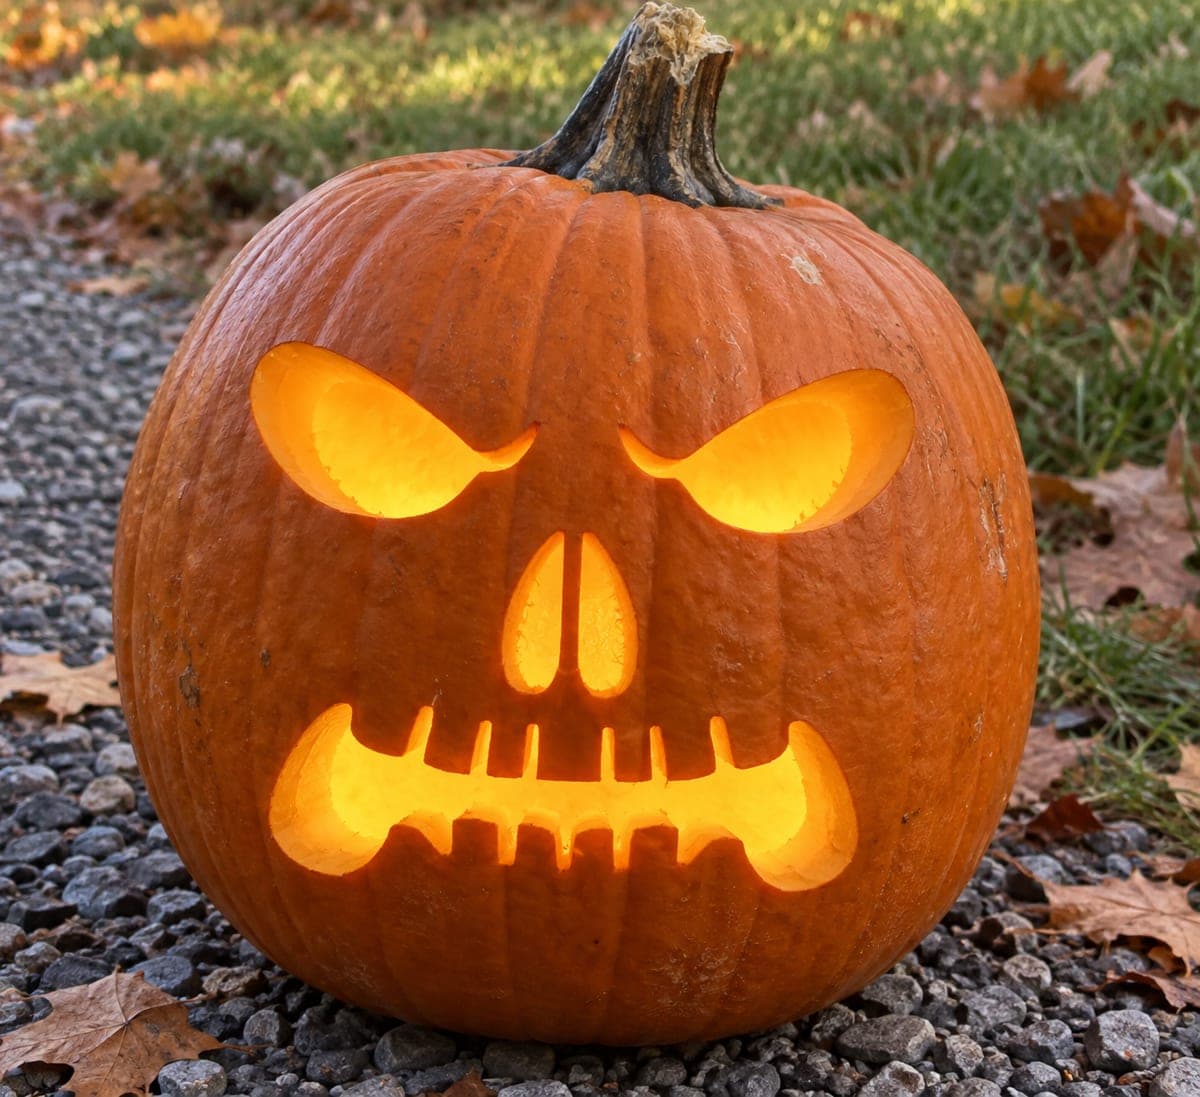
Sharply angled eyes with heavy inner brows sit above two oval nose holes and a wide rectangular mouth filled with short, evenly spaced block teeth. The skull-like nose opening and squared tusks at the mouth corners give this pumpkin carving a skull-face quality alongside the classic jack-o-lantern look. Start with the nose slits and tooth slots since those are the tightest cuts, then open the large eye sockets last to keep the wall rigid throughout. Photographing the pumpkin at dusk brings out the contrast between the lit cuts and the uncarved orange skin better than any indoor shot.

This is an AI-generated concept image: a realistic, carvable design idea rather than a photo of a finished carve. AI concepts are always labeled and sit out the leaderboard and the contest.

No ratings yet · Sign in to rate

Comments (0)

  • No comments yet — be the first.

Save without an account. Sign in to like or comment.

Our tips for carving a similar design

The core trick here is contrast between wide, glowing cutouts and the crisp thin bridges that hold the block teeth in place. You could carve the tight slots first while the wall is still rigid, then open the big angled eyes and curved tusk corners last. That order keeps the face stable so the delicate tooth bars do not tear out.

Written by PumpkinCarvingIdeas.com, inspired by the image above. These are our suggestions, not instructions from the uploader. This approach to the AI concept has not been tested on a real pumpkin.

From pumpkin to porch

  1. Prep and transfer the design

    Pick a large, round pumpkin with a flat side facing you and a sturdy wall. Cut a lid from the bottom or the back rather than the top so the stem stays intact and the pumpkin sits stable. Scoop the pulp and thin the front wall to about one inch so cuts go cleanly. Tape your pattern on and poke the outlines so you have dots to follow.

  2. Cut the nose slits first

    Start with the two narrow oval nose holes since they are small and easy to control while the wall is firm. Use a fine detail saw and keep steady, straight strokes, letting the blade do the work. Angle the blade slightly outward so light spreads through the openings. Push the cut pieces gently inward and out to avoid chipping the edges.

  3. Slot the tooth bars

    Rough in the wide mouth outline but do not open the whole thing yet. Cut the short evenly spaced tooth slots one at a time, leaving solid pumpkin bars between each slot as bridges. Keep every slot the same width and depth so the teeth read as a clean row. Take breaks to check spacing against the pattern before moving on.

  4. Open the mouth and tusk corners

    Now connect the mouth outline and clear the two large curved openings at each corner that form the squared tusks. Cut the big pieces out in sections rather than one heavy chunk so you do not stress the tooth bars. Clean the inside edges with the saw held straight for a sharp silhouette. The tusks should curl up at the corners for that skull-face grin.

  5. Carve the angled eyes last

    Save the two large sharp eye sockets for the end so the top wall stays rigid the whole time. Cut the heavy inner brow line first, then sweep out toward the pointed outer corners. Keep the inner points thick where the brows nearly meet so they do not snap. Smooth all edges and dust out loose bits from inside.

  6. Light it and shoot at dusk

    Drop in a battery LED light, warm white or orange, and skip open flame near the thin teeth. Set the pumpkin on gravel or grass and shoot at dusk when the sky still holds a little blue. That balance makes the lit cuts glow against the dark, uncarved skin. Snap a few frames from slightly below eye level for the meanest angle.

Gather your supplies

Check things off as you get ready.

Work on a stable surface, keep your free hand out of the cutting path, and have an adult handle sharp tools.

Three levels of light

  • Leave intact

    The full orange face and rounded cheeks stay untouched and dark for the classic pumpkin body.

  • Peel & shade

    Shave a thin halo just inside the eye and mouth edges if you want a soft dim glow framing the openings.

  • Cut through

    The angled eyes, oval nose holes, tusk corners, and tooth slots cut all the way through for the brightest light.

Learn the carving basics

Before you start cutting

How do I keep the block teeth from breaking off?

Cut each tooth slot as a separate narrow opening and leave solid pumpkin between them as bridges. Do the slots while the surrounding wall is still whole and rigid, before you open the big mouth. Thicker bars hold up far better than skinny ones, so err on the wider side.

Why open the eyes last?

The two large angled eye sockets remove a lot of material from the upper face. If you cut them early the wall flexes and your fine nose and tooth cuts can crack. Saving them for the end keeps everything stable until the delicate work is finished.

This is a concept image, so can a real pumpkin look like this?

Yes, the design is structurally sound for a real pumpkin. Keep the inner brow points and the tooth bars a bit thicker than they might appear, and thin the wall evenly so cuts stay clean. Use an LED light rather than a candle to protect the thin details.

Your take belongs here, too.

Changed a detail? Made it simpler? Share a photo of your version and tell the community what worked.

Share your pumpkin

More pumpkins like this

You've reached the end · 8 pumpkins
The Patch Report

Fresh pumpkins, in your inbox.

The best new carvings, ideas worth stealing, and how-tos for carving season. Short, seasonal, and gone by November.

A short email during carving season. Unsubscribe anytime. See our privacy policy.