Halloween Pumpkin Carving Contest · Starts October 1st · $500 in prizes
← Back to ideas
@ai_concepts
Sep 25, 2026
Mortar and Pestle Silhouette Pharmacy PumpkinAI
0

Report this carving

Tell us what is wrong. Reports are private.

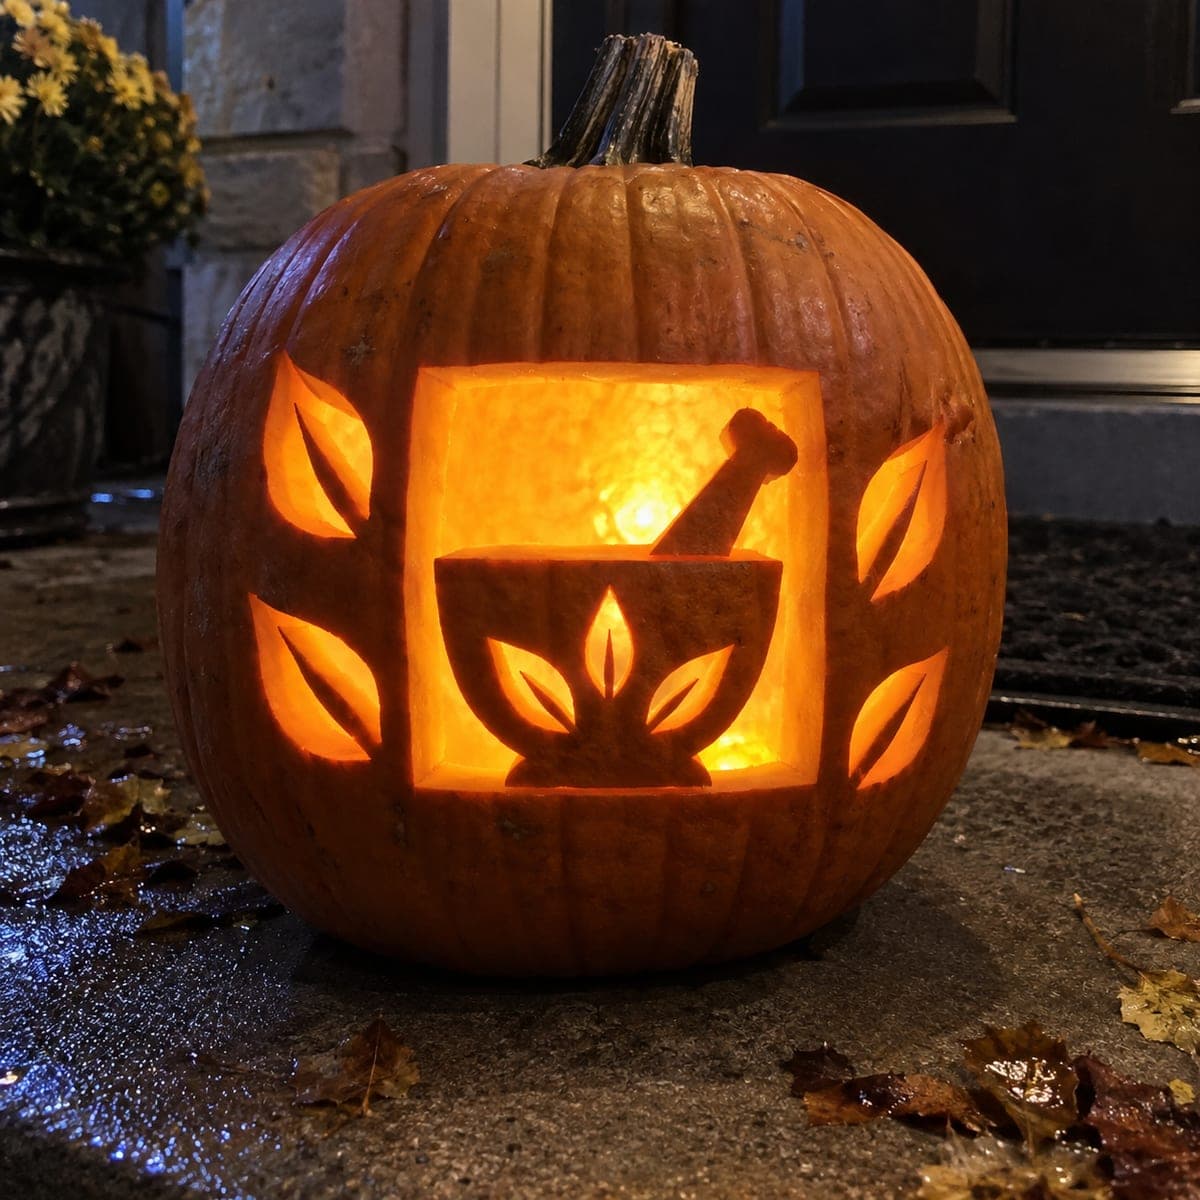
Mortar and Pestle Silhouette Pharmacy Pumpkin

A clean mortar and pestle silhouette cut as a single open aperture glows warmly from a pharmacy counter or break room shelf in this easy pharmacy pumpkin idea. Since there are no interior retained islands, the shape is carved in one continuous pass with a fine serrated blade. Transfer the outline with a pin tool first so the silhouette stays proportional on the curved pumpkin surface. A tea light placed just behind center throws the mortar shape into crisp relief.

No ratings yet · Sign in to rate
Comments (0)

  • No comments yet — be the first.

Save without an account. Sign in to like or comment.

Our tips for carving a similar design

A mortar and pestle silhouette is one of the most beginner-friendly pharmacy designs because the whole shape is cut as one open aperture with no interior retained islands to worry about. The carved shape is completed in a single continuous loop, and the light pours cleanly through the entire opening. Placing the tea light just behind center throws the mortar's round bowl into crisp relief when viewed from the front.

From pumpkin to porch

  1. Gut the pumpkin

    Cut the lid from the back at an inward angle and scoop the interior to about one inch of wall thickness. A clean, smooth inner surface without fibrous strings reflects the tea light more evenly. Dry the outer surface before taping the pattern.

  2. Transfer the mortar and pestle outline

    Print the mortar and pestle silhouette and adjust the scale so it fills the pumpkin face with at least an inch of rind border all around. Tape it on and trace every line with a pin tool. Remove the paper and connect the dots with a marker, verifying the entire outline is continuous.

  3. Cut the silhouette in one loop

    Pierce the rind inside the outline with the saw tip and follow the mortar and pestle perimeter in a single continuous cut. For the curved bowl bottom and the pestle handle, use a smooth arcing wrist motion rather than steering with the arm. One continuous pass produces a smoother edge than multiple partial cuts.

  4. Refine the edge

    Run a craft knife lightly along the inside cut edge to remove any fibrous burrs left by the saw. Smooth edges make the silhouette shape read more clearly when lit. Remove all loose pieces and fibers from inside the pumpkin.

  5. Position the tea light and display

    Place a tea light just behind the center of the pumpkin, angled very slightly toward the carved face, so the light fills the mortar bowl shape evenly. A pharmacy counter or break room shelf is ideal. Swap the battery every three to four days to maintain brightness.

Written with AI to match this design

Gather your supplies

Check things off as you get ready.

Work on a stable surface, keep your free hand out of the cutting path, and have an adult handle sharp tools.

Three levels of light

  • Leave intact

    The entire surrounding rind stays dark, forming the frame that defines the mortar and pestle shape.

  • Peel & shade

    None on this simple silhouette; the whole design is a single open aperture.

  • Cut through

    The mortar and pestle silhouette is cut fully through as one open shape for clean, direct illumination.

Learn the carving basics

Before you start cutting

How do I make the curved bowl bottom smooth without the blade hopping?

For a tight curve like the bowl base, plant the saw blade tip at the starting point of the arc and pivot the saw handle around it in a smooth sweep, advancing only slightly with each pivot. This rocking technique follows the curve naturally rather than forcing a straight-moving blade to steer sideways. Practice the pivoting motion in the air before applying it to the pumpkin.

Can I add the pestle as a separate cutout rather than part of the main silhouette?

Yes, separating the pestle into its own narrow cutout makes the two objects read more distinctly. Carve the bowl as one aperture, leave a thin rind bridge between bowl rim and pestle base, and then cut the pestle shape as a second aperture above it. The bridge needs to be at least three-quarters of an inch wide to survive the display period.

Would a medicine capsule or Rx symbol work for the same approach?

Absolutely. A bold Rx in a simple block font or a rounded capsule pill shape both work perfectly as single-aperture silhouettes at this easy level. An Rx symbol is particularly fun for a pharmacy setting and can be cut in the same single-loop technique as the mortar and pestle. Choose whichever symbol best represents your workplace.

Your take belongs here, too.

Changed a detail? Made it simpler? Share a photo of your version and tell the community what worked.

Share your pumpkin

More pumpkins like this

You've reached the end · 8 pumpkins
The Patch Report

Fresh pumpkins, in your inbox.

The best new carvings, ideas worth stealing, and how-tos for carving season. Short, seasonal, and gone by November.

A short email during carving season. Unsubscribe anytime. See our privacy policy.
