Halloween Pumpkin Carving Contest · Starts October 1st · $500 in prizes
← Back to ideas
@ai_concepts
Sep 25, 2026
Herb Leaf Mortar Capsule Expert Pharmacy PumpkinAI
0

Report this carving

Tell us what is wrong. Reports are private.

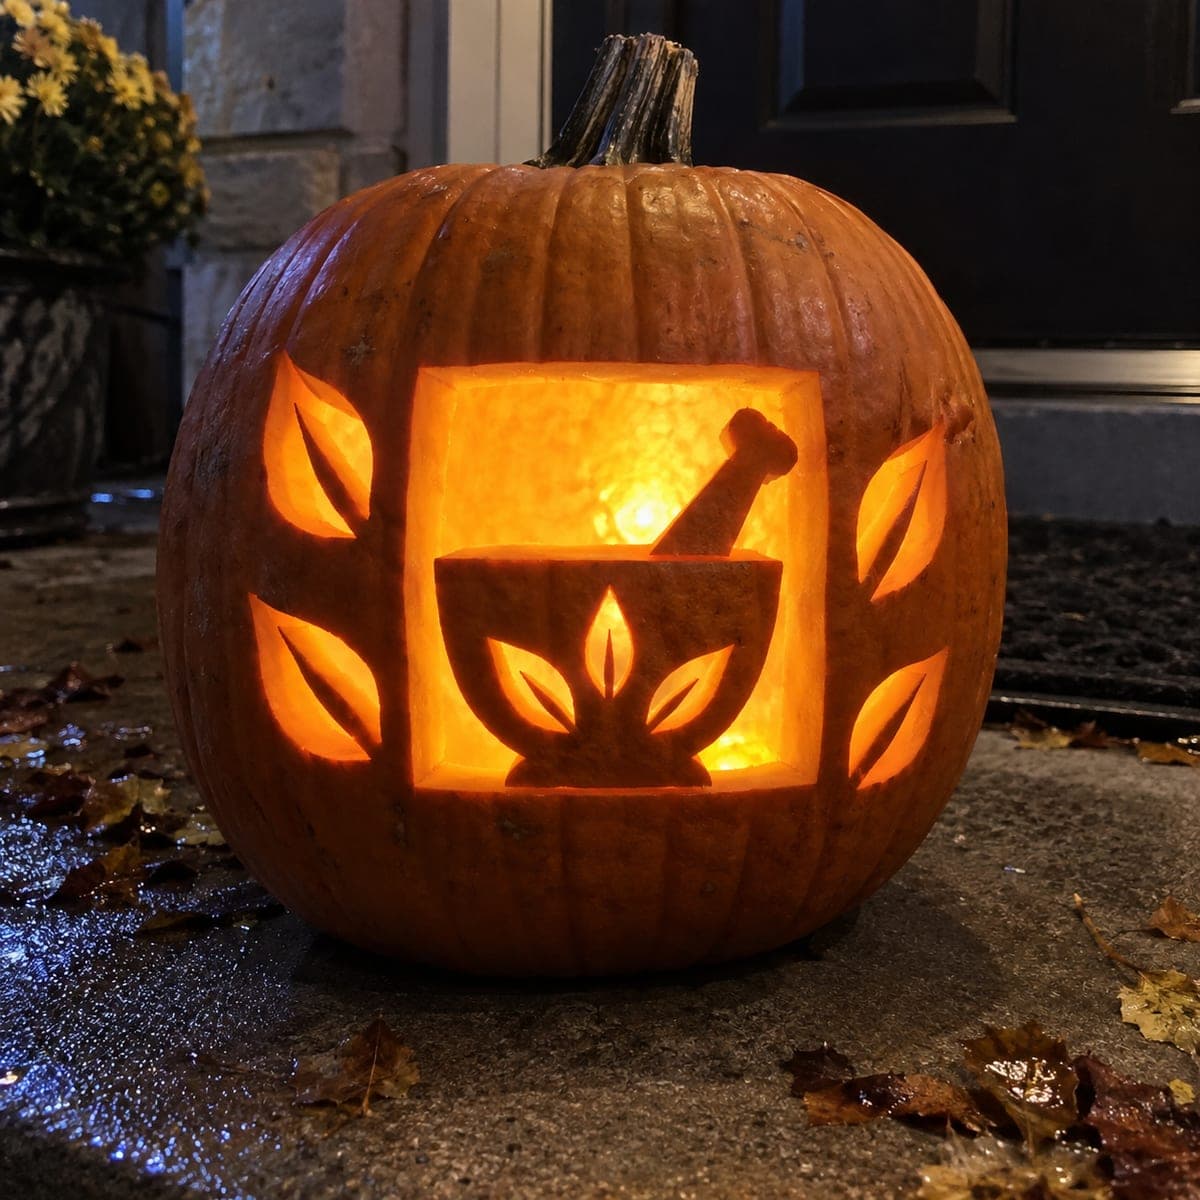
Herb Leaf Mortar Capsule Expert Pharmacy Pumpkin

A complex composition featuring a rooted mortar and pestle, carved herb leaves, and multiple capsule apertures all glowing simultaneously makes this an expert pharmacy pumpkin carving idea worth displaying at a professional conference or pharmacy school event. The mortar bowl and pestle openings are divided by a rooted rim bar that must stay fat throughout carving to support the upper composition. Leaf and capsule apertures rely on continuous surrounding shell and solid dividing bars, so cut each opening from the outside inward. Small upper dot details can retain shallow backing to soften the glow without becoming freestanding.

No ratings yet · Sign in to rate

Comments (0)

  • No comments yet — be the first.

Save without an account. Sign in to like or comment.

Our tips for carving a similar design

This is a complex multi-element composition where a rooted mortar and pestle, carved herb leaves, and multiple capsule apertures must all coexist within a structurally sound rind. The mortar bowl and pestle openings are divided by a rooted rim bar that must remain fat throughout carving to support the upper section of the composition. Leaf and capsule apertures each rely on continuous surrounding shell and solid dividing bars, so cutting proceeds from the outermost elements inward. Small upper dot details can be given shallow backing to soften their glow without becoming freestanding and fragile.

From pumpkin to porch

  1. Full structural plan

    Sketch the composition on paper and label every retained element: the rim bar, pestle shaft, leaf shapes, and capsule bars. For each element, confirm two connection points to the outer shell or to a connected element. Write the planned cut sequence numbered from 1 upward, starting with outermost apertures and ending with the central rim bar area. This plan is the session guide; keep it visible throughout.

  2. Pre-thinning and prep

    Scoop the interior to a consistent three-quarters of an inch across the full carving area. Verify depth at ten or more test points. Transfer the pattern with a pin tool after pre-thinning, not before, so the pin points are fully visible on the thinned wall. Shade all retained elements in pencil after removing the pattern paper.

  3. Cut outermost capsule and leaf apertures

    Open the outermost capsule halves and outer leaf apertures first, following the numbered sequence. Cut each capsule half on one side of its bar, then the opposite side, confirming the bar is solid between cuts. Cut leaf negative space carefully, stopping at each leaf's root connection before coming in from the other direction.

  4. Cut the mortar bowl opening

    Carve the mortar bowl as an open aperture, leaving the foot connected broadly to the lower sill and the rim bar connected to the pestle base above. The rim bar is the most critical structural element in this composition; never cut into it regardless of how small the adjacent opening appears to require. Work slowly around the inside of the bowl, confirming the bar is fat and solid after each pass.

  5. Cut remaining inner elements and dot details

    Complete any remaining inner apertures, including the pestle channel on either side of the shaft. For small upper dot details, cut them as small circular apertures or back them with a gouge pass to keep them as translucent spots rather than freestanding holes. Small freestanding circles in a pumpkin composition invariably fall out within a day or two.

  6. Check glow and display

    Insert the LED puck and view the full composition in a darkened room. Confirm the rim bar reads as a clear dividing element between bowl and pestle areas, and that leaf shapes cast readable silhouettes within the mortar glow. A professional conference or pharmacy school event is the right venue for this level of work.

Written with AI to match this design

Gather your supplies

Check things off as you get ready.

Work on a stable surface, keep your free hand out of the cutting path, and have an adult handle sharp tools.

Three levels of light

  • Leave intact

    Outer shell, rim bar, pestle shaft, leaf shapes, and capsule bars remain fully dark as the structural silhouette skeleton.

  • Peel & shade

    Small upper dot details backed with a shallow gouge pass glow softly as muted accent spots rather than piercing holes.

  • Cut through

    Mortar bowl, capsule halves, and leaf apertures cut fully through emit direct bright light across the full composition.

Learn the carving basics

Before you start cutting

What happens if I accidentally cut into the rim bar mid-session?

Stop immediately and assess how much material is removed. If only the outer skin is nicked, apply craft glue and let it cure for two minutes before continuing. If the cut goes partway through the bar, reinforce the entire bar from the interior with a line of craft glue along the crack and press the sides together firmly. If the bar is cut through, the composition is compromised; continue carving the remaining elements but accept that the rim bar will need a painted repair to read cleanly when lit.

How do I get herb leaf shapes to look botanical rather than generic?

Herb leaf shapes with a pointed tip, a slightly undulating edge, and a visible central vein retained as a thin rind strip look distinctly plant-like rather than generic oval. The central vein strip should root back to the leaf edge at each end and run the full leaf length, acting as both a visual detail and a structural element that keeps the leaf from being a simple open oval. This small design decision moves the leaf from generic to botanical immediately.

How do I balance the overall brightness so no single element dominates?

The mortar bowl is naturally the largest and brightest opening, so reduce its visual dominance by positioning the LED puck slightly off-center away from the bowl and toward the capsule area. This distributes brightness more evenly across the composition. You can also back the inner mortar face very lightly with one gouge pass to slightly diffuse the bowl glow, evening it against the smaller capsule openings.

Your take belongs here, too.

Changed a detail? Made it simpler? Share a photo of your version and tell the community what worked.

Share your pumpkin

More pumpkins like this

You've reached the end · 8 pumpkins
The Patch Report

Fresh pumpkins, in your inbox.

The best new carvings, ideas worth stealing, and how-tos for carving season. Short, seasonal, and gone by November.

A short email during carving season. Unsubscribe anytime. See our privacy policy.