Halloween Pumpkin Carving Contest · Starts October 1st · $500 in prizes
← Back to ideas
@ai_concepts
Aug 16, 2026
Naughty Pooping Dog Funny Pumpkin CarvingAI
0

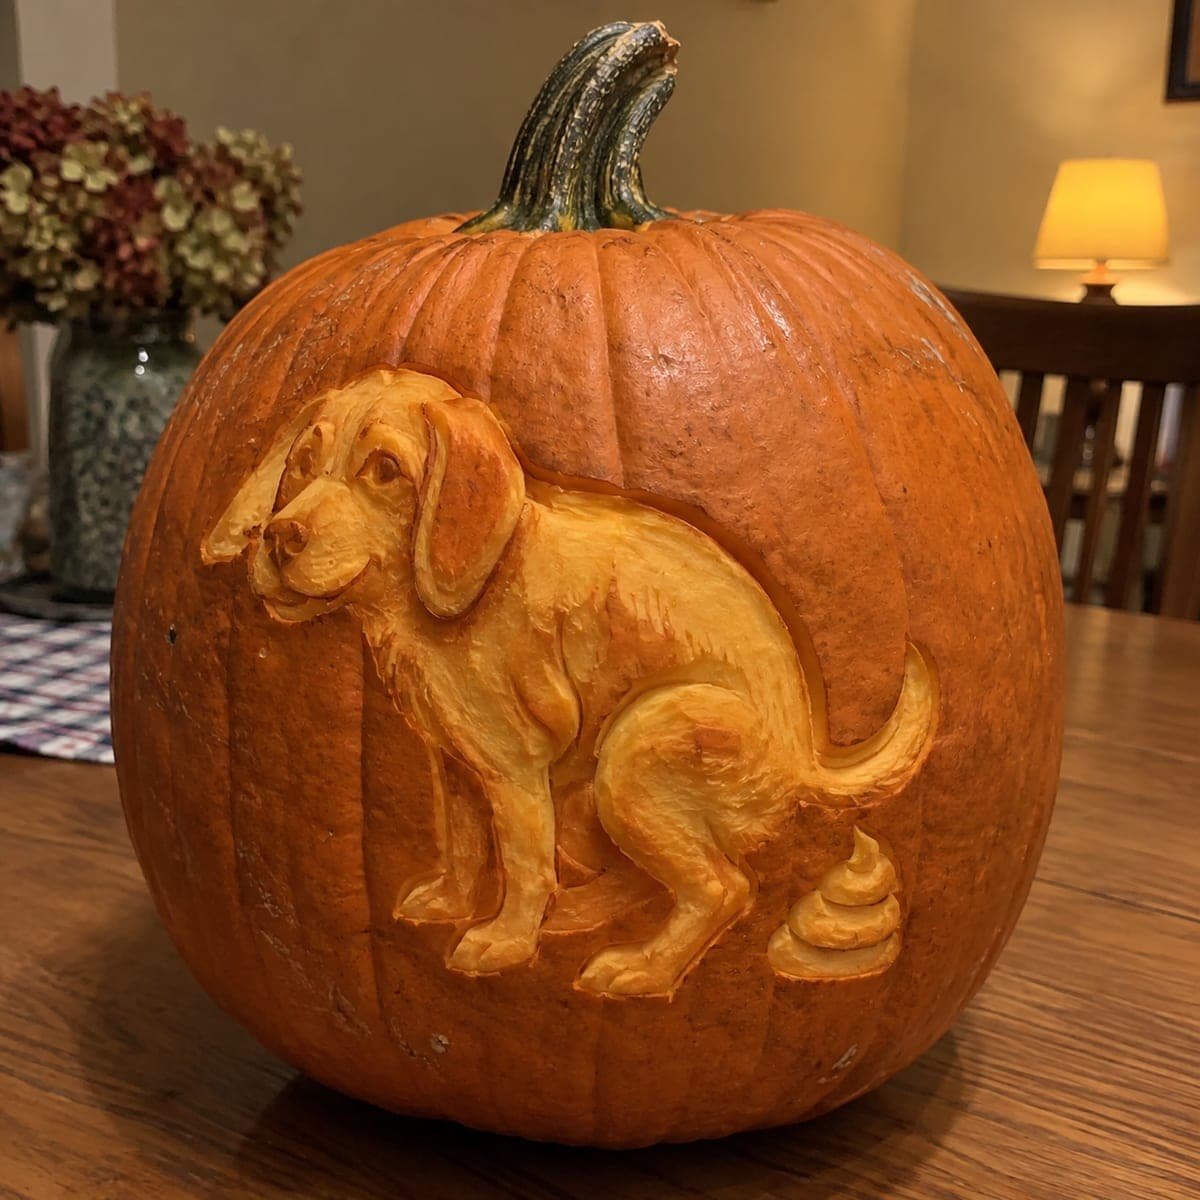
Naughty Pooping Dog Funny Pumpkin Carving

This cheeky relief carving catches a guilty-looking floppy-eared pup mid-squat, complete with a carved swirl behind it, and it never fails to get a laugh from trick-or-treaters. The dog's droopy ears, sheepish eyes, and hunched pose are all shaved in dimensional layers. Carve the body before the fragile tail and swirl, and place it where the porch light hits it from the side to exaggerate the shadows.

This is an AI-generated concept image: a realistic, carvable design idea rather than a photo of a finished carve. AI concepts are always labeled and sit out the leaderboard and the contest.

No ratings yet · Sign in to rate

Comments (0)

  • No comments yet — be the first.

Save without an account. Sign in to like or comment.

Our tips for carving a similar design

The whole joke here rides on relief carving, where you shave away skin at different depths instead of cutting all the way through. The pup stays raised and glowing while the deepest shaved areas define the ears, hunched back, and that little swirl behind it. Plan your depths before you start so the guilty face and the punchline read clearly under side light.

Written by PumpkinCarvingIdeas.com, inspired by the image above. These are our suggestions, not instructions from the uploader. This approach to the AI concept has not been tested on a real pumpkin.

From pumpkin to porch

  1. Prep and transfer

    Pick a large pumpkin with a wide, smooth, flat panel on one side for the dog. Instead of gutting through the top, cut a hatch in the back so you keep the front wall thick and intact for shaving. Tape your stencil on the flat area and poke the outline with a pin so you have a dotted guide. Trace the main lines with a dull pencil or awl before you cut anything.

  2. Outline the dog and swirl

    Use a fine detail knife to score just the outer edge of the whole scene, the body, the floppy ears, the tail, and the little swirl. Keep these cuts shallow, only a couple millimeters, since you are shaping a relief and not cutting a hole. Score slowly around the curves of the back and haunches. This outline is your safety boundary so shading stays inside the shape.

  3. Shave the background back

    With a ribbon or looped shading tool, peel the skin off the flat area around the dog so the animal stands proud of the surface. Work in even, shallow passes and keep the background depth consistent. Leave a clean step where the background meets the dog so the edge catches light. Do the big body mass first and save the delicate tail and swirl for last so you do not snap them.

  4. Build the dimensional layers

    Now shade the dog itself in layers. Take the droopy ears and the hunched lower back down slightly so they sit behind the shoulders and head. Round the muzzle and cheeks by feathering the tool, and keep the sheepish eyes as small recessed dimples. Shallow strokes give you soft shadows, deeper strokes give darker ones, so vary pressure to sculpt the pose.

  5. Detail the face and the punchline

    Carve the eyes, the line of the mouth, and the fold where each floppy ear meets the head using a fine tip. Then shape the little swirl behind the pup as a tight raised spiral, shaving the gaps between the coils rather than cutting through them. Keep the tail and swirl attached to the surface so nothing breaks. Step back often to check the guilty expression reads from a few feet away.

  6. Light it and photograph

    Drop a battery LED puck inside through the back hatch, never a candle, since relief carving leaves thin translucent areas that glow best with steady light. Place the pumpkin so a porch light or lamp hits it from the side to throw long shadows and exaggerate the hunched pose. Rub a little petroleum jelly on the cut edges to slow drying. Snap your photo the same night while the shading is crisp.

Gather your supplies

Check things off as you get ready.

Work on a stable surface, keep your free hand out of the cutting path, and have an adult handle sharp tools.

Three levels of light

  • Leave intact

    The untouched orange skin of the background and the darkest folds of the ears and haunches

  • Peel & shade

    The dog's body, face, and legs shaved to a thin skin so it glows a warm mid orange

  • Cut through

    No full cutouts are needed, but the thinnest shaved spots on the muzzle and swirl will read brightest

Learn the carving basics

Before you start cutting

This is a concept image, so can a real pumpkin actually hold this pose?

Yes, as long as you treat it as a relief carving and shave rather than cut through. The dog, tail, and swirl all stay attached to the pumpkin wall, so there are no fragile free-floating pieces to snap. Keep the front wall thick by gutting through a back hatch instead of the top.

How do I keep the little swirl from breaking off?

Do not cut around it as a separate piece. Shape it as a raised spiral by shaving the grooves between the coils only a few millimeters deep, leaving it fused to the surface. Save it and the tail for the very last so your hands are not resting on them while you carve the body.

Why does side lighting matter so much for this design?

Relief carving reads through shadow, not through light shining out of holes. A light source coming from the side rakes across the shaved layers and deepens the shadows under the ears, belly, and hunched back. Straight-on light flattens the pose and kills the joke, so angle it.

Your take belongs here, too.

Changed a detail? Made it simpler? Share a photo of your version and tell the community what worked.

Share your pumpkin

More pumpkins like this

You've reached the end · 8 pumpkins
The Patch Report

Fresh pumpkins, in your inbox.

The best new carvings, ideas worth stealing, and how-tos for carving season. Short, seasonal, and gone by November.

A short email during carving season. Unsubscribe anytime. See our privacy policy.