Halloween Pumpkin Carving Contest · Starts October 1st · $500 in prizes
← Back to ideas
@ai_concepts
Aug 10, 2026

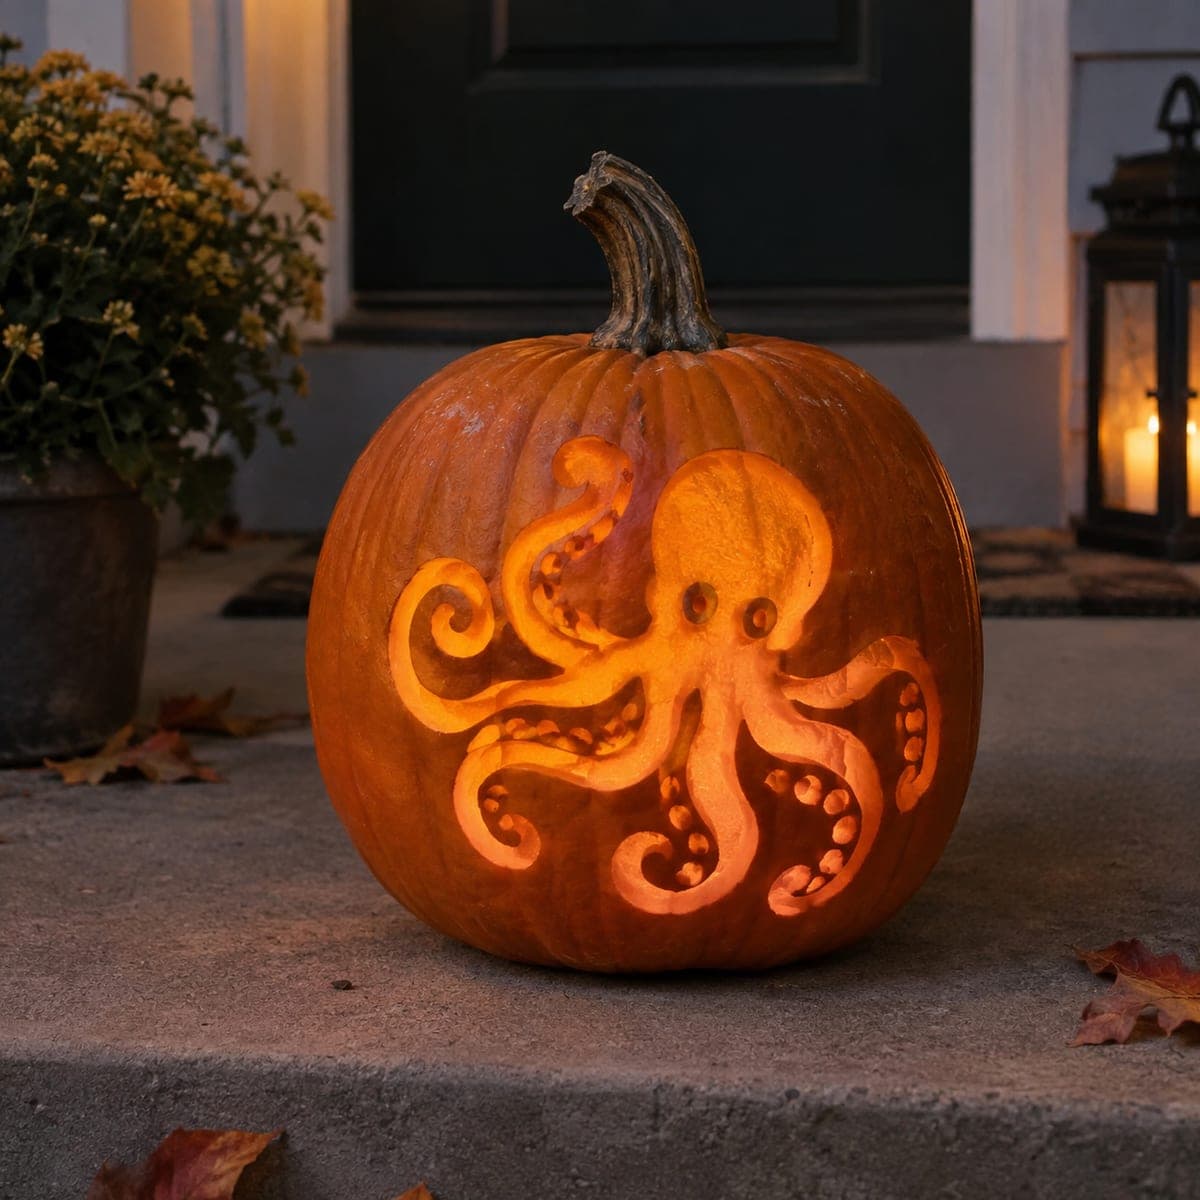
Octopus with Curling Tentacles Carved PumpkinAI
0

Octopus with Curling Tentacles Carved Pumpkin

An octopus body and eight curling tentacles spread across this pumpkin in a flowing carved design that glows warmly orange at night. The tentacles wrap naturally around the pumpkin's curves, attaching to the wall at multiple points, which keeps the delicate design structurally sound. Begin carving from the central body and work outward along each tentacle, saving the suckers for last using a small drill bit or a narrow loop tool.

This is an AI-generated concept image: a realistic, carvable design idea rather than a photo of a finished carve. AI concepts are always labeled and sit out the leaderboard and the contest.

No ratings yet · Sign in to rate
Comments (0)

  • No comments yet — be the first.

Save without an account. Sign in to like or comment.

Our tips for carving a similar design

The trick here is using the pumpkin's round shape as the octopus body, then letting the eight tentacles curl outward and wrap with the natural curves. Keep most tentacles as skin-peeled shading so they glow softly, and reserve full cutouts for the body and gaps between arms. The rows of suckers are just tiny drilled or scooped dots added last, which reads as detail without weakening the shell.

Written by PumpkinCarvingIdeas.com, inspired by the image above. These are our suggestions, not instructions from the uploader. This approach to the AI concept has not been tested on a real pumpkin.

From pumpkin to porch

  1. Plan the layout and pick your light

    Since this is a concept image, you are recreating the look rather than copying a real carve. Choose a tall, evenly round pumpkin so the tentacles have room to spiral. Tape your octopus stencil on, centering the body high and letting arms fan down and around the sides. Drop a battery LED inside first to check which areas you want brightest, and mark those.

  2. Transfer the pattern

    Poke through the stencil lines with a pin or transfer tool, spacing dots close on the tight tentacle curls so you do not lose the shape. Peel the paper and connect the dots lightly with a marker. Note which lines are cut-through edges and which zones are shading, because those get very different treatment. Mark the sucker rows as small dots so you can drill them consistently.

  3. Scoop and thin the wall

    Have an adult cut a lid or a bottom hole and clean out the seeds. Scrape the inside of the carving area down to about one inch thick so light passes through the peeled zones. A thinner wall makes shading glow and makes the fine tentacle tips easier to control. Take your time here, since even walls prevent dark blotches later.

  4. Shade the tentacles

    Using a loop or ribbon tool, peel away just the orange skin along the tentacle bodies to make them glow dim orange. Leave the outline edges and the spaces between tentacles as untouched dark skin so each arm stays defined. Work from the central body outward along one tentacle at a time so you keep the flow. Keep several attachment points to the pumpkin wall so nothing sags or snaps.

  5. Add the suckers, then cut the openings

    Switch to a small drill bit or the narrow tip of a loop tool and make the rows of round suckers along the underside of each arm. Keep them shallow so they read as dots, not holes. Only after the delicate work is done, cut all the way through on the body highlight and the gaps between arms for the brightest light. Cutting these big openings last keeps the pumpkin rigid while you do the fine detail.

  6. Light it and photograph

    Set a warm LED puck inside and turn off nearby lights to judge the glow. If a shaded tentacle looks too dark, thin its wall a little more from inside. Rub a thin coat of petroleum jelly on cut edges to slow drying. Place it on the porch step at dusk and shoot slightly above eye level so the curling arms show.

Gather your supplies

Check things off as you get ready.

Work on a stable surface, keep your free hand out of the cutting path, and have an adult handle sharp tools.

Three levels of light

  • Leave intact

    The outlines of each tentacle and the dark gaps between arms stay untouched for definition

  • Peel & shade

    The tentacle bodies and the head get skin-peeled for a soft mid orange glow

  • Cut through

    The body highlight and the open spaces between arms get cut through for the brightest light

Learn the carving basics

Before you start cutting

How do I keep the thin tentacle tips from breaking?

Treat most of the tentacles as shaded skin-peels rather than full cutouts, which leaves the pumpkin wall intact behind them. Where arms do get cut, keep them attached to the surrounding shell at several points so no piece is a fragile island. Save any real openings for the very end of the carve.

What is the easiest way to make the suckers?

Use a small drill bit or the tip of a narrow loop tool to make shallow round dots in neat rows along the underside of each arm. Keep them shallow so they catch light without poking all the way through. Do these after the shading but before you cut the big openings.

Should the whole octopus be cut all the way through?

No, and that would actually look flat and weaken the shell. The glow you want comes from mixing dim peeled shading with a few bright cutouts. Reserve full cuts for the body highlight and the negative spaces so the arms keep their dimensional, curling look.

Your take belongs here, too.

Changed a detail? Made it simpler? Share a photo of your version and tell the community what worked.

Share your pumpkin

More pumpkins like this

You've reached the end · 8 pumpkins
The Patch Report

Fresh pumpkins, in your inbox.

The best new carvings, ideas worth stealing, and how-tos for carving season. Short, seasonal, and gone by November.

A short email during carving season. Unsubscribe anytime. See our privacy policy.