Halloween Pumpkin Carving Contest Β· Starts October 1st Β· $500 in prizes
← Back to ideas
@ai_concepts
Aug 17, 2026
Curly Tentacle Octopus Etched Pumpkin DesignAI
0

Curly Tentacle Octopus Etched Pumpkin Design

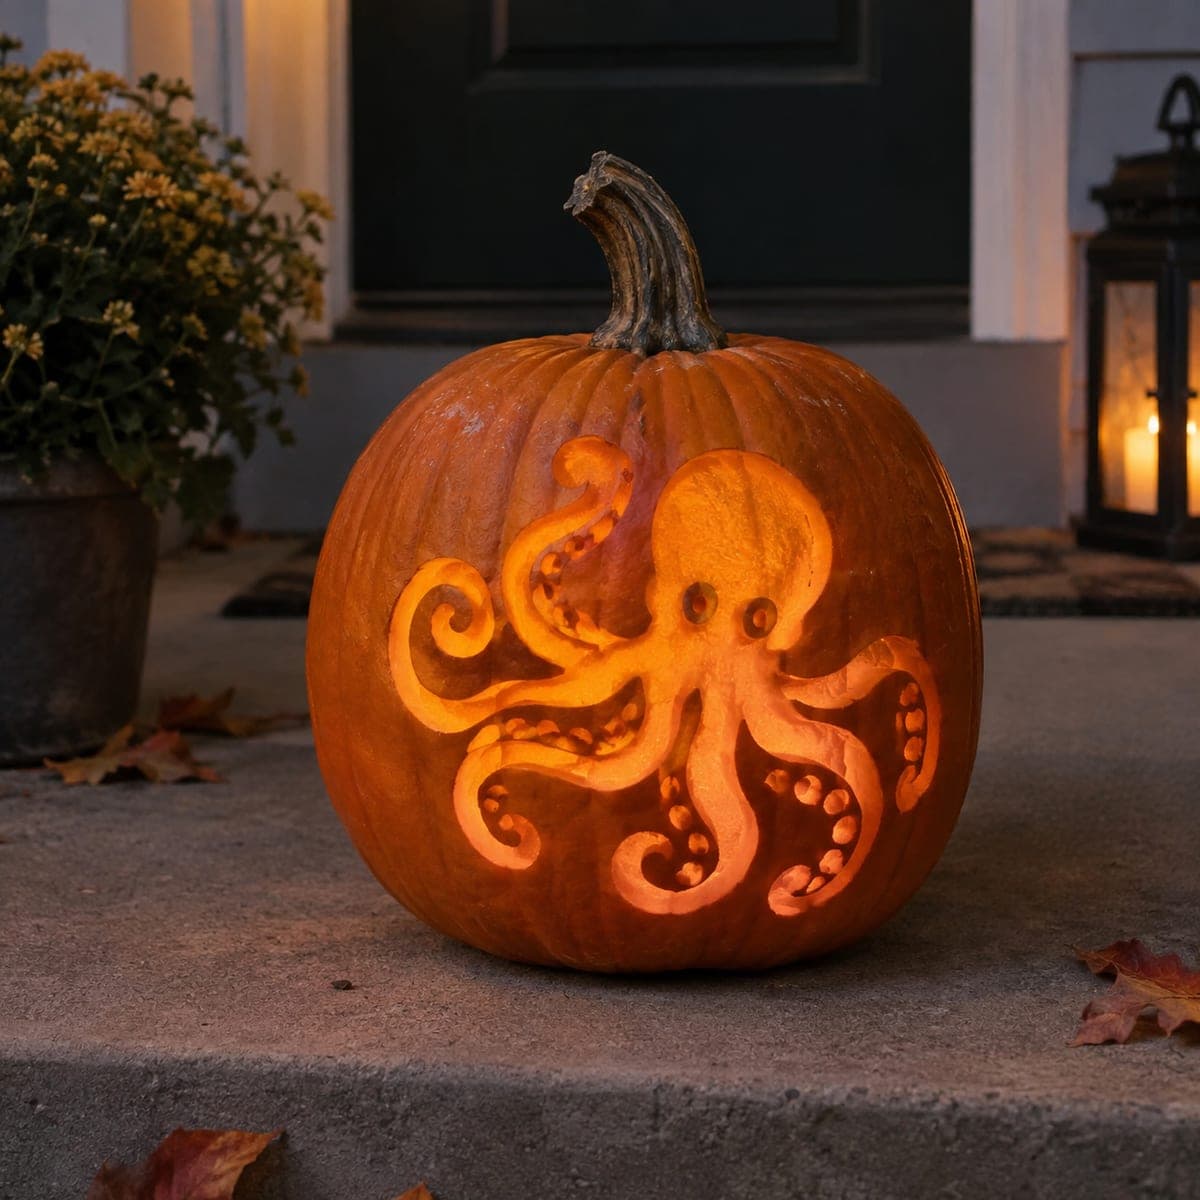
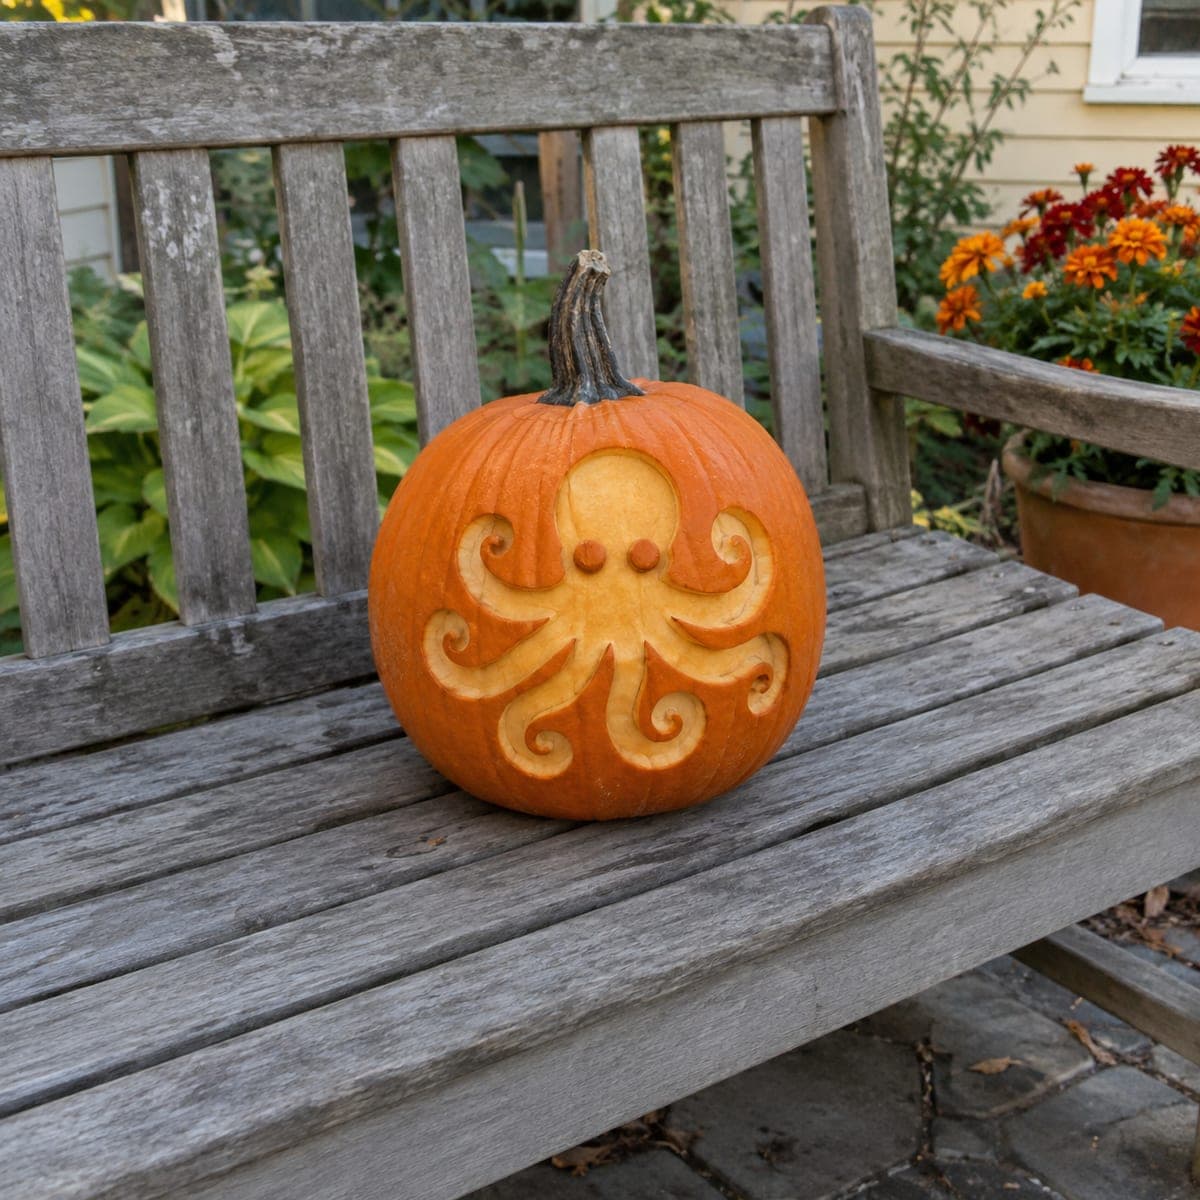
Eight curling tentacles spiral out from a round-headed octopus in this etched pumpkin, carved shallow so the pale rind reads clearly even in daylight. The design leans on symmetry, which makes it easier than it looks; each arm is basically the same curl repeated at different angles. Draw a light grid around the head to place the tentacles evenly, then peel each arm with a loop tool and finish the two dot eyes deepest of all.

This is an AI-generated concept image: a realistic, carvable design idea rather than a photo of a finished carve. AI concepts are always labeled and sit out the leaderboard and the contest.

No ratings yet Β· Sign in to rate

Comments (0)

  • No comments yet β€” be the first.

Save without an account. Sign in to like or comment.

Our tips for carving a similar design

The core trick here is shallow etching, where you peel away only the top skin so the pale rind glows soft orange instead of cutting all the way through. The octopus reads through symmetry, so each of the eight tentacles is the same simple curl repeated at a new angle around a round head. Plan to draw a light grid, etch the arms with a loop tool, and save the two dot eyes for the deepest cuts.

Written by PumpkinCarvingIdeas.com, inspired by the image above. These are our suggestions, not instructions from the uploader. This approach to the AI concept has not been tested on a real pumpkin.

From pumpkin to porch

  1. Pick the pumpkin and transfer the design

    Choose a tall, round pumpkin with a smooth, blemish-free face so the etched arms stay crisp. Since this is a concept design, sketch or print the octopus first, then draw a light pencil grid around where the head will sit to space the tentacles evenly. Tape the pattern flat and poke or trace the main lines onto the skin. Symmetry does the heavy lifting, so take your time getting the arms mirrored before you cut anything.

  2. Open a lid or a back door

    Cut a hole to gut and light the pumpkin. A back door low on the shell keeps the front face clean and hides the LED, which suits a daylight-display piece like this. If you prefer a traditional lid, angle the cut inward so it does not fall through. Scoop the pulp and thin the front wall to about one inch so light passes through your etched areas.

  3. Etch the tentacle curls

    Using a loop or ribbon tool, peel away the skin along each tentacle to expose the pale rind underneath. Keep the depth shallow and even, about an eighth of an inch, so the arms read as a soft glowing band rather than open holes. Work one curl at a time and rotate the pumpkin to match the mirror-image arm on the other side. Clean up the scroll tips with a small detail tool so each spiral ends in a neat point.

  4. Shape the round head

    Etch the large circular head the same way, peeling the skin inside the outline for a smooth pale dome. Leave a thin ridge of untouched skin between the head and the tentacles so the shapes stay separated and defined. Blend the loop-tool strokes in one direction to avoid a patchy surface. Step back often to check the head stays symmetrical over the arms.

  5. Cut the eyes last

    Finish with the two small dot eyes, cutting these all the way through for the brightest points on the whole face. Because they are tiny and structural, drill or poke a pilot hole first, then widen with a small blade. Save these for last so the shell stays strong while you handle the big etched areas. Two clean dots give the octopus its whole expression, so keep them even and round.

  6. Light it and photograph

    Drop in a battery LED, warm white or amber, and set it low inside so the etched arms catch the glow. For daytime, the pale rind reads on its own, so display it on a shaded porch or bench. Rub a little petroleum jelly on the cut eyes to slow drying. Snap your photo in soft evening light to show both the glow and the etched texture.

Gather your supplies

Check things off as you get ready.

Work on a stable surface, keep your free hand out of the cutting path, and have an adult handle sharp tools.

Three levels of light

  • Leave intact

    The untouched orange skin of the head interior and the thin ridges separating each arm stay dark.

  • Peel & shade

    The eight curling tentacles and the round head, skin-peeled to a dim orange glow.

  • Cut through

    The two small dot eyes, cut through for the brightest points on the face.

Learn the carving basics

Before you start cutting

How do I keep all eight tentacles even?

Draw a light pencil grid or clock face around the head before you cut, marking where each arm starts. Space them like spokes on a wheel, then repeat the same curl shape at each angle. Etching pairs of arms across from each other helps you spot any drift early.

How deep should I etch so it shows in daylight?

Keep the etching shallow, about an eighth of an inch, just enough to remove the skin and expose the pale rind. That pale layer reads clearly in daytime without needing light behind it. Going too deep risks breaking through and losing the clean glowing-band look.

Can I skip the loop tool and use a knife?

A loop or ribbon tool is ideal because it shaves skin evenly and follows curves smoothly. If you only have a knife, score the outline first, then carefully peel the skin inside with the tip held at a low angle. Work slowly on the scroll tips so they do not tear.

Your take belongs here, too.

Changed a detail? Made it simpler? Share a photo of your version and tell the community what worked.

Share your pumpkin

More pumpkins like this

You've reached the end Β· 8 pumpkins
The Patch Report

Fresh pumpkins, in your inbox.

The best new carvings, ideas worth stealing, and how-tos for carving season. Short, seasonal, and gone by November.

A short email during carving season. Unsubscribe anytime. See our privacy policy.