Halloween Pumpkin Carving Contest · Starts October 1st · $500 in prizes
← Back to ideas
@ai_concepts
Sep 14, 2026
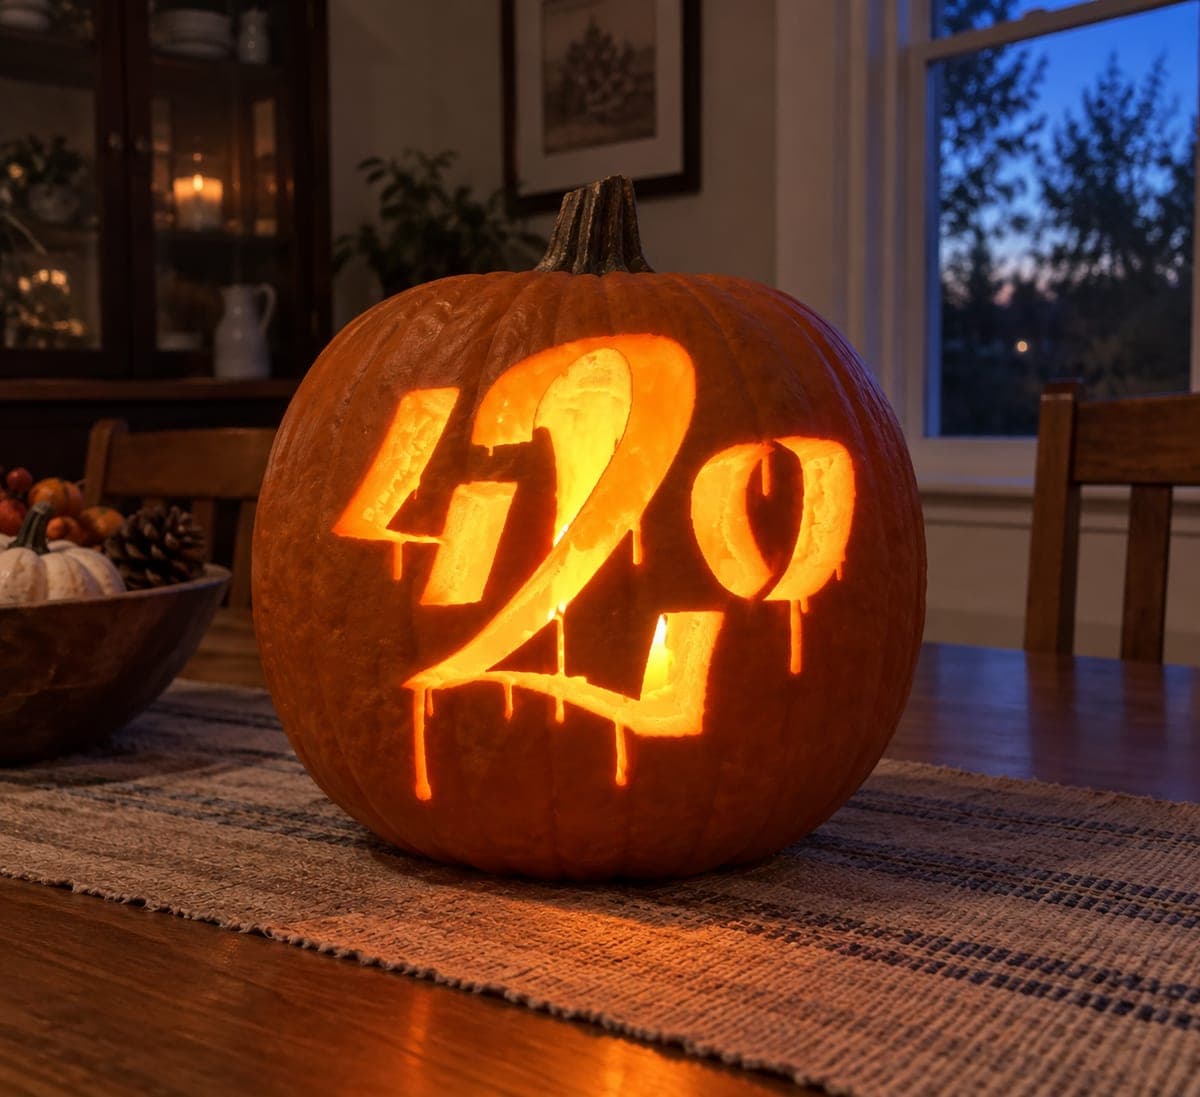
Overlapping 420 Number PumpkinAI
0

Overlapping 420 Number Pumpkin

Bold dripping-style numerals spell out 420 across the pumpkin face, with each digit rendered in a graffiti-influenced font that includes downward drip extensions below the baseline. The cutout technique opens the digits as glowing voids, and the drips add elongated pierced channels below each number. Keep the thin wall between the 4 and the 2 at least half an inch wide; that bridge is the most structurally critical point and if it fails the whole face can sag.

This is an AI-generated concept image: a realistic, carvable design idea rather than a photo of a finished carve. AI concepts are always labeled and sit out the leaderboard and the contest.

No ratings yet · Sign in to rate
Comments (0)

  • No comments yet — be the first.

Save without an account. Sign in to like or comment.

Our tips for carving a similar design

The core trick here is treating three overlapping graffiti numerals as one connected cutout, with drip extensions pulling the glow downward below each digit. You carve the numbers as full openings so the light reads as bright shapes, then add narrow drip channels to fake a melting-paint look. The whole plan lives or dies on the thin wall between the 4 and the 2, so plan every cut around protecting that bridge.

Written by PumpkinCarvingIdeas.com, inspired by the image above. These are our suggestions, not instructions from the uploader. This approach to the AI concept has not been tested on a real pumpkin.

From pumpkin to porch

  1. Plan and transfer the layout

    Since this is a concept design, sketch or print the 420 numerals so they overlap slightly and fill most of the pumpkin face. Tape the pattern flat and poke transfer dots along every edge, including the drip tails below each digit. Before you cut anything, mark the bridge between the 4 and the 2 and make sure it stays at least half an inch wide. Widen it now if your dots crowd it, because you cannot add material back later.

  2. Open the lid and clean out the wall

    An adult should cut a lid from the bottom or the back rather than the top so the stem stays intact for looks. Scoop the guts and scrape the inside of the carving wall down to about an inch thick with a loop tool. A thinner, even wall lets light pass and makes the numeral cuts far easier. Keep the wall behind the 4-to-2 bridge a touch thicker for support.

  3. Score the outlines first

    Use a fine detail saw to lightly trace every numeral edge without pushing all the way through. This gives you clean guide lines and lets you double check spacing before committing. Pay special attention to the tight curves of the 2 and the 0. Leave the drip tails scored but uncut for now.

  4. Cut the smaller shapes before the big ones

    Full cutouts weaken the face as you go, so remove the smallest interior pieces first, then the drip channels, then the large open bellies of the numbers. Work from the center outward and always cut toward open space, not toward the bridge. Support each piece with your free hand as it releases so it does not tear the surrounding wall. Save the widest openings in the 0 and the 4 for last.

  5. Refine the drips and the bridge

    Taper each drip channel so it narrows as it runs down, which sells the melting-paint effect. Recheck the 4-to-2 bridge and gently bevel its back edge so more light reaches it without thinning the front face. If any edge feels fragile, leave a hair more skin rather than chasing a perfect line. Smooth rough cuts with a small clay tool or sandpaper wrapped on a stick.

  6. Light it and photograph

    Drop in one or two battery LED lights, warm white or amber, and never a candle near these large openings. Push the lights toward the back wall so the glow spreads evenly across all three numerals. Shoot in a dim room at dusk so the cutouts read bright against the shell. If the bottom drips look faint, add a second LED low inside the cavity.

Gather your supplies

Check things off as you get ready.

Work on a stable surface, keep your free hand out of the cutting path, and have an adult handle sharp tools.

Three levels of light

  • Leave intact

    The broad orange face around the numbers stays untouched and dark to frame the glow.

  • Peel & shade

    Shave a thin skin layer on the drip tails for a dim, watery glow that fades toward the bottom.

  • Cut through

    Fully open the bodies of the 4, 2, and 0 so the numerals burn brightest.

Learn the carving basics

Before you start cutting

How do I keep the bridge between the 4 and the 2 from breaking?

Mark that wall before any cutting and keep it at least half an inch wide across its whole length. Cut the shapes on either side of it last so the face stays supported as long as possible, and always saw away from the bridge. If it feels flexible, leave it a little wider rather than trimming for a cleaner line.

What is the best order to cut so many overlapping openings?

Go smallest to largest. Remove tiny interior slivers and the drip channels first, then the medium shapes, and save the wide bellies of the numerals for the end. Large openings weaken the shell, so cutting them last keeps the pumpkin firm while you do the fussy work.

Do I need a special font to make the numbers look like this?

A chunky graffiti or bubble-style numeral works best because thick strokes hold up better than thin ones and give you room for the drip tails. Choose or draw digits with generous overlap so they read as one connected design. Avoid skinny, sharp-cornered fonts that leave fragile walls.

Your take belongs here, too.

Changed a detail? Made it simpler? Share a photo of your version and tell the community what worked.

Share your pumpkin

More pumpkins like this

You've reached the end · 8 pumpkins
The Patch Report

Fresh pumpkins, in your inbox.

The best new carvings, ideas worth stealing, and how-tos for carving season. Short, seasonal, and gone by November.

A short email during carving season. Unsubscribe anytime. See our privacy policy.