Halloween Pumpkin Carving Contest · Starts October 1st · $500 in prizes
← Back to ideas
@ai_concepts
Sep 14, 2026
Simple 420 Numeral PumpkinAI
0

Simple 420 Numeral Pumpkin

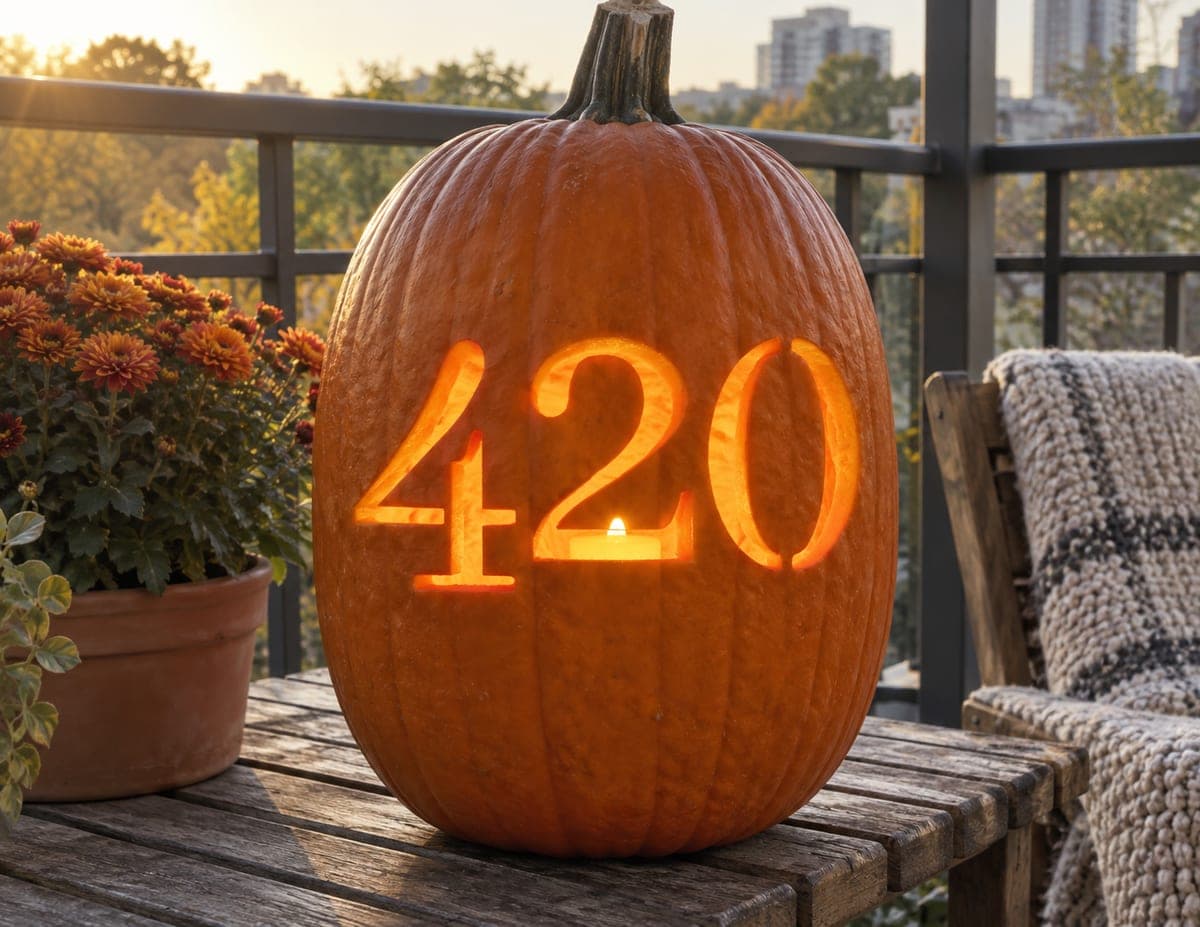
Three clean serif numerals spelling 420 are spaced evenly across a tall oval pumpkin, each cut through to let warm candlelight glow from the interior. The restrained, almost typographic style makes this one of the more subtle 420 pumpkin carving ideas in this style. The zero's interior island is the trickiest part: score the bridge connections at top and bottom before cutting the outer oval so the center piece stays put until you are ready to remove it deliberately.

This is an AI-generated concept image: a realistic, carvable design idea rather than a photo of a finished carve. AI concepts are always labeled and sit out the leaderboard and the contest.

No ratings yet · Sign in to rate
Comments (0)

  • No comments yet — be the first.

Save without an account. Sign in to like or comment.

Our tips for carving a similar design

The whole design leans on three bold serif numerals cut fully through so the interior light reads as crisp glowing shapes. The one real trick is the zero, which has a floating center island that needs small bridges at the top and bottom to hold it in place until you decide to remove it. Plan the spacing first, cut the solid numerals, then handle the zero last.

Written by PumpkinCarvingIdeas.com, inspired by the image above. These are our suggestions, not instructions from the uploader. This approach to the AI concept has not been tested on a real pumpkin.

From pumpkin to porch

  1. Pick a tall, flat-faced pumpkin

    Choose a tall oval pumpkin with one smooth, fairly flat side facing you. A flat panel keeps the three numerals from distorting as they wrap around the curve. Wipe the surface clean and dry so your stencil will sit flat. Set it at a comfortable working height on a stable table.

  2. Open the lid and clean out the inside

    Have an adult cut a lid from the bottom rather than the top so the stem stays intact and the pumpkin sits flat. Scoop the seeds and scrape the front wall down to about an inch thick with a sturdy spoon or scraper. A thinner front wall makes the numerals much easier to cut through cleanly. Even walls also let the light spread more evenly behind all three shapes.

  3. Transfer the 420 stencil

    Center your three numerals across the front and space them evenly by eye or with light pencil marks. Tape a printed stencil in place and poke the outlines with a pin or pencil tip, following every serif edge. Pay special attention to marking the zero's inner oval and note where you will leave two small bridges, one at the top and one at the bottom of that inner shape. Remove the paper and check that all lines are clear before cutting.

  4. Cut the 4 and the 2 first

    Using a small serrated carving saw, cut the solid numerals first while the pumpkin is still strong. Keep the blade straight in and out, and make gentle sawing strokes rather than forcing it. Cut the interior triangle of the 4 as its own piece so the number reads correctly. Push each freed piece out toward you and tidy the edges as you go.

  5. Cut the zero and save the island for last

    Score the top and bottom bridge connections lightly so the center island knows where to stay attached. Cut the outer oval of the zero all the way around, leaving those two small bridges intact so the center piece cannot fall in. Step back and decide how open you want it, then deliberately trim the bridges and lift the island out. For a cleaner typographic look, remove it fully; to keep the shape reinforced, leave the bridges thin but in place.

  6. Light it and photograph at dusk

    Drop in a battery LED puck or a string of warm LEDs, never an open flame, since the deep front cutouts channel a lot of light. Set the pumpkin on a porch rail or table and shoot at dusk when the sky still holds some color. Rotate it slightly until all three numerals glow evenly. A light coat of petroleum jelly on the cut edges will slow drying if you want it to last a few extra days.

Gather your supplies

Check things off as you get ready.

Work on a stable surface, keep your free hand out of the cutting path, and have an adult handle sharp tools.

Three levels of light

  • Leave intact

    The whole orange body of the pumpkin stays untouched and dark, framing the numerals.

  • Peel & shade

    Optional skin-peeling around the numeral edges would add a faint halo, though the pictured style keeps it minimal.

  • Cut through

    The three numerals and the zero's inner oval are cut fully through for the brightest glow.

Learn the carving basics

Before you start cutting

How do I keep the zero's center from falling in?

Score and keep two small bridges, one at the top and one at the bottom of the inner oval, before you cut the outer edge. Those bridges hold the island steady while you work. Only trim them away at the very end once you have decided how open you want the zero to look.

Since this is an AI concept, can a real pumpkin look the same?

Yes, the design is fully carvable in real life. Keep the numeral strokes reasonably thick so the serifs do not crumble, and thin the front wall to about an inch for clean cuts. Swap the pictured candle for a battery LED to keep the deep cutouts safe.

How do I space three numerals evenly?

Find the vertical center of the flat face and place the 2 there first, then set the 4 and the 0 on either side with equal gaps. Light pencil guide marks help before you tape the stencil down. Step back and check the balance from a few feet away before you start cutting.

Your take belongs here, too.

Changed a detail? Made it simpler? Share a photo of your version and tell the community what worked.

Share your pumpkin

More pumpkins like this

You've reached the end · 8 pumpkins
The Patch Report

Fresh pumpkins, in your inbox.

The best new carvings, ideas worth stealing, and how-tos for carving season. Short, seasonal, and gone by November.

A short email during carving season. Unsubscribe anytime. See our privacy policy.