Halloween Pumpkin Carving Contest · Starts October 1st · $500 in prizes
← Back to ideas
@ai_concepts
Sep 2, 2026
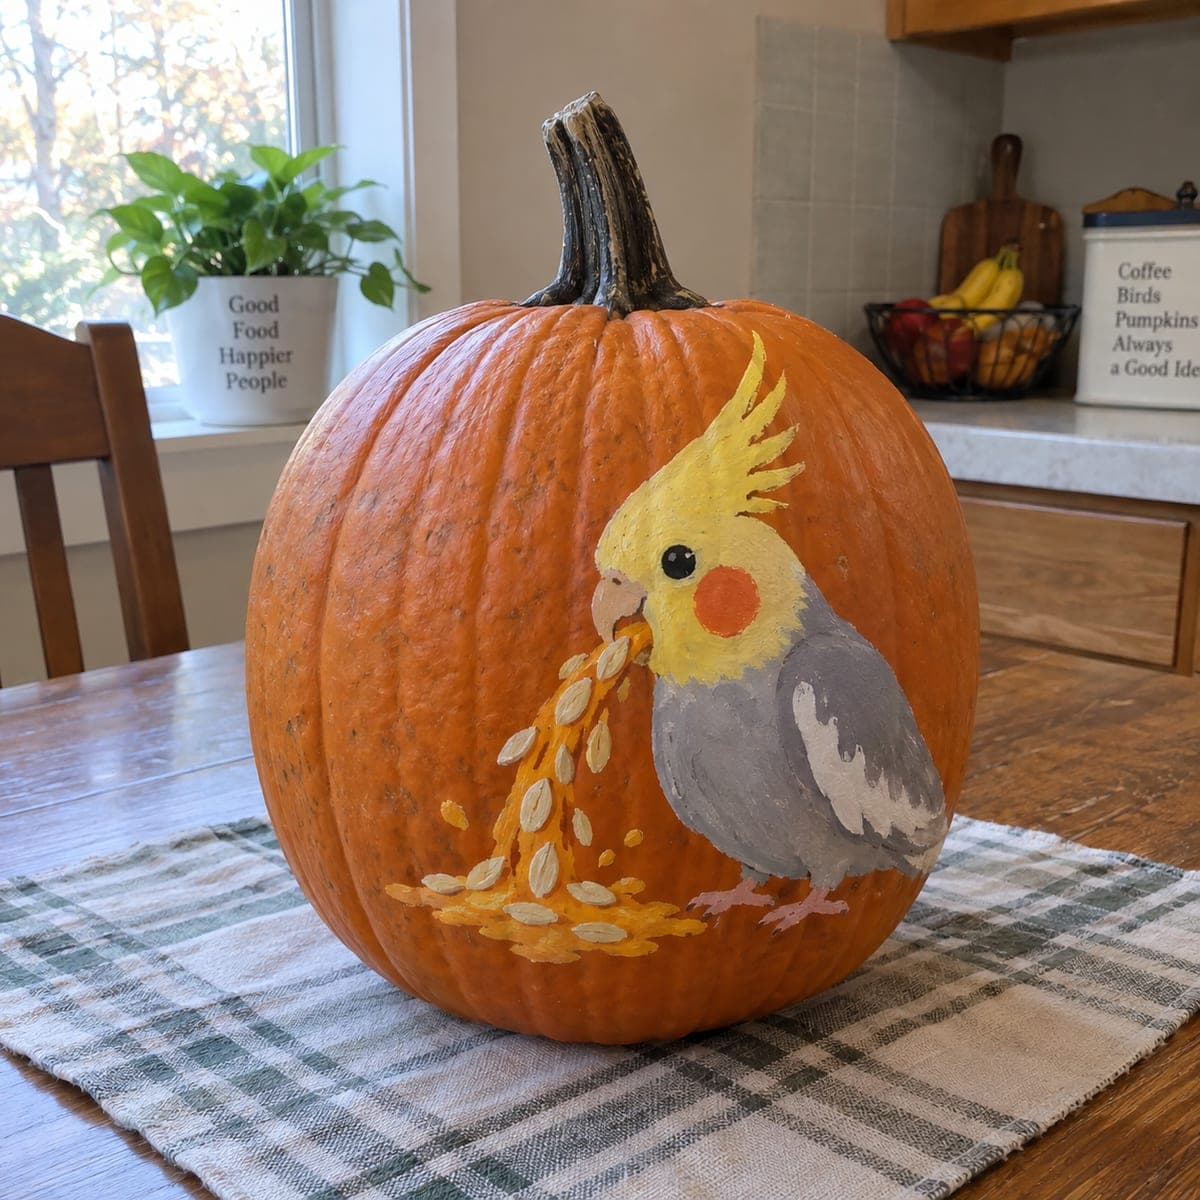
Painted Cockatiel Pumpkin With Spilled SeedsAI
0

Painted Cockatiel Pumpkin With Spilled Seeds

A gray cockatiel with a bright yellow crest and orange cheek patch perches on this no-carve pumpkin, caught mid-snack in a tumbling spill of painted pumpkin seeds. Bird owners will recognize the messy-eater pose instantly, which gives the design its personality. Paint the body in gray first and let it dry before layering the white wing bar and yellow head, then dot the falling seeds with a small round brush in cream and tan.

This is an AI-generated concept image: a realistic, carvable design idea rather than a photo of a finished carve. AI concepts are always labeled and sit out the leaderboard and the contest.

No ratings yet · Sign in to rate
Comments (0)

  • No comments yet — be the first.

Save without an account. Sign in to like or comment.

Our tips for carving a similar design

The whole design leans on a no-carve painting trick: build the bird in flat layers, darkest to lightest, so the gray body reads first and the yellow crest and cream seeds pop on top. Since this is a concept image with no real pumpkin behind it, treat it as a plan you can copy by sketching the perched bird on one shoulder of a smooth pumpkin and letting the tumbling seeds trail down toward the base. The messy-eater pose is the personality, so give the seeds room to scatter.

Written by PumpkinCarvingIdeas.com, inspired by the image above. These are our suggestions, not instructions from the uploader. This approach to the AI concept has not been tested on a real pumpkin.

From pumpkin to porch

  1. Pick a smooth pumpkin and sketch

    Choose a pumpkin with one clean, mostly flat side and wipe it down so paint grips. Lightly pencil the cockatiel's round body, the tilted head, and the rough oval where the seed spill will fall. Keep the bird on the shoulder of the pumpkin so the seeds can cascade down toward the table. Do not worry about detail yet, just block the big shapes.

  2. Base-coat the body gray

    Fill the whole body and wing area with a medium gray acrylic and let it dry fully before touching it again. A second thin coat gives more even coverage than one heavy layer. Keep the edges soft rather than hard-lined so feathers look natural. Let this dry before moving on so the next colors do not smear.

  3. Layer the white bar and yellow head

    Once the gray is dry, paint the white wing bar and the pale belly, then add the yellow head and crest. Pull a few short brush strokes upward on the crest so it looks feathery rather than solid. Add the round orange cheek patch and a small pale beak. Let each color dry before layering the next to keep them crisp.

  4. Add face details and outlines

    Dot the dark eye and let it dry, then add a tiny white highlight to bring it to life. Use a fine brush and a slightly darker gray to suggest a few feather lines on the wing and tail. Keep pink feet simple with three short toes each. Small marks read better than heavy outlines here.

  5. Paint the tumbling seed spill

    Lay down a loose orange-gold stream first as the flesh spilling from the beak, then use a small round brush to dot individual seeds in cream and tan on top. Vary the size and angle so they look like they are scattering, and let a few bounce away from the main pile. This is where the funny mid-snack story comes through. Let everything dry.

  6. Seal and stage your photo

    Brush on a clear matte or satin sealer so the paint survives a night on the porch or table. If you want a soft glow, tuck a battery LED puck beside the pumpkin rather than cutting into your painting. Set it on a plain runner and shoot in daylight or warm indoor light. Snap your photo and share it with the community.

Gather your supplies

Check things off as you get ready.

Work on a stable surface, keep your free hand out of the cutting path, and have an adult handle sharp tools.

Three levels of light

  • Leave intact

    The painted gray body, wing, and dark eye stay opaque and read as the solid, shadowed subject.

  • Peel & shade

    For a subtle glow you could lightly sand or thin the paint over the seed spill so it warms up softly under a nearby LED.

  • Cut through

    This is a no-carve design, so skip through-cuts; if you must add light, set an LED beside the pumpkin instead of cutting the painting.

Learn the carving basics

Before you start cutting

Do I have to carve anything for this design?

No, this is a fully painted no-carve pumpkin, so your knife stays in the drawer. That makes it a great choice for a pumpkin you want to keep looking good for a couple of weeks. If you crave a glow, just tuck a battery LED next to it rather than hollowing it out.

What order should I paint the layers?

Work darkest and largest to lightest and smallest. Base the gray body first and let it dry, then add the white wing bar, then the yellow head and orange cheek, and finish with the fine eye, feet, and scattered seeds. Letting each layer dry keeps the colors from muddying together.

How do I make the seed spill look messy instead of neat?

Paint a loose gold stream from the beak first, then dot seeds in cream and tan on top with a small round brush. Vary their size, tilt them at different angles, and let a few strays bounce away from the pile. That uneven scatter is what sells the mid-snack, messy-eater look.

Your take belongs here, too.

Changed a detail? Made it simpler? Share a photo of your version and tell the community what worked.

Share your pumpkin

More pumpkins like this

You've reached the end · 8 pumpkins
The Patch Report

Fresh pumpkins, in your inbox.

The best new carvings, ideas worth stealing, and how-tos for carving season. Short, seasonal, and gone by November.

A short email during carving season. Unsubscribe anytime. See our privacy policy.