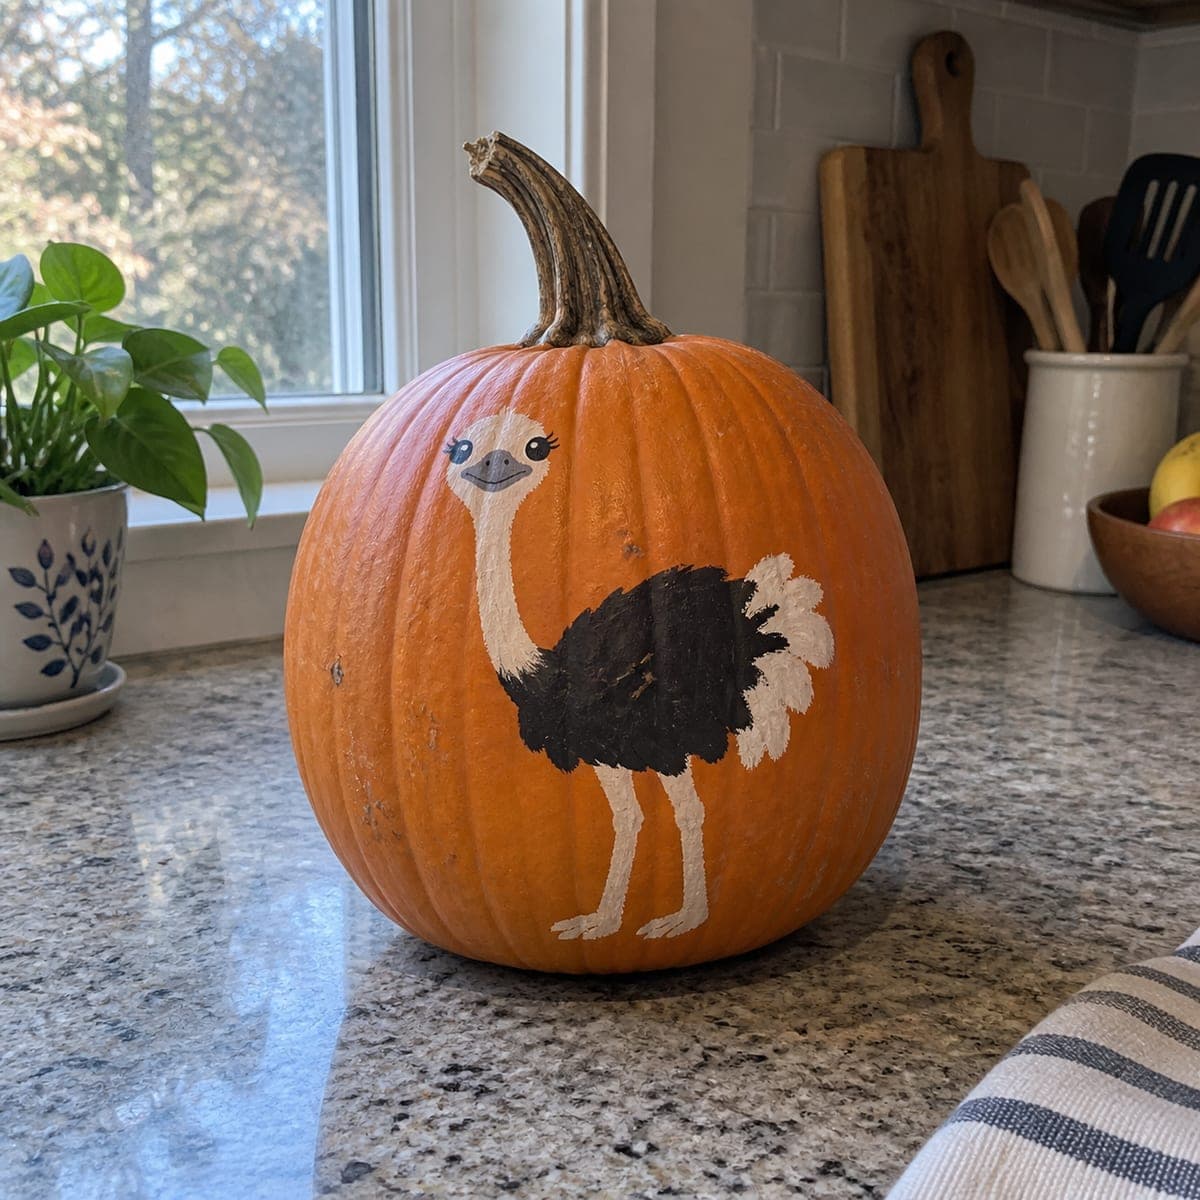
Long lashes, a periscope neck, and a fluffy two-tone body make this painted ostrich pumpkin instantly lovable on a kitchen counter. The bird is built from simple shapes, a white neck stripe, a dark oval body, and a ruffle of cream tail feathers dabbed on with a dry brush. Sketch the neck curve in chalk first, since getting that one line right is what makes the whole ostrich read.
This is an AI-generated concept image: a realistic, carvable design idea rather than a photo of a finished carve. AI concepts are always labeled and sit out the leaderboard and the contest.
The whole design rests on one confident curve, the ostrich neck, so the core trick is sketching that line in chalk before any paint touches the pumpkin. From there the bird is just simple shapes stacked together, a white neck stripe, a dark oval body, cream tail ruffles, and two thin legs. Because this is a no-carve painted look, you build it in layers and let each color dry so nothing smears.
Written by PumpkinCarvingIdeas.com, inspired by the image above. These are our suggestions, not instructions from the uploader. This approach to the AI concept has not been tested on a real pumpkin.
From pumpkin to porch
1
Wash and dry the pumpkin
Wipe the whole pumpkin with a damp cloth to lift dust and field dirt, then dry it fully. Paint grips much better on a clean, dry surface. Pick the smoothest, flattest panel facing out as your canvas. Set the pumpkin on a towel so it does not roll while you work.
2
Chalk the neck curve first
Using a piece of chalk or a washable pencil, draw the long S-curve of the neck from the head down to where the body begins. This single line sets the whole pose, so redraw it until it looks right. Chalk wipes off easily, so take your time. Once you like it, lightly sketch the round head, the oval body, and two straight legs.
3
Block in the big shapes
Paint the dark body oval first with black or deep brown acrylic and let it dry. Add the white neck stripe, the pale head, and the two legs with cream or off-white paint. Keep edges clean by loading only a little paint on the brush. Let each color dry before painting a neighboring one so they do not bleed together.
4
Dry-brush the tail feathers
Dip a stiff brush in cream paint, then wipe most of it off on a paper towel so the bristles are nearly dry. Dab and flick short strokes at the back of the body to build a soft, ruffled tail. Layer a few passes for a fluffy look. This same dry-brush touch adds gentle texture along the top of the body where feathers meet the neck.
5
Add the face details
Paint a small dark beak, then add a round eye with a black dot and a tiny white highlight. Finish with a few long curved lashes above the eye using a thin liner brush. These small marks give the ostrich its cheerful personality, so keep a steady hand and let earlier layers dry first. Touch up any wobbly edges with the background-matching paint.
6
Seal and stage the photo
Once everything is fully dry, brush on a thin coat of clear matte sealer to protect the paint from kitchen humidity. Set the pumpkin near a window or under soft lamp light for your final photo. If you want a warm glow nearby, tuck a battery LED puck behind it rather than inside, since this design is not hollowed out. Wipe your chalk guide marks away if any remain.
Gather your supplies
Check things off as you get ready.
Work on a stable surface, keep your free hand out of the cutting path, and have an adult handle sharp tools.
Three levels of light
Leave intact
The orange pumpkin skin stays untouched as the background around the bird, no peeling or cutting needed.
Peel & shade
For an optional glow twist, lightly scrape a thin halo of skin behind the ostrich so a soft dim ring shows when lit.
Cut through
This is a no-carve painted design, so skip full cutouts; if you want brightness, place a battery LED behind the pumpkin instead.
Standard craft acrylics work well because they dry fast and layer cleanly. Let each color dry before adding the next so the black body and white neck do not muddy together. A final coat of matte sealer helps the paint survive kitchen humidity.
How do I get that fluffy tail without special tools?
Use a stiff brush loaded with just a little cream paint, then wipe most of it off on a paper towel. Dab and flick short strokes so the bristles leave a broken, feathery texture. Build it up in two or three light passes rather than one heavy stroke.
My neck curve looks stiff, how do I fix it?
Because it is chalk, just wipe it off and redraw until the S-curve feels relaxed and slightly leaning. Draw the whole line in one smooth motion rather than short choppy segments. Getting this one line right is what makes the ostrich read at a glance.
Your take belongs here, too.
Changed a detail? Made it simpler? Share a photo of your version and tell the community what worked.
 AI
AI


Comments (0)