Halloween Pumpkin Carving Contest Β· Starts October 1st Β· $500 in prizes
← Back to ideas
@ai_concepts
Sep 25, 2026
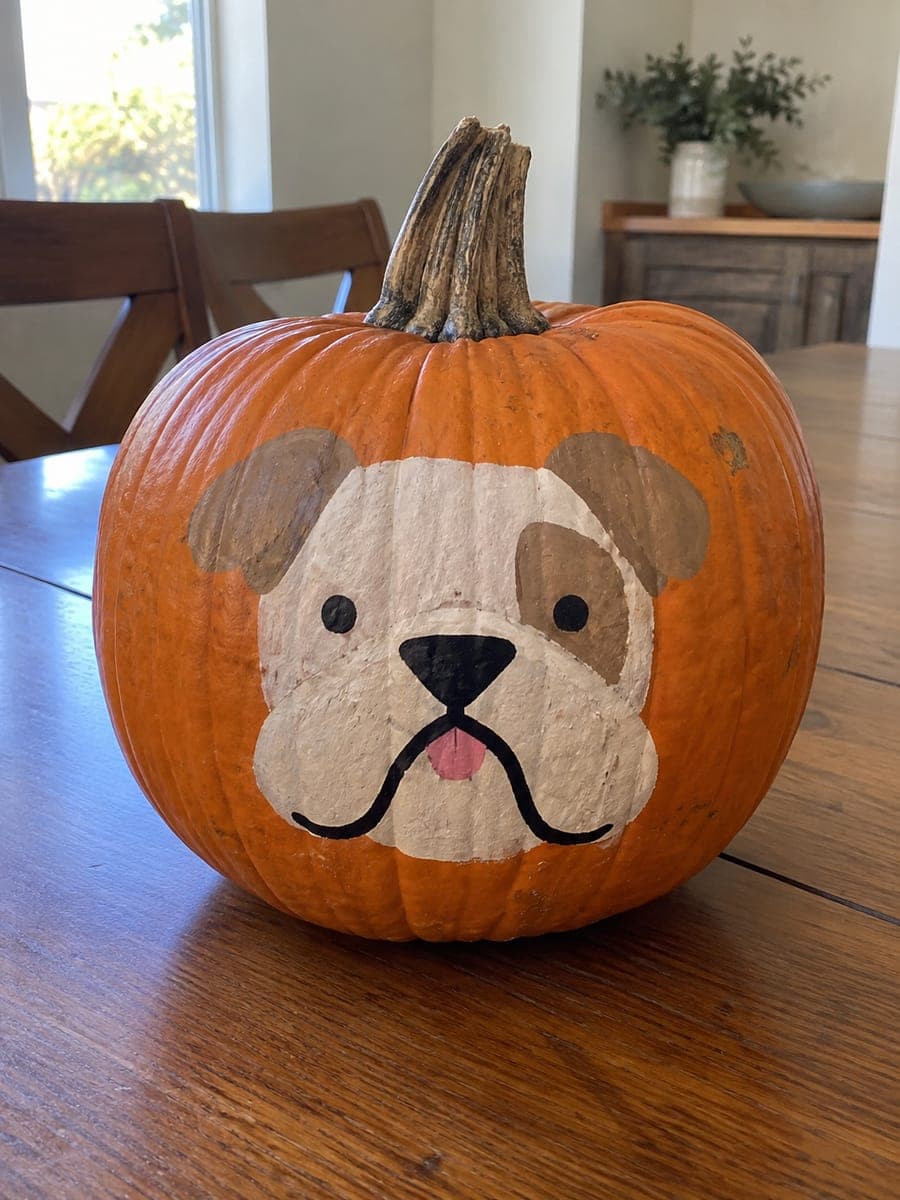
Painted English Bulldog Pumpkin in Natural LightAI
0

Report this carving

Tell us what is wrong. Reports are private.

Painted English Bulldog Pumpkin in Natural Light

Flat painted shapes on an uncut rind bring an english bulldog pumpkin carving idea to life with no knives required. Lay down a light pencil sketch of the broad head and jowls, then fill each area with thick acrylic paint in layers, letting each color dry before adding the next. A dry-brushed lighter tone on the forehead suggests wrinkles without fine detail work. This pumpkin holds up longer outdoors than carved versions since the rind stays sealed.

No ratings yet Β· Sign in to rate

Comments (0)

  • No comments yet β€” be the first.

Save without an account. Sign in to like or comment.

Our tips for carving a similar design

Flat painted shapes build up the bulldog's broad jowly face in layers, with each color zone drying before the next is added. A dry-brushed lighter forehead tone creates the illusion of wrinkles without requiring any fine brushwork. The intact rind means this pumpkin will stay fresh and display-ready well past Halloween.

From pumpkin to porch

  1. Clean and dry the pumpkin

    Wipe the outer rind with a slightly damp cloth to remove any surface wax or debris, then let it air-dry for at least 30 minutes. Acrylic paint bonds poorly to wet or oily surfaces. Avoid touching the painting area with bare hands once it is clean.

  2. Sketch the bulldog head and jowls

    Use a soft pencil to outline the broad head shape, the wide jowl curves, the ear placement, and the approximate eye and nose positions. Keep the lines light so they blend under paint. The bulldog's wide lower face should occupy roughly the lower two-thirds of the painting area.

  3. Apply the base coat

    Fill the head and jowl area with a warm off-white or pale tan base coat using a flat brush. Two thin coats give better coverage than one thick one. Let the first coat dry fully before applying the second.

  4. Block in color zones

    Add any darker facial markings (brindle patches, darker jowl shade) over the dry base coat using a slightly smaller flat brush. Paint the ears and any darker head area in a contrasting tone. Let each section dry before painting adjacent areas to prevent bleeding.

  5. Add facial details and dry-brush wrinkles

    Paint the dark almond eyes, round black nose, and curved frown-smile line with a fine detail brush. For the forehead wrinkles, load a stiff flat brush with a small amount of light cream or white paint and dry-brush (wiping most paint off the brush first) across the forehead in short horizontal strokes.

  6. Seal and display

    Once all paint layers are fully dry (at least one hour), apply a matte acrylic spray sealant from about 12 inches away in a sweeping motion. This locks in the paint and protects against light rain and humidity. Display in a sheltered spot for the longest life.

Written with AI to match this design

Gather your supplies

Check things off as you get ready.

Work on a stable surface, keep your free hand out of the cutting path, and have an adult handle sharp tools.

Three levels of light

  • Leave intact

    The intact orange rind everywhere outside the painted design area

  • Peel & shade

    None, the shell stays fully intact

  • Cut through

    None. Position an outdoor spotlight or porch light to illuminate the painting from the front.

Learn the carving basics

Before you start cutting

How do I get the jowl curves to look smooth rather than jagged?

Use a medium round brush rather than a flat one for curved edges. Load the brush lightly and follow the curve in one continuous stroke rather than dabbing. If the edge is still ragged once dry, clean it up with a fine brush and the background color.

Can I use markers instead of paint for the facial details?

Permanent markers work for thin lines like wrinkles and whisker dots, but they bleed on acrylic paint if the paint is not fully cured. Wait at least a full hour after the last paint layer before using markers over it. Acrylic paint is still the better choice for filled areas.

The dry-brush technique is spreading paint unevenly. What am I doing wrong?

The brush likely has too much paint on it. Wipe the loaded brush across a paper towel until barely any paint transfers, then try on the pumpkin. The dry-brush effect should look like a light haze of color, not solid coverage. Less paint on the brush always produces a better result.

Your take belongs here, too.

Changed a detail? Made it simpler? Share a photo of your version and tell the community what worked.

Share your pumpkin

More pumpkins like this

You've reached the end Β· 8 pumpkins
The Patch Report

Fresh pumpkins, in your inbox.

The best new carvings, ideas worth stealing, and how-tos for carving season. Short, seasonal, and gone by November.

A short email during carving season. Unsubscribe anytime. See our privacy policy.