Halloween Pumpkin Carving Contest · Starts October 1st · $500 in prizes
← Back to ideas
@ai_concepts
Sep 25, 2026
Glowing English Bulldog Jack-O-Lantern Easy CutoutAI
0

Report this carving

Tell us what is wrong. Reports are private.

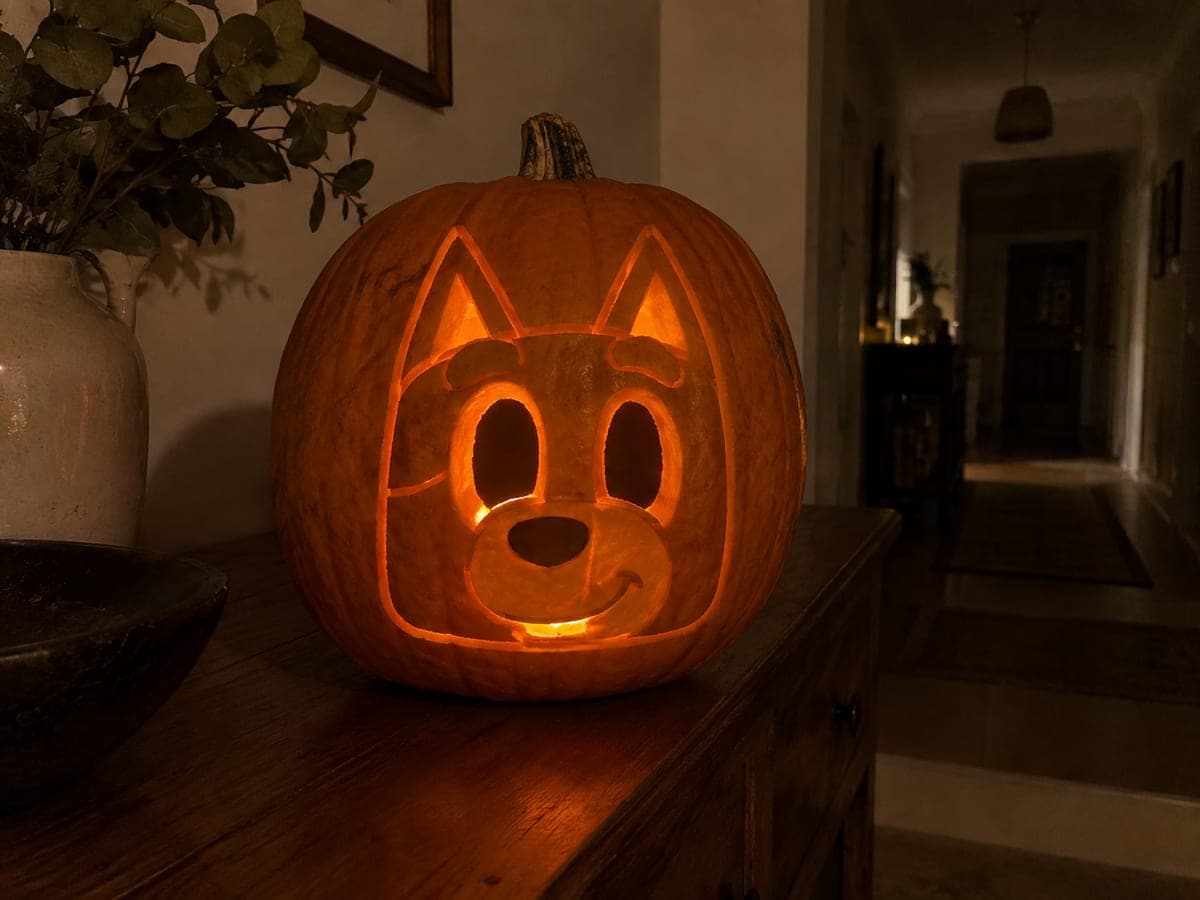
Glowing English Bulldog Jack-O-Lantern Easy Cutout

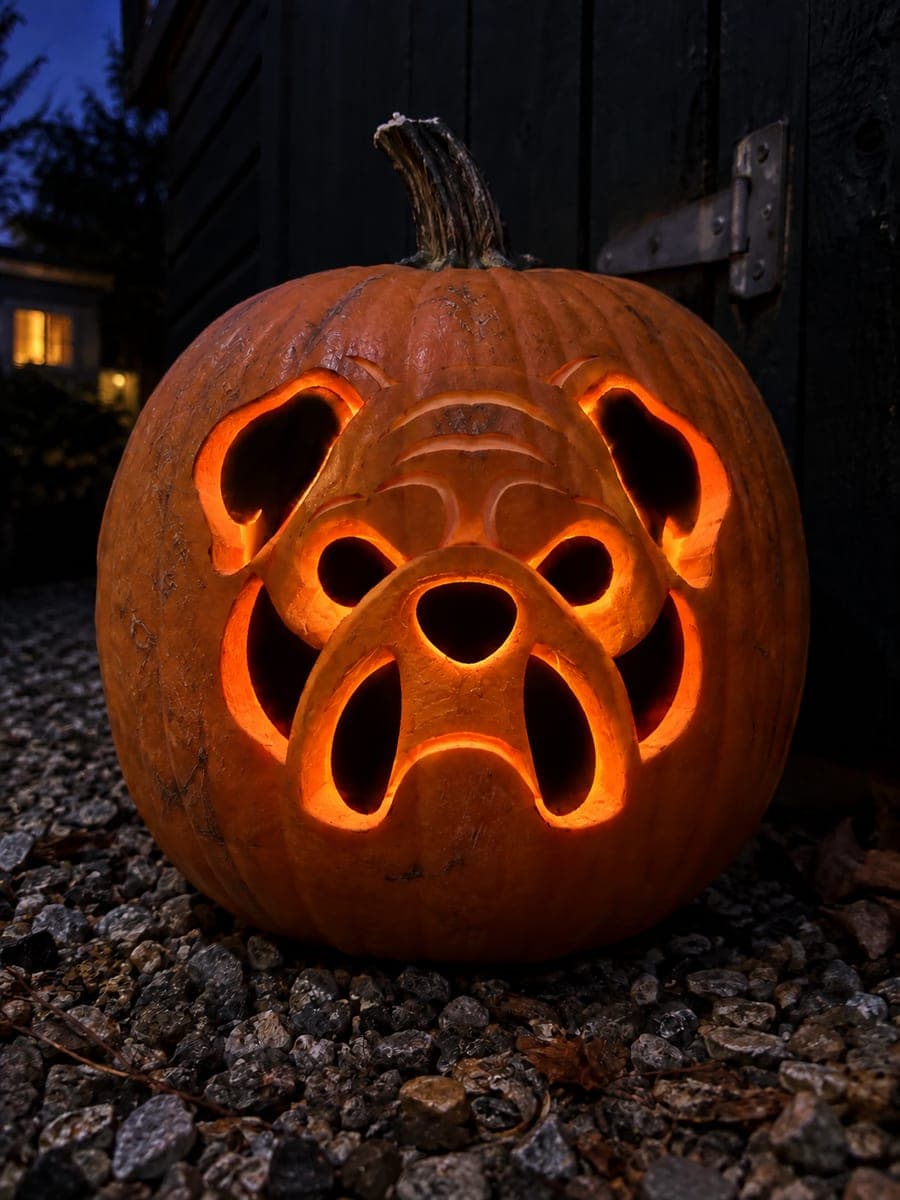
Round eyes, a wide nose, and drooping jowl holes glow in this simple english bulldog pumpkin carving, with the head, ear, and brow contours added as shallow backed relief rather than full cuts. Carve the three main apertures first since they anchor every other mark, then use a detail knife held at a low angle to skim the brow and head contours. This pumpkin carving idea suits beginners because the large open shapes give plenty of room for a steady hand.

No ratings yet · Sign in to rate

Comments (0)

  • No comments yet — be the first.

Save without an account. Sign in to like or comment.

Our tips for carving a similar design

The round eyes, wide nose, and drooping jowl holes do all the heavy lifting here, each large enough to cut with a beginner-friendly pumpkin saw. Brow, head, and ear contours are skimmed at a shallow angle rather than cut through, so there are no fragile bridges to worry about. The design reads clearly because the three glowing apertures fall in a recognizable face arrangement.

From pumpkin to porch

  1. Prepare and hollow

    Remove the lid from the back and scoop out the interior to roughly a half-inch wall thickness. An even wall makes the shallow relief cuts consistent across the whole surface. Wipe the outer rind clean and dry before applying the stencil.

  2. Transfer the stencil

    Tape the stencil onto the pumpkin and pin-punch all outlines including the brow and head contour lines you will later shade. Mark through-cut lines in one color and relief lines in another before removing the paper. This prevents confusion once the pumpkin is in your lap.

  3. Cut the eyes first

    Saw out both round eye apertures before any other opening. Large circular cuts are easy to keep clean with short controlled saw strokes. Rotate the pumpkin as you work rather than trying to reach around the whole curve from one angle.

  4. Cut the nose and jowl holes

    Move to the wide nose aperture, then the drooping jowl openings on each side of the muzzle. Adults should handle the saw for the jowl shapes, which have slightly more complex outlines than circles. Check that all three openings are fully clear before moving to the relief work.

  5. Add the backed contours

    Hold a detail knife at a low angle and skim the brow ridge, head outline, and ear contours to roughly a third of the wall depth. Work in smooth passes following the drawn lines. The backed contours add the bulldog's characteristic heavy expression without cutting through the shell.

  6. Light and display

    Place an LED tea light inside and view in dim light. The glowing eyes, nose, and jowls should immediately read as a bulldog face. Elevate the pumpkin slightly so the jowl apertures are at eye level for best effect.

Written with AI to match this design

Gather your supplies

Check things off as you get ready.

Work on a stable surface, keep your free hand out of the cutting path, and have an adult handle sharp tools.

Three levels of light

  • Leave intact

    The broad muzzle and cheek rind panels between the apertures, plus the forehead and crown

  • Peel & shade

    Brow ridge, head outline, and ear contours carved to roughly one-third wall depth

  • Cut through

    Both round eyes, the wide nose, and the drooping jowl apertures

Learn the carving basics

Before you start cutting

The jowl shapes are lopsided on my pumpkin. How do I correct them?

Uneven jowls usually happen when the stencil slips on a curved pumpkin surface. Re-tape one side at a time and pin-transfer from the center outward to reduce distortion. If they are already cut, deepen the shallower side slightly and the visual difference becomes less noticeable when the pumpkin is lit.

How shallow is too shallow for the backed contours?

If you remove less than a fifth of the wall thickness, the contour will be nearly invisible when lit. Aim for at least a quarter to a third of the depth for the relief to cast a readable shadow. Test in a dark room with a phone flashlight before committing to a final depth.

Can a child do the shading step under supervision?

Older children (10 and up) can try the backing step with a blunt-tipped clay sculpting tool on very fresh soft pumpkins, but sharp knives should remain with adults. The three main apertures definitely require adult handling regardless of the child's age.

Your take belongs here, too.

Changed a detail? Made it simpler? Share a photo of your version and tell the community what worked.

Share your pumpkin

More pumpkins like this

You've reached the end · 8 pumpkins
The Patch Report

Fresh pumpkins, in your inbox.

The best new carvings, ideas worth stealing, and how-tos for carving season. Short, seasonal, and gone by November.

A short email during carving season. Unsubscribe anytime. See our privacy policy.