Halloween Pumpkin Carving Contest · Starts October 1st · $500 in prizes
← Back to ideas
@ai_concepts
Sep 25, 2026
Glowing Bingo Heeler Face Pumpkin CutoutAI
0

Report this carving

Tell us what is wrong. Reports are private.

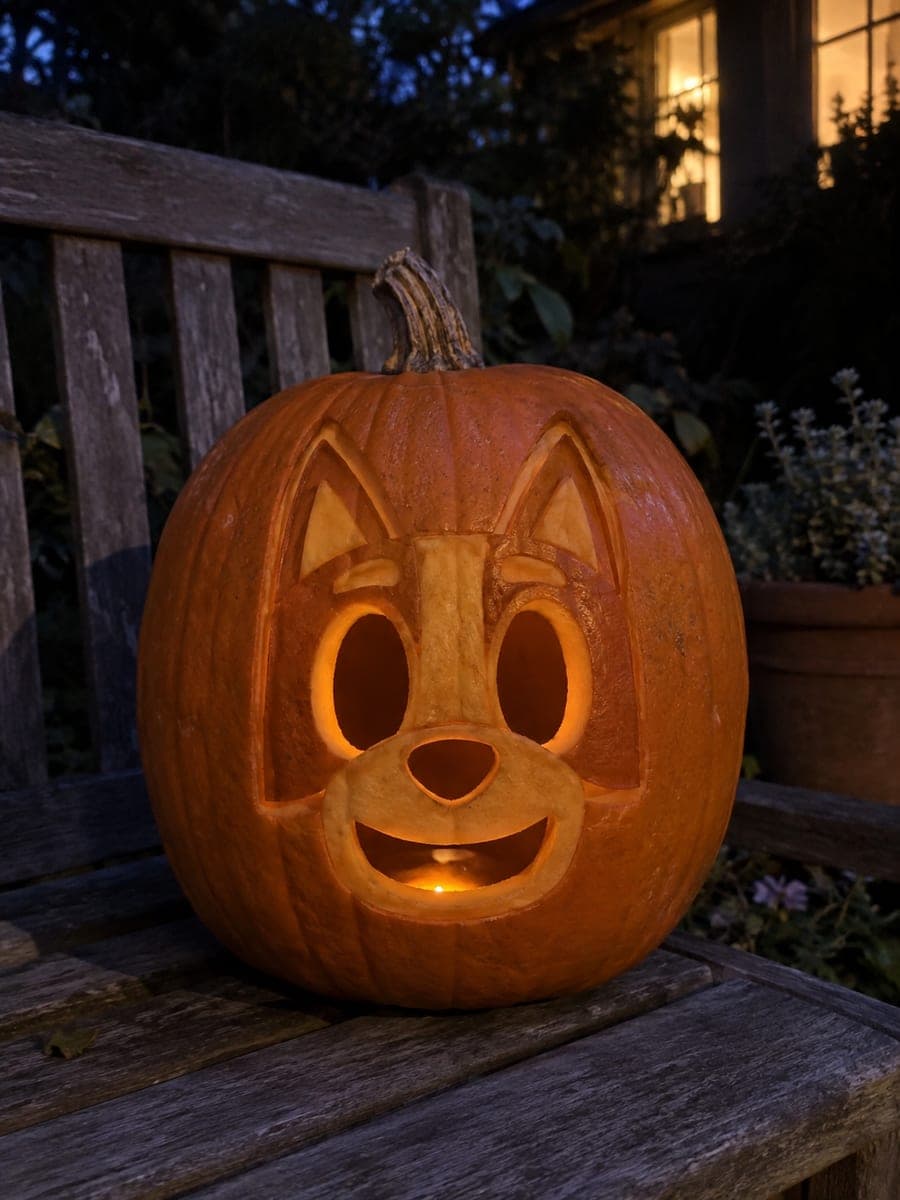
Glowing Bingo Heeler Face Pumpkin Cutout

This easy bingo pumpkin carving captures the cheerful blue heeler puppy with hollow oval eyes, a broad nose hole, and a wide open smile all cut clean through the shell. Keep each facial opening widely spaced so the connecting rind stays sturdy, and back the ear, muzzle, and spot details with a shallow scrape rather than a full cut. A warm LED tea light inside brings out the character without the flicker of a real flame. Great first pumpkin carving idea for younger kids.

No ratings yet · Sign in to rate
Comments (0)

  • No comments yet — be the first.

Save without an account. Sign in to like or comment.

Our tips for carving a similar design

The key to this design is spacing the oval eyes, nose hole, and wide smile far enough apart that the rind bridges between them stay solid. The ears, muzzle outline, and spot patches are scraped shallow rather than cut through, adding visual detail without risking structural collapse. An LED tea light inside completes the effect.

From pumpkin to porch

  1. Prep and gut the pumpkin

    Cut a lid from the bottom of the pumpkin so the opening faces down, which makes lighting and removing the LED easier. Scrape the interior walls to about an inch thick so light passes evenly through the scraped areas. Dry the inner walls with a paper towel to slow decay.

  2. Transfer the stencil

    Tape the Bingo face stencil to the smoothest side of the pumpkin and trace the outlines with a poking tool or ballpoint pen. Press firmly enough to indent the rind without tearing through. Remove the stencil and check that all the cut and scrape lines are clearly marked.

  3. Cut the eyes, nose, and smile

    Use a thin-bladed pumpkin saw to cut the oval eyes first, working slowly around the curves. Follow with the small round nose hole, then the wide smile arc. Keep at least three-quarters of an inch of rind between each opening so nothing cracks when you remove the pieces.

  4. Scrape the ear, muzzle, and spot details

    Switch to a linoleum-style gouge or the tip of a clay loop tool to remove the outer layer of skin from the ear fronts, the muzzle oval, and any spot patches. Aim for a depth of about 3 millimeters, leaving the rind floor intact. This thinned area glows with a softer, mid-tone light compared to the full cutouts.

  5. Clean the edges

    Use a small knife or the flat edge of a gouge to trim any ragged cuts so the openings have clean, smooth borders. Wipe away any flesh debris with a damp cloth. Tidy edges make a noticeable difference to how sharp the design looks when lit.

  6. Light and display

    Place a warm LED tea light inside through the bottom opening and set the pumpkin on a flat surface. Step back and check that all the scraped areas glow at a mid intensity and the cut openings shine fully. If any scraped spot looks too dim, carefully thin it further from the inside with the gouge.

Written with AI to match this design

Gather your supplies

Check things off as you get ready.

Work on a stable surface, keep your free hand out of the cutting path, and have an adult handle sharp tools.

Three levels of light

  • Leave intact

    The broad forehead, cheeks, and outer ear backs stay uncut and dark, forming Bingo's head shape.

  • Peel & shade

    The ear fronts, muzzle oval, and spot patches are skin-scraped for a warm mid-glow.

  • Cut through

    The oval eyes, round nose hole, and wide smile are cut fully through for bright full light.

Learn the carving basics

Before you start cutting

Will the muzzle scraping be visible if the pumpkin is not lit?

In daylight or room light the scraped area will look lighter and slightly translucent compared to the untouched rind, so the face reads even without a light source. The contrast becomes more dramatic when the LED is on. That dual-mode readability is one of the advantages of combining scraping with full cuts.

My pumpkin saw keeps slipping on the rounded surface. How do I start a clean cut?

Start each cut by pressing the tip of the saw blade straight into the rind to create a small anchor hole before beginning the saw stroke. This prevents the blade from skating sideways. Cutting on a slightly downward angle also helps the blade bite into the rind surface.

How do I keep the smile from cracking at the corners?

Cut the smile as a smooth continuous arc rather than a straight line with corners, since angular corners concentrate stress. If the design includes corner cuts, widen the rind at those points slightly. Coating the cut edges with petroleum jelly after carving slows drying and reduces the chance of cracks forming.

Your take belongs here, too.

Changed a detail? Made it simpler? Share a photo of your version and tell the community what worked.

Share your pumpkin

More pumpkins like this

You've reached the end · 8 pumpkins
The Patch Report

Fresh pumpkins, in your inbox.

The best new carvings, ideas worth stealing, and how-tos for carving season. Short, seasonal, and gone by November.

A short email during carving season. Unsubscribe anytime. See our privacy policy.