Halloween Pumpkin Carving Contest · Starts October 1st · $500 in prizes
← Back to ideas
@ai_concepts
Sep 25, 2026
Full-Body Bingo Heeler Pumpkin CarvingAI
0

Report this carving

Tell us what is wrong. Reports are private.

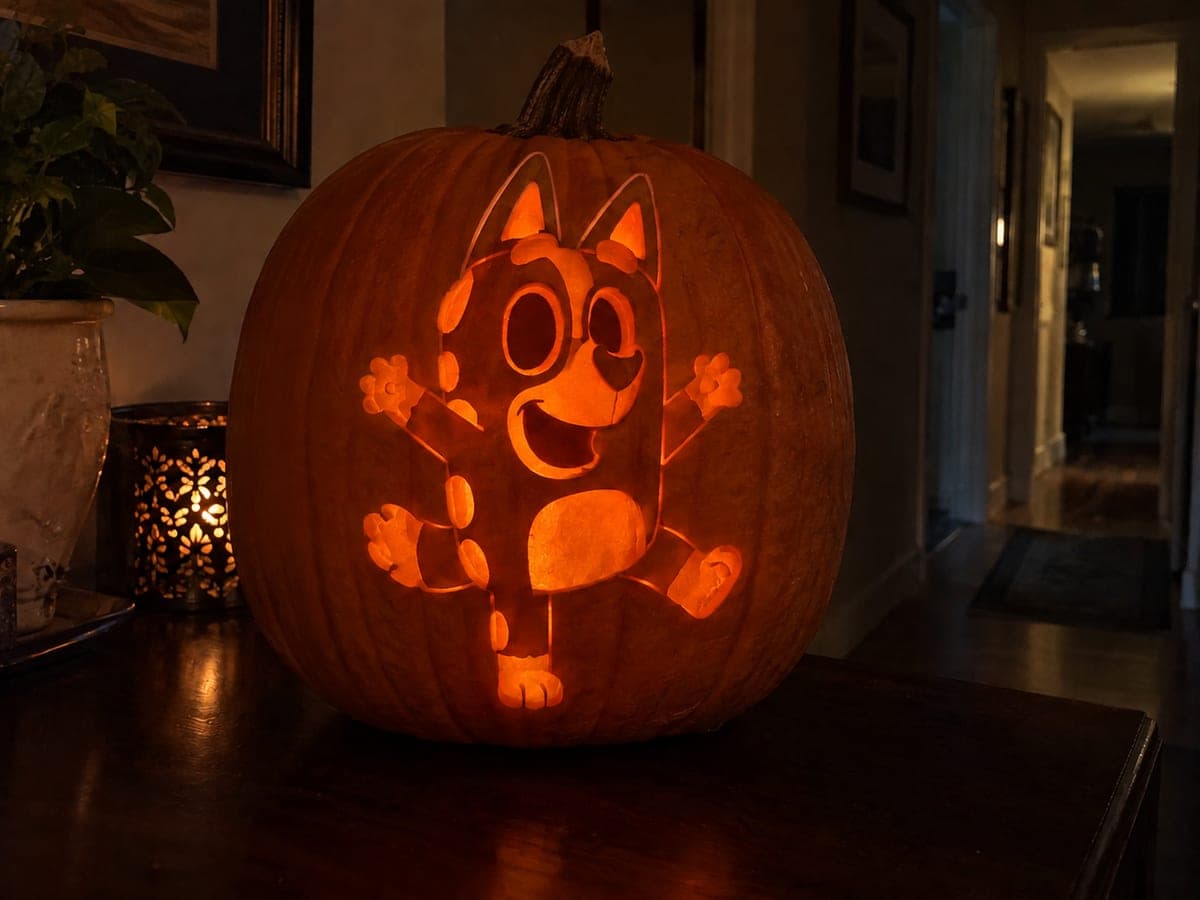
Full-Body Bingo Heeler Pumpkin Carving

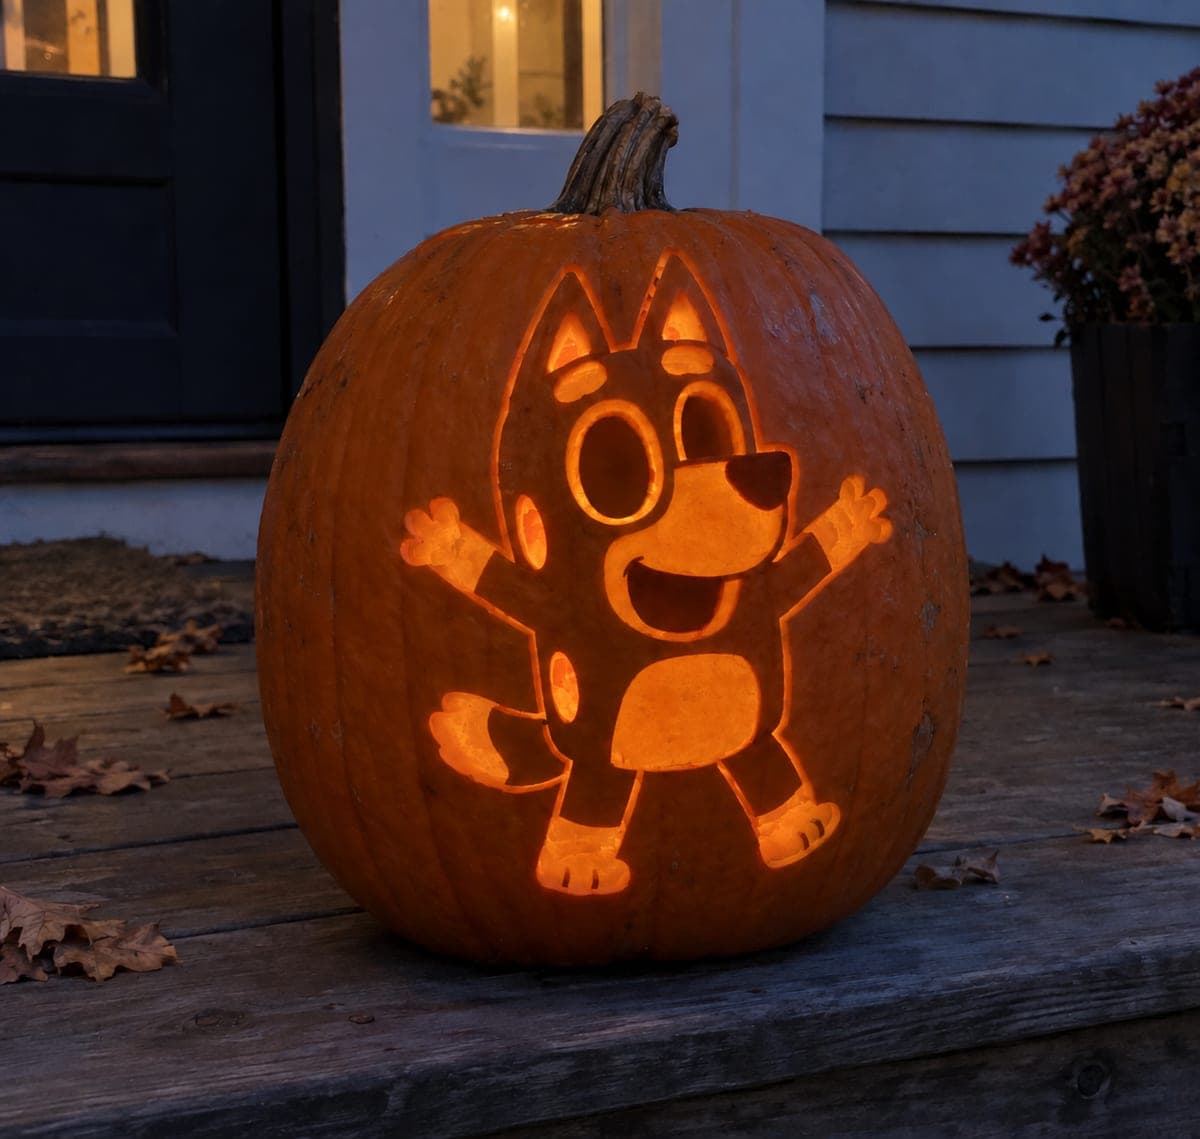
The expert bingo pumpkin carving presents the whole-body character with complete hollow eye ovals and an open mouth, while the body and limb contours are retained as solid flesh-backed rind to hold the design together without pupil or tongue inserts. Work from the outer limb silhouette inward, keeping body and leg contours broad so the figure stays anchored. Because there are no pupils to worry about, the glowing eyes read as boldly expressive from several feet away.

No ratings yet · Sign in to rate
Comments (0)

  • No comments yet — be the first.

Save without an account. Sign in to like or comment.

Our tips for carving a similar design

The entire character fills the pumpkin face, with hollow oval eyes and an open mouth as the primary light sources and the body and limb contours kept as backed solid rind to hold everything together. Working from the outer limb silhouette inward keeps structural supports in place while you make interior cuts, and the absence of pupil inserts means the eyes read as boldly expressive glowing ovals.

From pumpkin to porch

  1. Choose and prep a wide pumpkin

    A flatter, wider pumpkin gives the full-body composition more horizontal room and a better canvas for the limbs. Bottom-cut and gut it, scraping interior walls to just under an inch thick. Mark a rough center cross on the face with pencil to help place the head, torso, and limbs symmetrically.

  2. Transfer the full-body stencil

    Use carbon paper or a dense pin-poke approach to transfer the complete stencil, paying particular attention to the body-limb junction points where contours meet. Mark every backed area in one color and every cut area in another before lifting the stencil. This two-color map prevents confusing cut zones from scrape zones mid-project.

  3. Outline and back the outer body silhouette

    Before any cuts, use a wide flat gouge to shallow-back the entire body and limb contour zone. This seals the outline in visible relief and acts as a safety guide when you later cut close to the body edges. Keep the backing depth about 5 millimeters and the floor intact.

  4. Cut the eyes and mouth

    Saw the full hollow eye ovals first, cutting each as a smooth closed curve. Follow with the open mouth, keeping the lip of the opening broad and avoiding sharp corners. These two sets of openings are the design's visual anchor, so take your time getting clean, crisp edges.

  5. Work inward from limb edges

    Starting at the outer leg and arm silhouettes, make relief backing cuts that define the legs, arms, and paws against any background areas you want to open slightly. Keep body-and-leg contour bridges broad, at least an inch, to prevent the figure from cracking at joint lines. If the design includes any background negative space, cut those areas last.

  6. Illuminate and photograph

    Set a warm LED inside and view the finished carving from three or four feet back in a dark room. The bold hollow eyes should draw the eye immediately, with the backed body reading as a softer warm silhouette around them. Photograph from straight on for the strongest composition, and capture a side profile to show the full-body depth.

Written with AI to match this design

Gather your supplies

Check things off as you get ready.

Work on a stable surface, keep your free hand out of the cutting path, and have an adult handle sharp tools.

Three levels of light

  • Leave intact

    The entire body, limbs, and outer contour stay as backed rind, glowing softly as a warm silhouette.

  • Peel & shade

    The body and limb contour zones are shallow-backed but floor-intact, producing a mid-level amber glow.

  • Cut through

    The full hollow eye ovals and open mouth are cut entirely through for the brightest, boldest light.

Learn the carving basics

Before you start cutting

How do I prevent the limbs from snapping off during carving?

Keep limb contours backed rather than fully cut, and never narrow any limb connection below an inch wide. If a limb must be narrow in the design, leave the rind slightly thicker at the joint and touch it last. Working from the outer edge inward preserves mass at the joints while you do detailed work near the body center.

The full-body stencil is large and keeps slipping. How do I hold it in place?

Use painter's tape around all four edges of the stencil and add a few strips across the middle to prevent ballooning. For carbon-paper transfer on a curved surface, work in small sections, smoothing the paper flat before tracing each area. A pre-cut stencil on orange contact paper that sticks directly to the rind is the most reliable option for large complex designs.

Will this design hold up for a full week on the porch?

A full-body design with extensive backed relief can be structurally fragile if the rind dries out and shrinks. Coat all cut edges inside and out with petroleum jelly to slow moisture loss, and keep the pumpkin in shade during the day. Bringing it indoors overnight extends the life considerably.

Your take belongs here, too.

Changed a detail? Made it simpler? Share a photo of your version and tell the community what worked.

Share your pumpkin

More pumpkins like this

You've reached the end · 8 pumpkins
The Patch Report

Fresh pumpkins, in your inbox.

The best new carvings, ideas worth stealing, and how-tos for carving season. Short, seasonal, and gone by November.

A short email during carving season. Unsubscribe anytime. See our privacy policy.