Halloween Pumpkin Carving Contest · Starts October 1st · $500 in prizes
← Back to ideas
@ai_concepts
Sep 25, 2026
Waving Bingo Heeler Bust Jack-O-LanternAI
0

Report this carving

Tell us what is wrong. Reports are private.

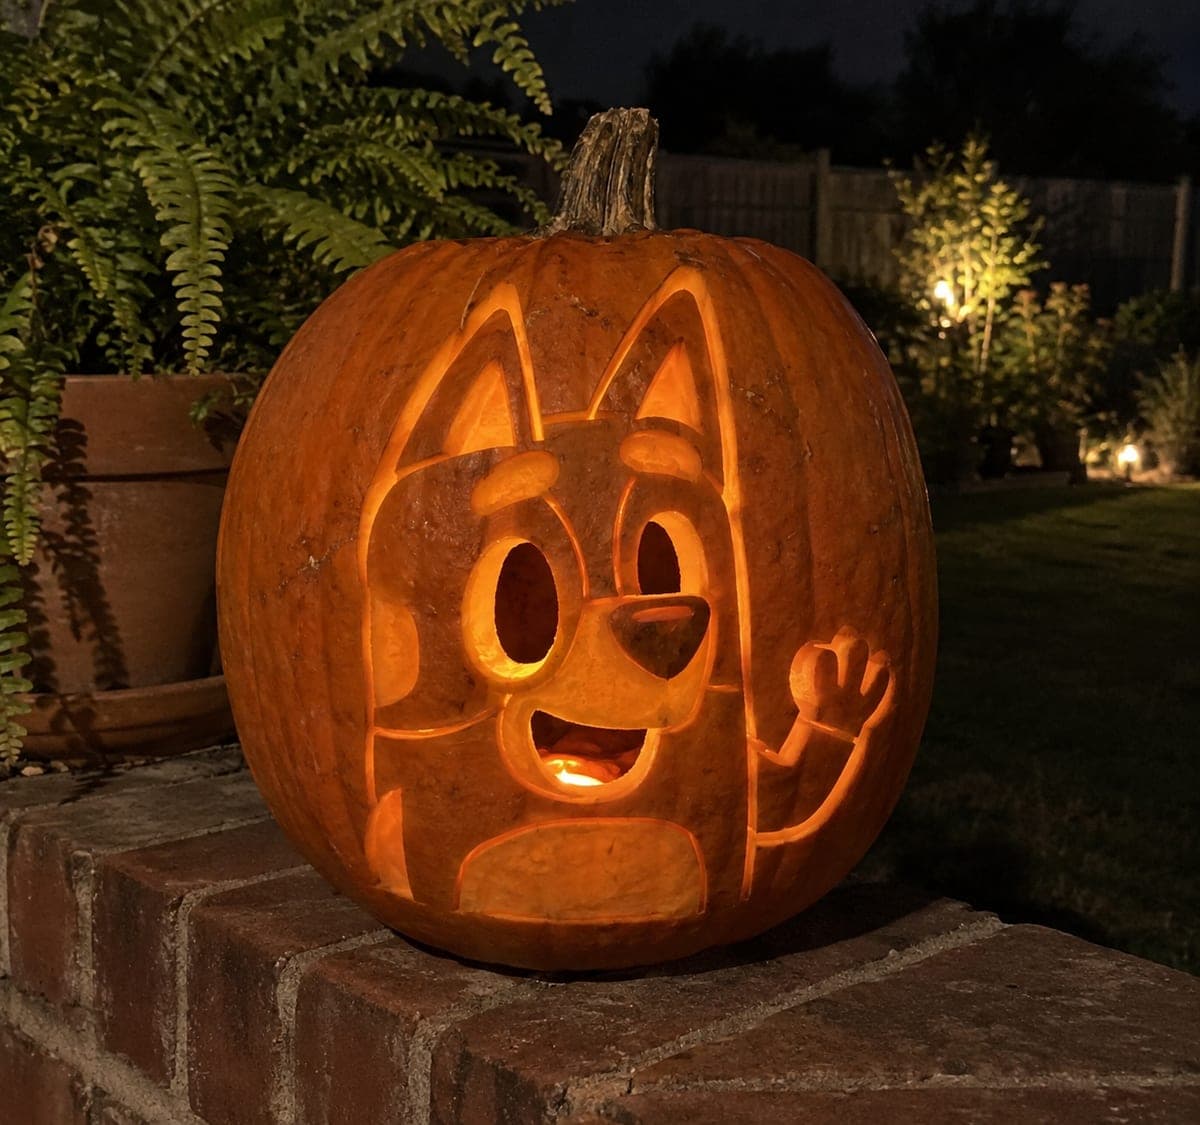
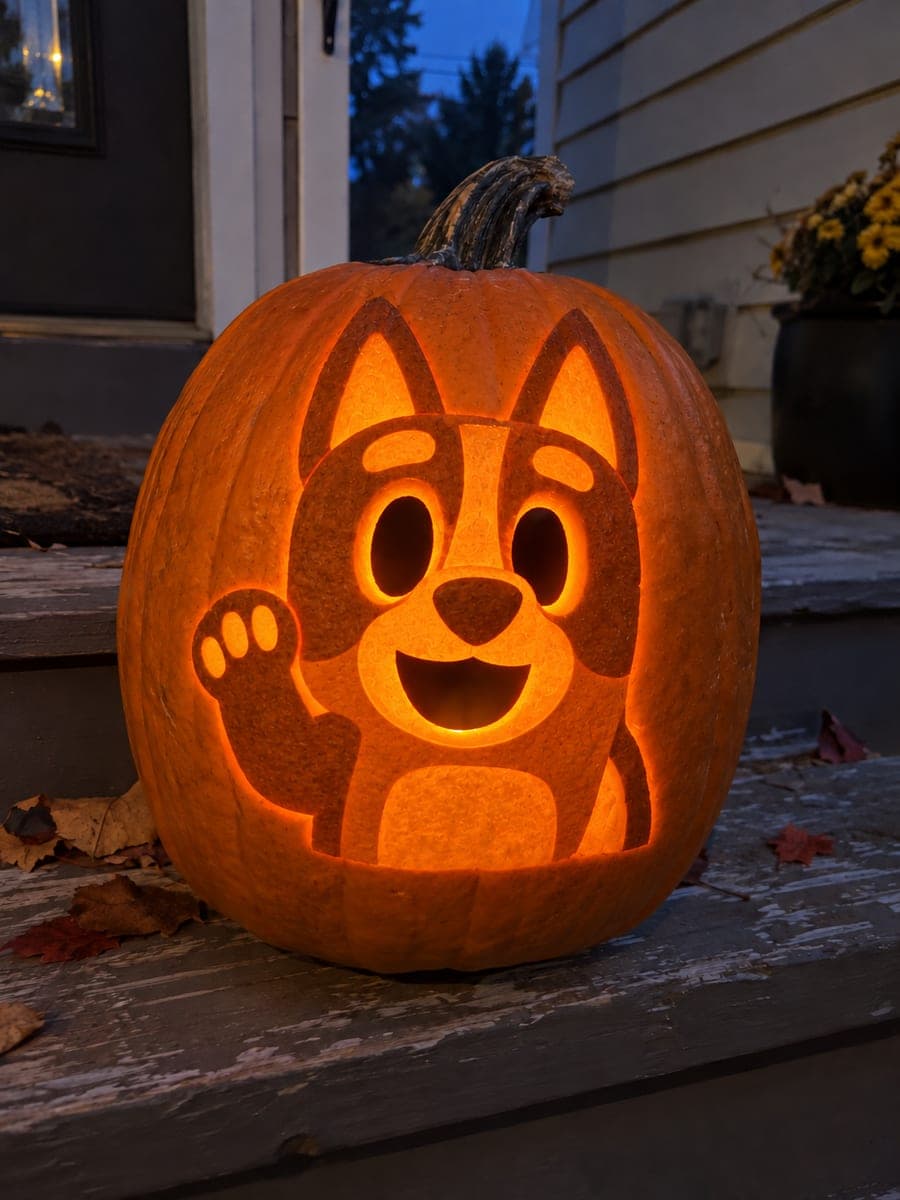
Waving Bingo Heeler Bust Jack-O-Lantern

This hard-level bingo pumpkin carving shows the blue heeler in a smooth bust pose with open oval eyes and an expressive mouth, while nose, body, ear, and paw details are rendered with a shallow backed technique that retains the rind floor for stability. Transfer the stencil with a pin-poke method, then cut the eye and mouth openings first before moving to the finer relief work around the ears and paws. Broad connecting bridges between elements are essential, so resist the urge to thin them down.

No ratings yet · Sign in to rate
Comments (0)

  • No comments yet — be the first.

Save without an account. Sign in to like or comment.

Our tips for carving a similar design

This design captures Bingo in a smooth waving bust with open oval eyes and an expressive mouth as the main light sources, while nose, body outline, ear details, and visible paw are all shallow-backed relief that glow at a softer level. Broad connecting bridges are essential throughout, so the stencil transfer with a pin-poke method needs to mark them clearly before any cut is made.

From pumpkin to porch

  1. Prep the pumpkin

    Bottom-cut and gut the pumpkin, scraping interior walls to a consistent inch-thick depth. Smooth the carving surface with a damp cloth and let it dry. Mark a light pencil centerline down the face so the bust stays symmetrical when you apply the stencil.

  2. Transfer the stencil precisely

    Tape the stencil flat against the pumpkin and poke every outline with a pin tool, spacing pokes about 3 millimeters apart. Remove the stencil and connect the dots with a felt-tip pen to create clear cut and scrape zones. Double-check that every bridge and the waving paw location are marked before picking up any blade.

  3. Cut the eye and mouth openings

    Cut the oval eyes first, keeping each one a smooth closed curve with no pointed ends that could crack under stress. Follow with the open expressive mouth, making sure the lips of the mouth opening are wide enough to hold. Leave broad rind between the eye and mouth for structural strength.

  4. Scrape the nose, ears, and body outline

    Use a linoleum gouge at a low angle to skim the outer skin from the nose shape, the ear faces, and the body and arm outline areas. Keep the depth consistent at about 4 millimeters so the glow is even across all the backed sections. Work slowly around any curved ear outlines to avoid accidentally breaking through.

  5. Scrape the paw detail

    The waving paw requires careful shallow work with a narrow gouge to define the individual toe pads without isolating any of them as floating islands. Keep each toe pad connected to its neighbor by a thin backed skin strip. If a toe pad does separate, secure it from behind with a small strip of tape until display time.

  6. Light and assess

    Place a warm LED inside and view the carving from several feet back in a darkened room. If any scraped section is not glowing, thin it carefully from the inside with a spoon or flat gouge. A low-angle LED positioned toward the face rather than centered gives the bust a dramatic portrait lighting effect.

Written with AI to match this design

Gather your supplies

Check things off as you get ready.

Work on a stable surface, keep your free hand out of the cutting path, and have an adult handle sharp tools.

Three levels of light

  • Leave intact

    The broad cheek areas and outer head silhouette stay fully dark, grounding the bust shape.

  • Peel & shade

    The nose, ear faces, body outline, and waving paw are shallow-scraped for a warm mid glow.

  • Cut through

    The oval eyes and open expressive mouth are cut fully through for the brightest light.

Learn the carving basics

Before you start cutting

How wide should the bridges between the face openings be to prevent cracking?

Aim for at least three-quarters of an inch on any bridge that sits between two cut openings. Bridges narrower than that can crack if the pumpkin dries out even slightly. If the original stencil shows thinner bridges, widen them when you transfer the design, as a small proportion change will not hurt the overall likeness.

The shallow-backed areas are hard to keep at a consistent depth. Any tips?

Mark a target depth on your gouge handle with a small piece of tape as a visual stop gauge. Working in multiple light passes is safer than trying to reach full depth in a single stroke. Check the depth from inside with a flashlight periodically so you can stop before accidentally cutting through.

Can I use a rotary tool instead of hand gouges for the shallow backing?

A rotary tool with a ball-nose bit works well for larger backed areas but can be harder to control around tight curves. If you use one, keep the speed low and move in slow, consistent passes. Hand gouges give you better tactile feedback around the paw's toe pad details, so consider switching back for that section.

Your take belongs here, too.

Changed a detail? Made it simpler? Share a photo of your version and tell the community what worked.

Share your pumpkin

More pumpkins like this

You've reached the end · 8 pumpkins
The Patch Report

Fresh pumpkins, in your inbox.

The best new carvings, ideas worth stealing, and how-tos for carving season. Short, seasonal, and gone by November.

A short email during carving season. Unsubscribe anytime. See our privacy policy.