Halloween Pumpkin Carving Contest · Starts October 1st · $500 in prizes
← Back to ideas
@ai_concepts
Sep 25, 2026
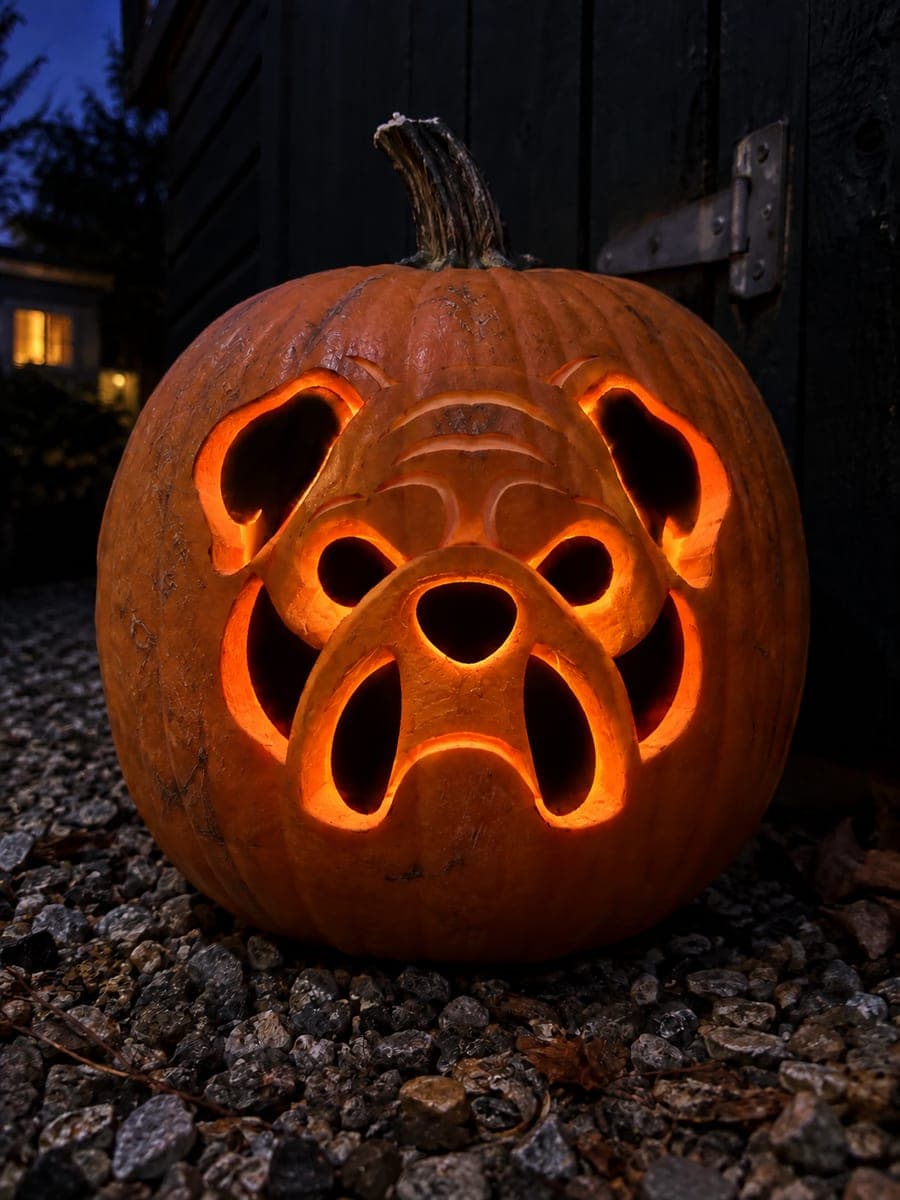
English Bulldog Pumpkin with Open Jowl AperturesAI
0

Report this carving

Tell us what is wrong. Reports are private.

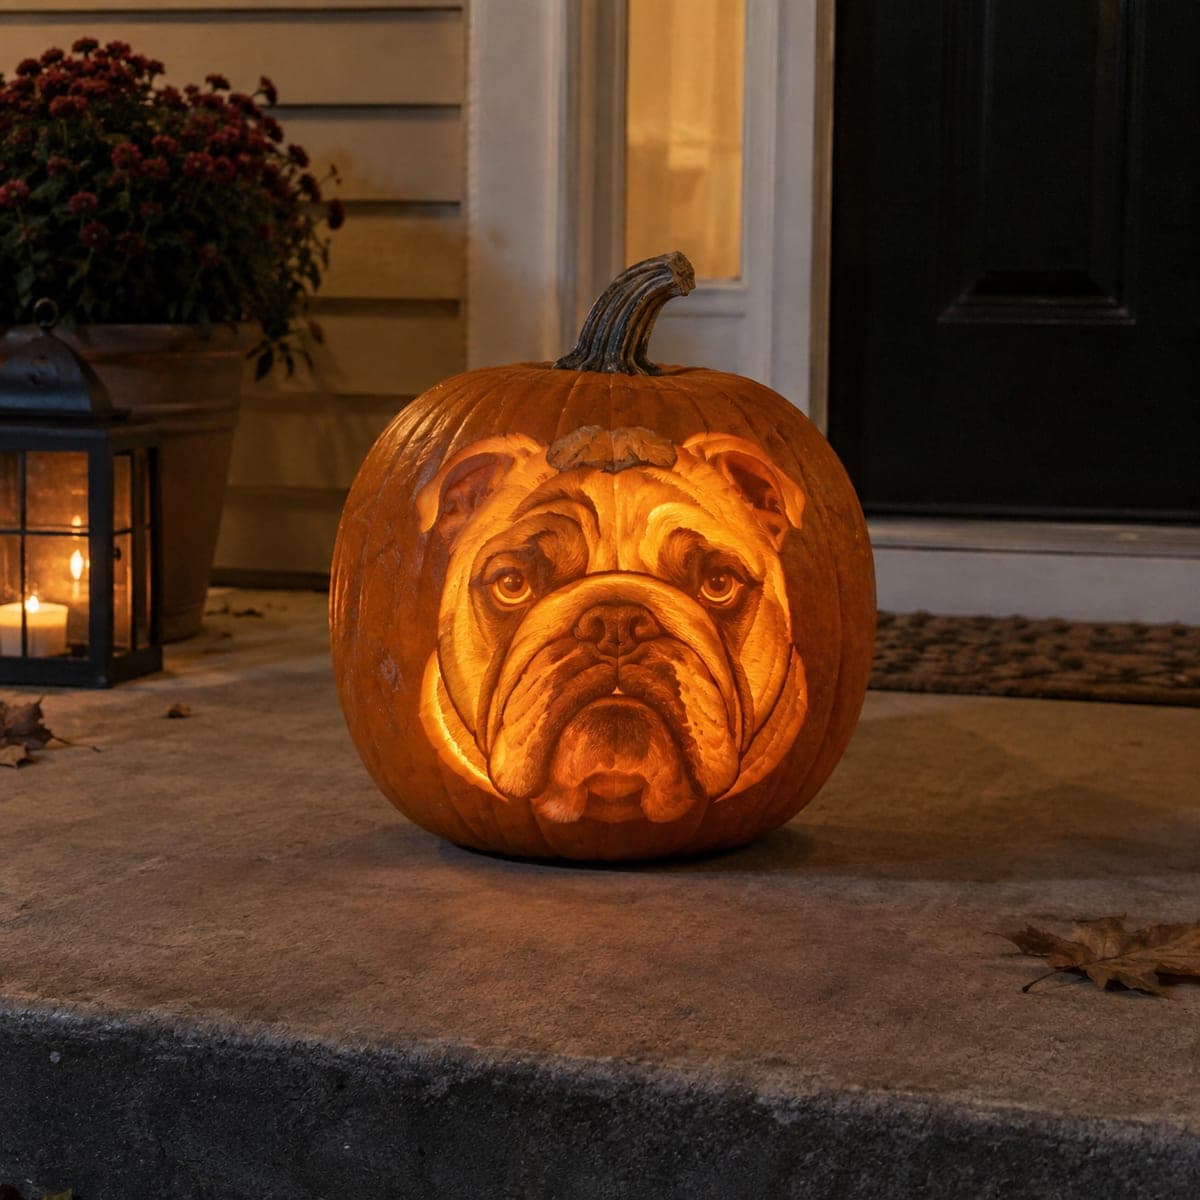
English Bulldog Pumpkin with Open Jowl Apertures

Ear, eye, nose, cheek, and jowl openings all glow in this hard english bulldog pumpkin carving, held together by a broad solid muzzle bridge across the center. Forehead wrinkle lines are added with shallow backed cuts rather than full punctures, preserving the top of the face. Work from the outermost ear and jowl apertures inward toward the nose so you never cut across a bridge you still need. A taper candle set low inside throws the wrinkle texture into sharp relief.

No ratings yet · Sign in to rate

Comments (0)

  • No comments yet — be the first.

Save without an account. Sign in to like or comment.

Our tips for carving a similar design

The broad solid muzzle bridge running across the center is the structural spine that keeps ear, eye, nose, cheek, and jowl windows from compromising each other. Shallow backed forehead wrinkles add texture without cutting through the top of the face. The correct cutting order, from the outermost apertures inward, ensures that spine stays intact until every peripheral opening is already clean.

From pumpkin to porch

  1. Select a large firm pumpkin

    A larger pumpkin gives more surface area between apertures, which means wider bridges. Hollow to a half-inch wall throughout and check thickness in the muzzle bridge area in particular. Too thin a muzzle bridge will flex or crack when the surrounding areas are opened.

  2. Transfer and classify all lines

    Pin-transfer the stencil and use two marker colors to distinguish through-cut apertures from the shallow backed forehead wrinkles. Confirm the muzzle bridge boundaries and forehead relief zones before picking up any cutting tool.

  3. Cut the outer ear and jowl apertures first

    Work from the outermost ear openings downward to the jowl apertures. These peripheral cuts remove the least-supportive rind first, so the pumpkin remains stable as you progress inward. Saw carefully around the ear tips, keeping each cut clear of the muzzle bridge.

  4. Open the eye, nose, and cheek apertures

    Move inward to the eye openings, nose window, and cheek apertures, cutting them in that order. Each completed aperture should be surrounded by intact rind bridges on all sides. Double-check the muzzle bridge width after every cut and stop if any section feels close to a quarter-inch or less.

  5. Carve the forehead wrinkles

    Use a detail knife or a narrow gouge to carve shallow backed wrinkle lines across the forehead to about a third of the wall depth. Short overlapping strokes following the natural direction of the wrinkles look most realistic. Kept as backed relief, these lines will never undermine the upper face structure.

  6. Light and evaluate

    Place a taper LED candle set low inside the pumpkin and view in a dark room. A low light source creates more upward-raking illumination that makes the forehead wrinkle texture pop. Check that all apertures are clean and no rind is partially hanging, which can cast unintended shadows.

Written with AI to match this design

Gather your supplies

Check things off as you get ready.

Work on a stable surface, keep your free hand out of the cutting path, and have an adult handle sharp tools.

Three levels of light

  • Leave intact

    The broad central muzzle bridge and the forehead panel above the wrinkle zone

  • Peel & shade

    Forehead wrinkle lines carved to roughly one-third wall depth

  • Cut through

    Ear, eye, nose, cheek, and jowl apertures all glowing fully

Learn the carving basics

Before you start cutting

How wide should the muzzle bridge be to stay safe?

At minimum, three-quarters of an inch for a medium pumpkin and a full inch for a large one. Measure the bridge width at its narrowest point after each adjacent aperture is cut. If it falls below the minimum, widen any future cuts away from the bridge rather than toward it.

The forehead wrinkle lines are barely visible when lit. How do I deepen them?

Re-run the detail knife along each wrinkle line, angling slightly to widen the groove as well as deepen it. A V-shaped profile casts more shadow than a flat-bottomed groove. Recheck in a dark room after every pass so you do not over-cut.

Is it safe to use a real candle inside this complex design?

No. A real candle can cause the pumpkin to char or catch fire, especially near multiple apertures that allow more oxygen flow. Always use a battery-powered LED candle for multi-aperture designs like this one. LED candles also let you handle the pumpkin safely to adjust its position.

Your take belongs here, too.

Changed a detail? Made it simpler? Share a photo of your version and tell the community what worked.

Share your pumpkin

More pumpkins like this

You've reached the end · 8 pumpkins
The Patch Report

Fresh pumpkins, in your inbox.

The best new carvings, ideas worth stealing, and how-tos for carving season. Short, seasonal, and gone by November.

A short email during carving season. Unsubscribe anytime. See our privacy policy.